VSIDE documentation
1. Introduction
1.1. General Overview
VSIDE is the new Eidosmedia Administration/Development tool. It is an extension of Visual Studio Code which uses the EDAPI server to retrieve information from the back-end.
-
As an administration tool, VSIDE covers the most important administration actions currently available through the Eidosmedia Eclipse plugin (also known as MEE).
-
As a development tool, VSIDE helps the user to create Prime/Swing extension panels based on the EM shared framework.
VSIDE is equipped with a wizard which also allows to create a REACT panel extension project in order to use the new Eidosmedia Component Library to create extensions with a more standard user interface and user experience.
1.2. Administration Tool
As administration tool VSIDE covers the most important administration action available today through the Eidosmedia Eclipse plugin.
Below a list of the most important administrative feature available in VSIDE:
| Feature |
|---|
Edit object content |
Edit object metadata [System & User Metadata] |
Read-only XML resolved content |
Read-only view of an object locked content |
Read-only view of system attributes and usage tickets buffers |
Lock/Unlock |
Compare the content of different objects |
Compare the content of different versions of an object |
View object properties |
View object links |
View object versions |
View object correlations |
View object roles |
1.3. Developer Tool
As developer tool VSIDE help the user to create Prime/Swing extensions panels based to the EM shared framework.
The VSIDE wizard also allow to create a REACT panel extension project in order to use the new Eidosmedia Component Library to create more standard user interface and user experience.
2. Installation
2.1. Requirements
To install VSIDE, extension of Visual Studio Code using the EDAPI server to retrieve information from the back-end, the following requirements must be met:
-
Visual Studio Code version: 1.40 or higher
-
EDAPI version: 6.x or higher
-
VSIDE "*.vsix" extension (download from: https://artifactory.eidosmedia.sh/ui/repos/tree/General/generic-public%2Fvside%2Feidosmedia-vside-1.0.20.vsix )
2.2. Installation Procedure
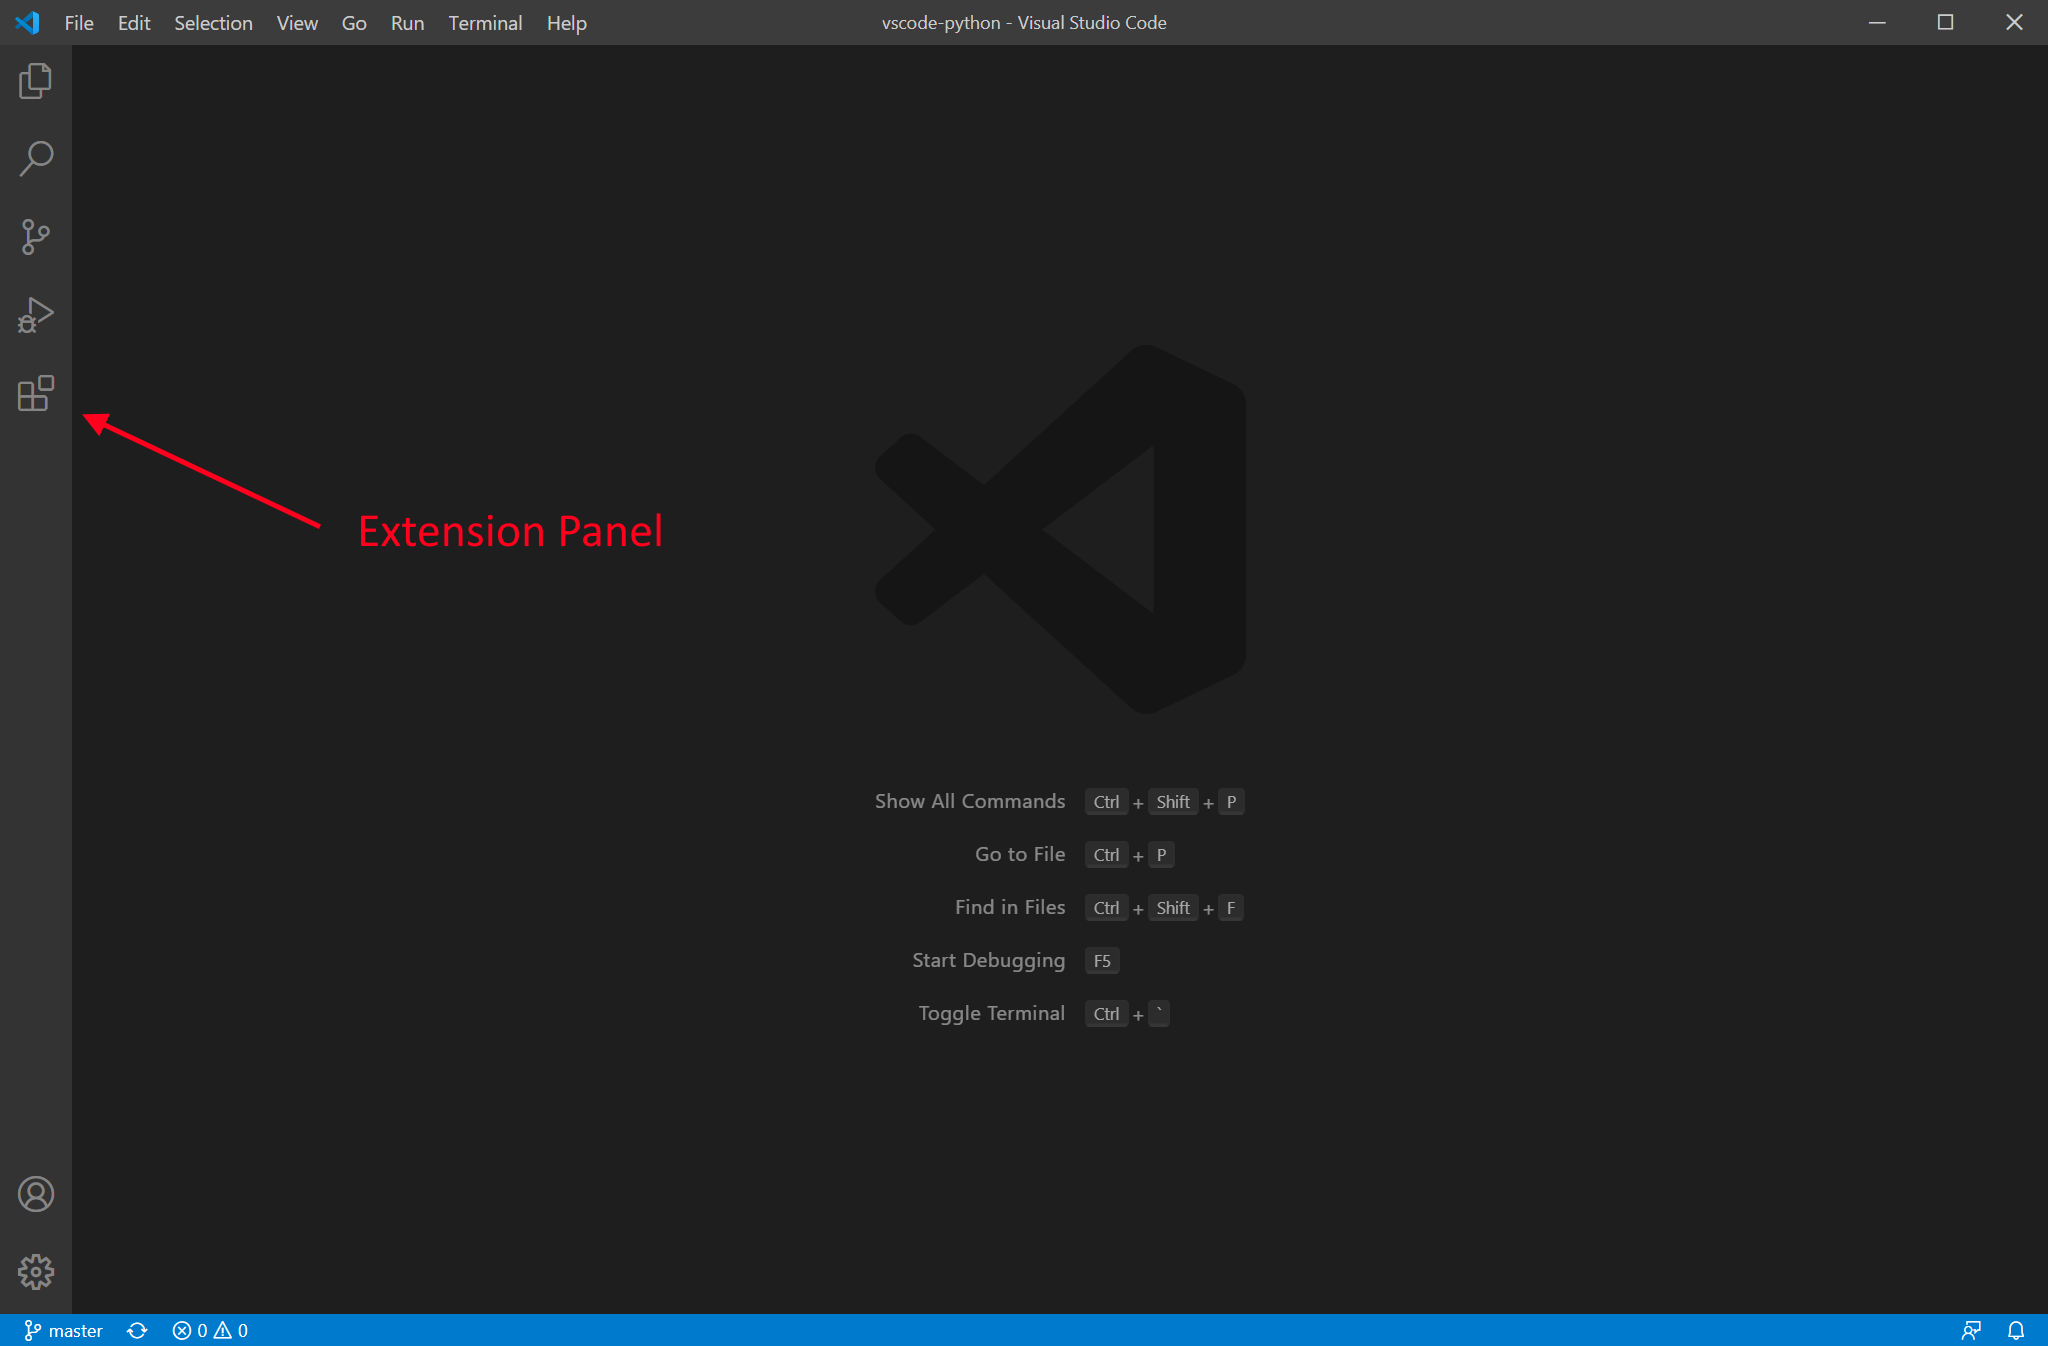
Usually all the standard Visual Studio Code extensions are located in the public marketplace and are searchable directly from the extension panel inside the VSCode framework as depicted in the screenshot below.
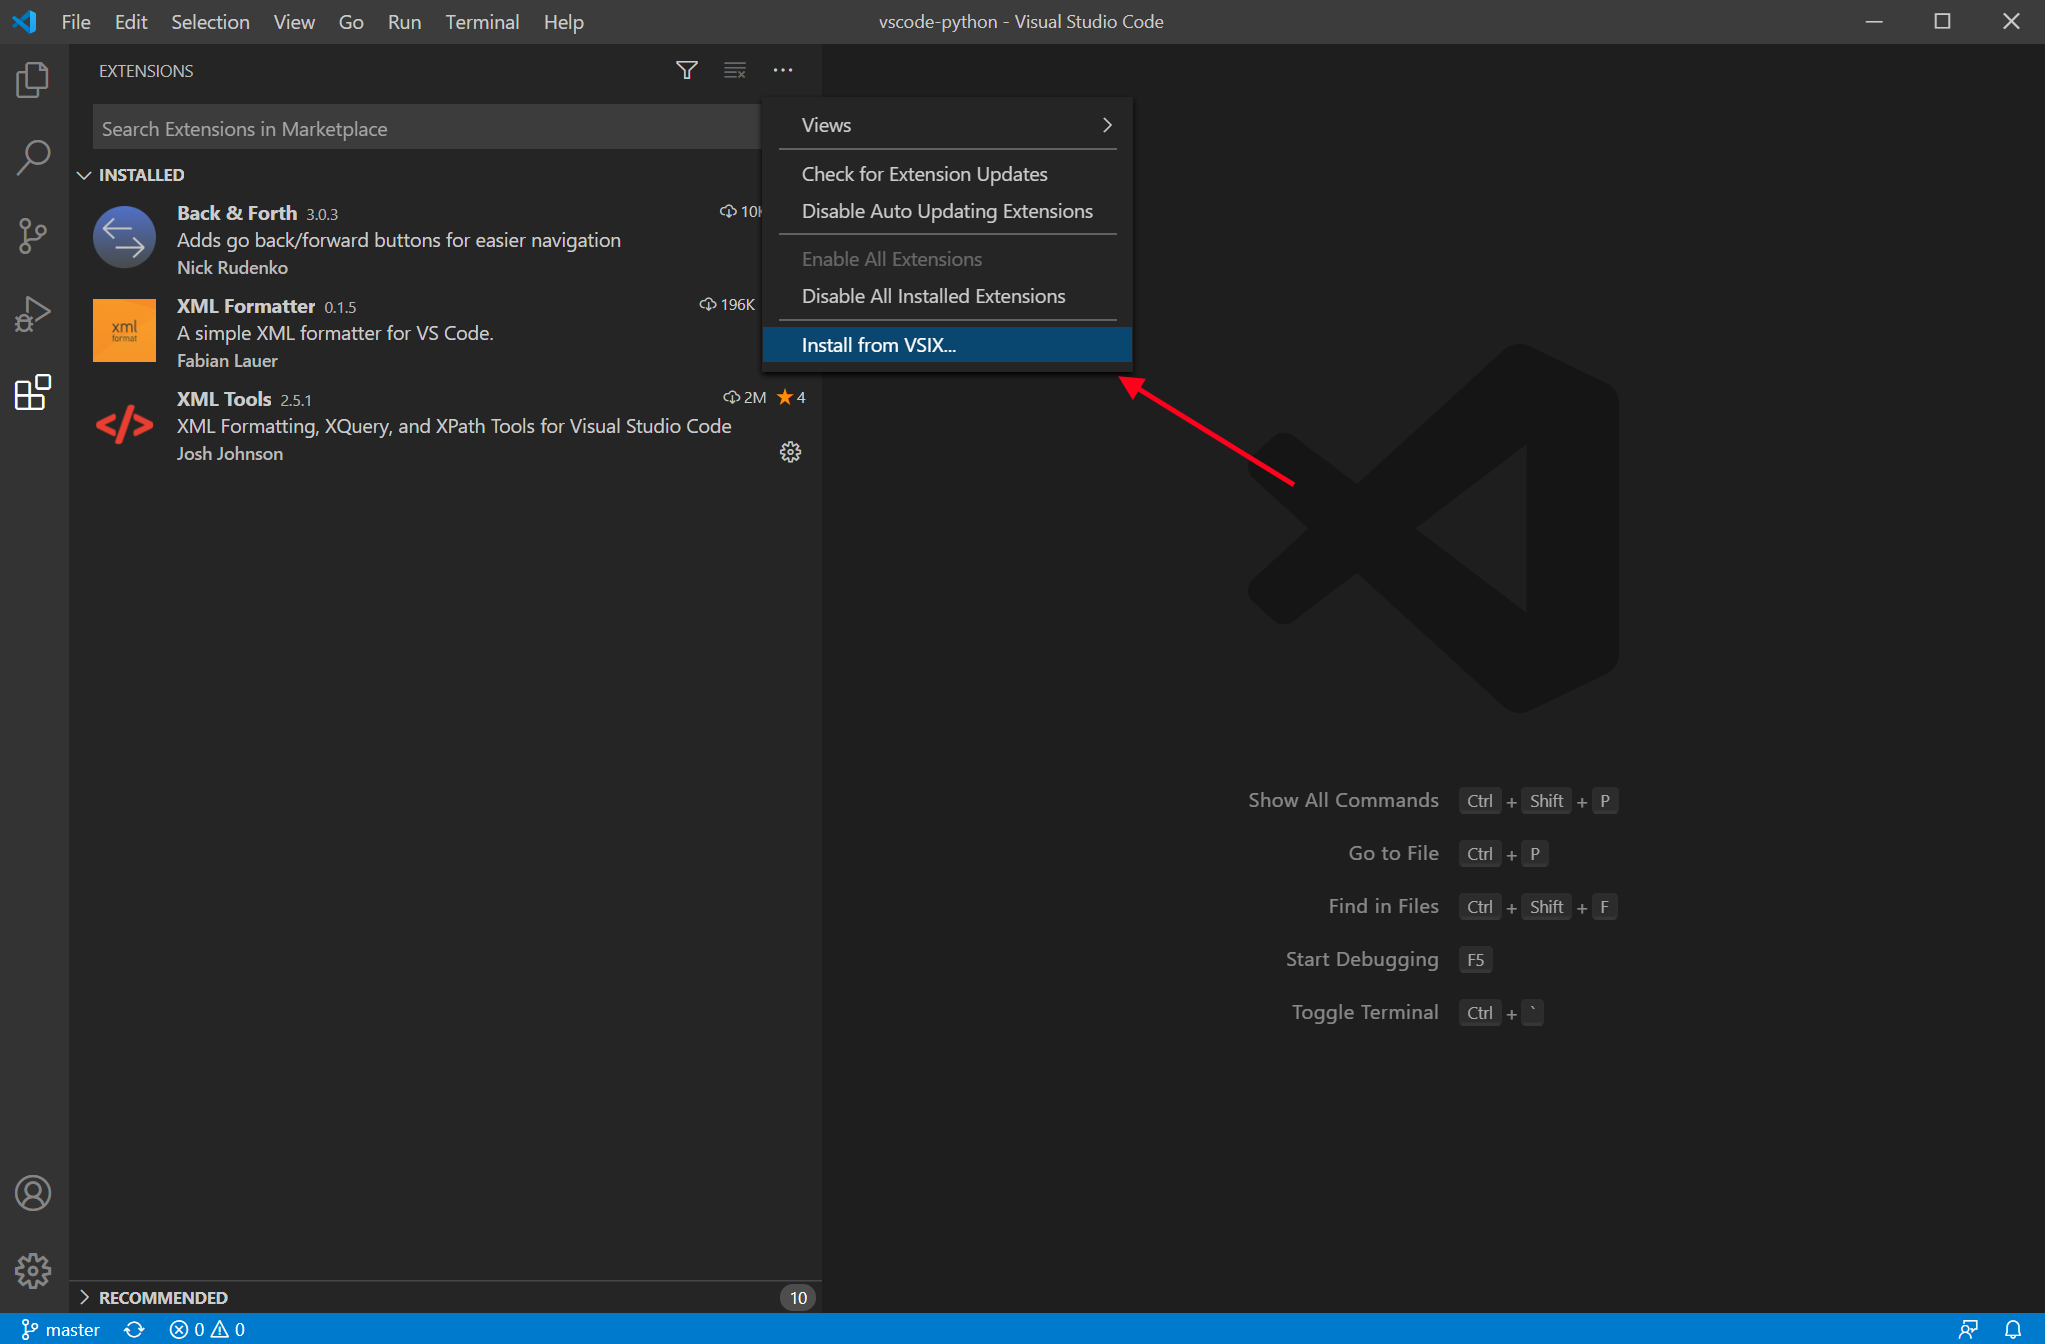
For proprietary extensions it is also possible to install them using directly the extension files which are files with extension ".VSIX". In this case, inside the extension panel you will find a menu where you can select the vsix file, as shown in the screenshot.
Select the vsix (https://artifactory.eidosmedia.sh/artifactory/generic-public/vside/eidosmedia-vside-1.0.20.vsix) file from your local drive and click on the "Install" button.
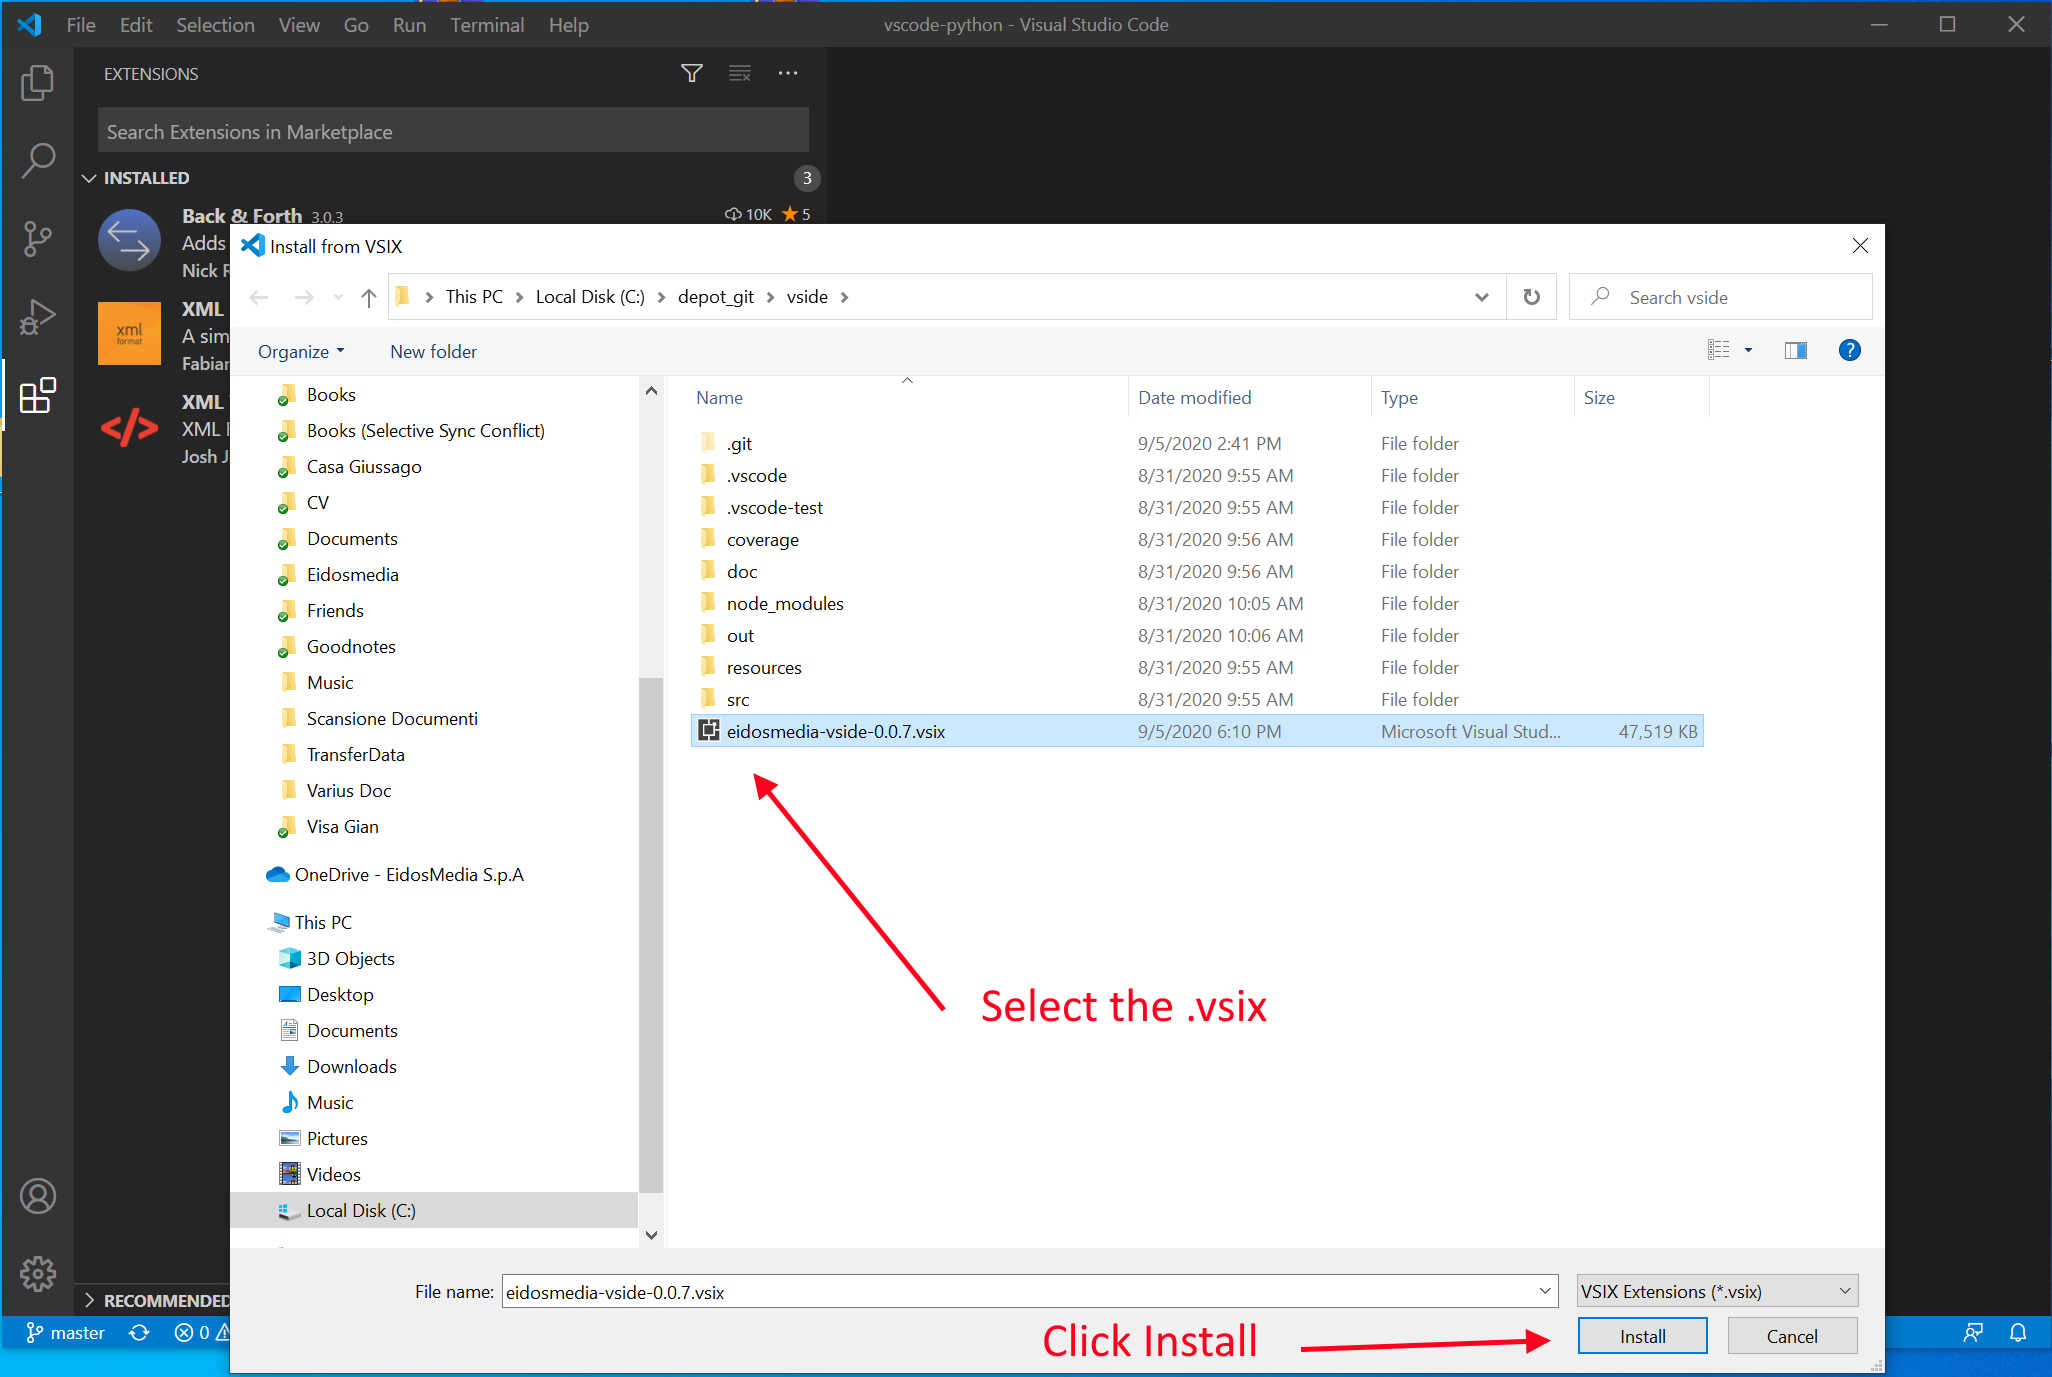
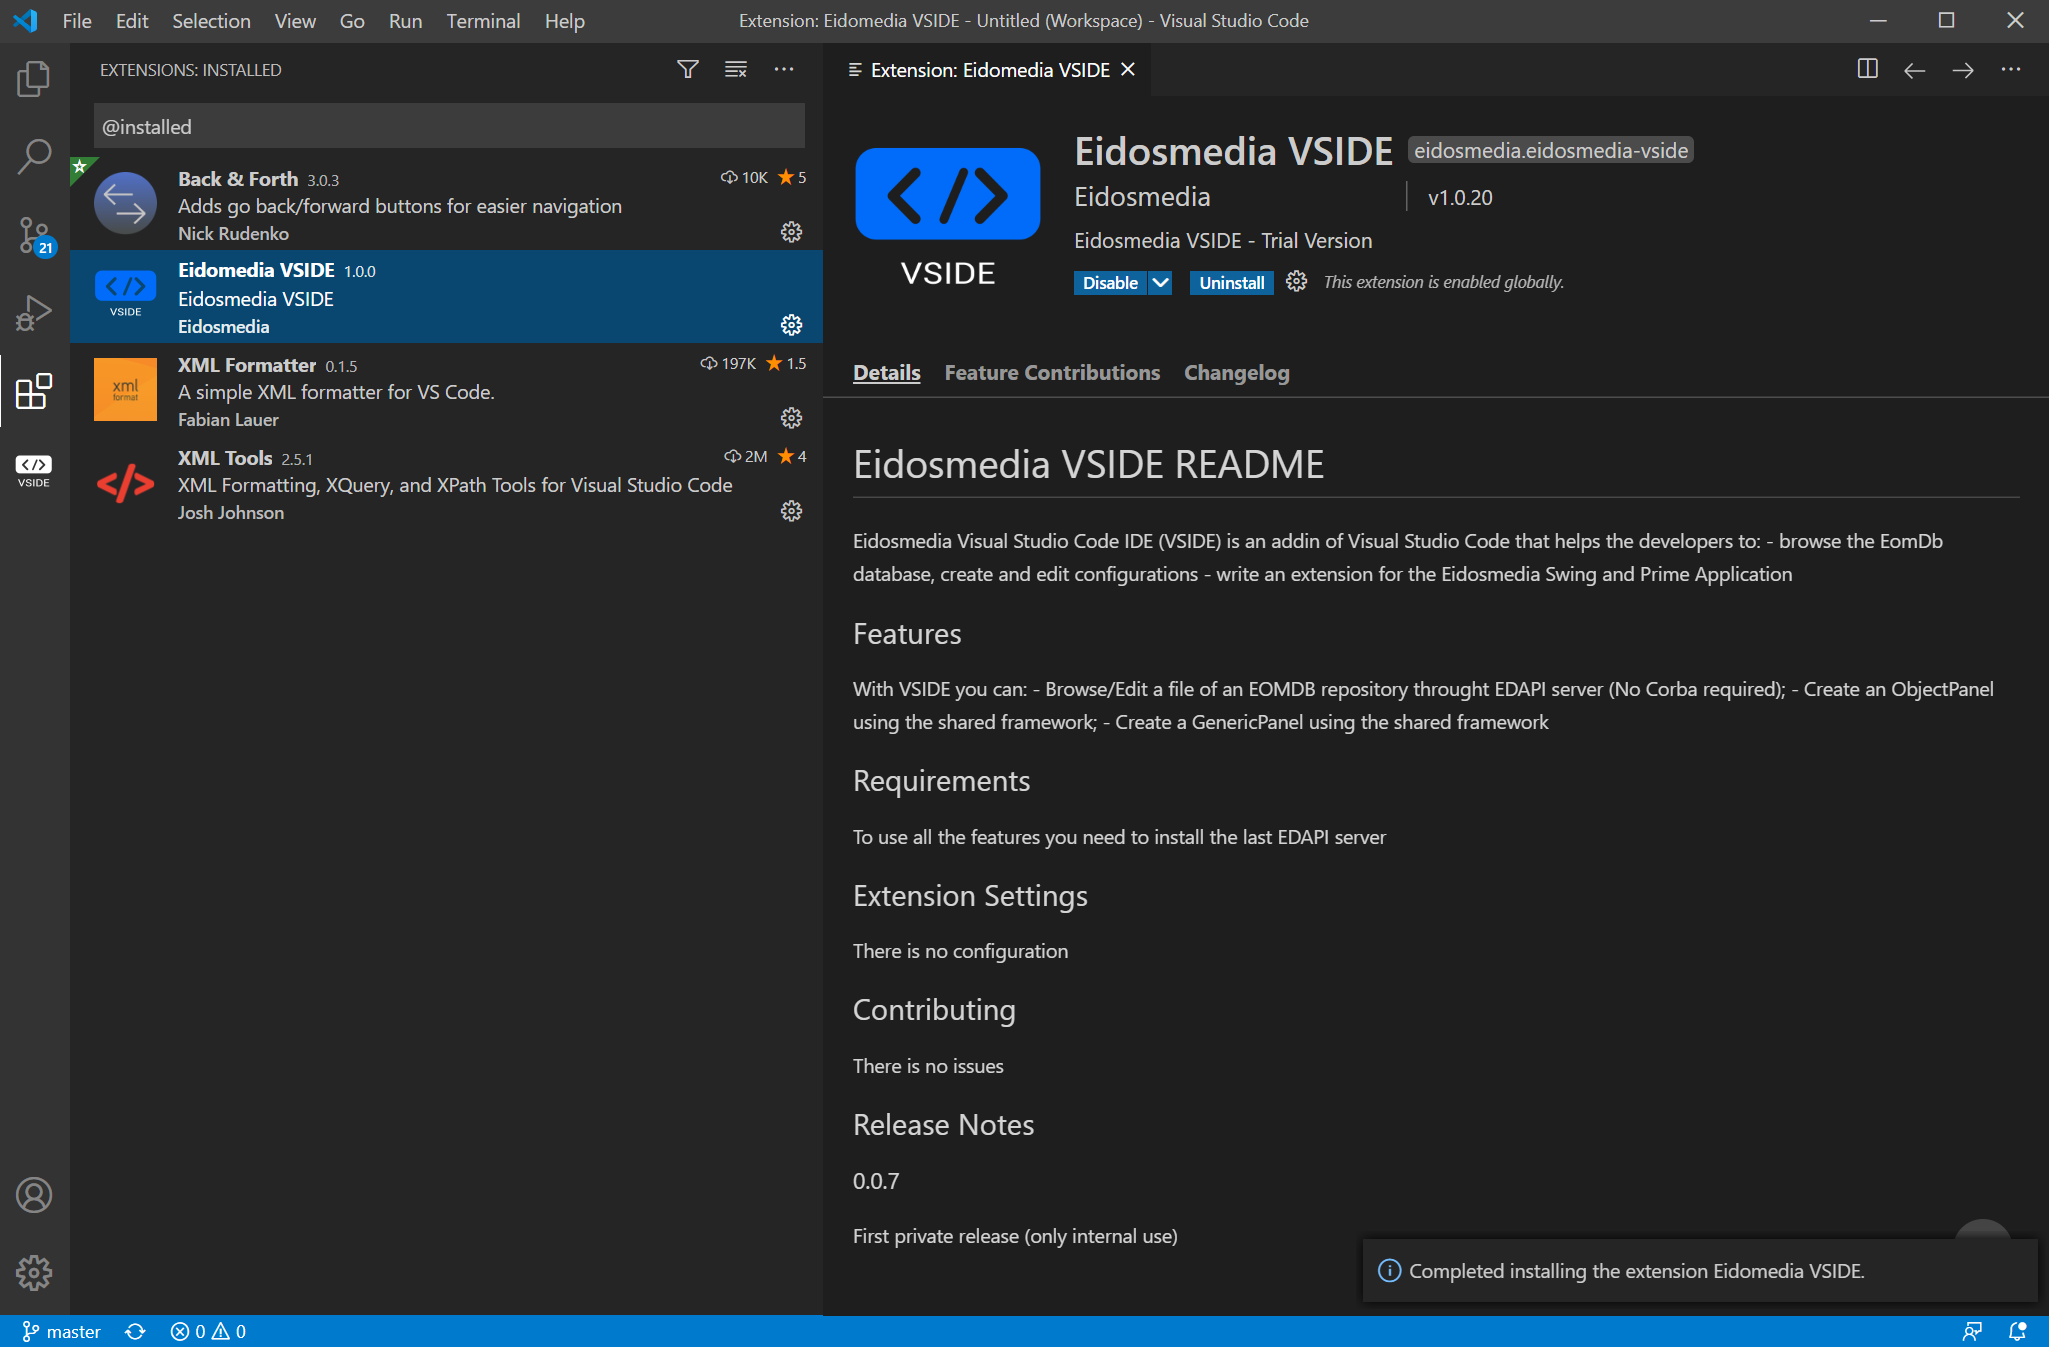
Note that the process will take a while. If everything works fine, you will have the extension installed in your vscode extension panel.
2.3. Em React Components Library
In order to use the new react EmComponent library you need to link the @eidosmedia namespace to our npm-registry. To to this you need to login to the Eidosmedia npm Artifactory repository.
Open a console and type:
npm login --registry=https://artifactory.eidosmedia.sh/artifactory/api/npm/npm-public/ --scope=@eidosmedia
when asked, Username is your Eidosmedia domain username but password is the JFrog Api Key, you can find it on https://artifactory.eidosmedia.sh/ui/admin/artifactory/user_profile
3. Configuration
3.1. Introduction
In order to use VSIDE as an administration tool, you need at least one EDAPI repository to work. This tutorial will help you to create a configuration file and subsequently connect to the first repository.
3.2. General Extension Overview
The first run of Visual Studio with VSIDE installed will be very similar to the image below.
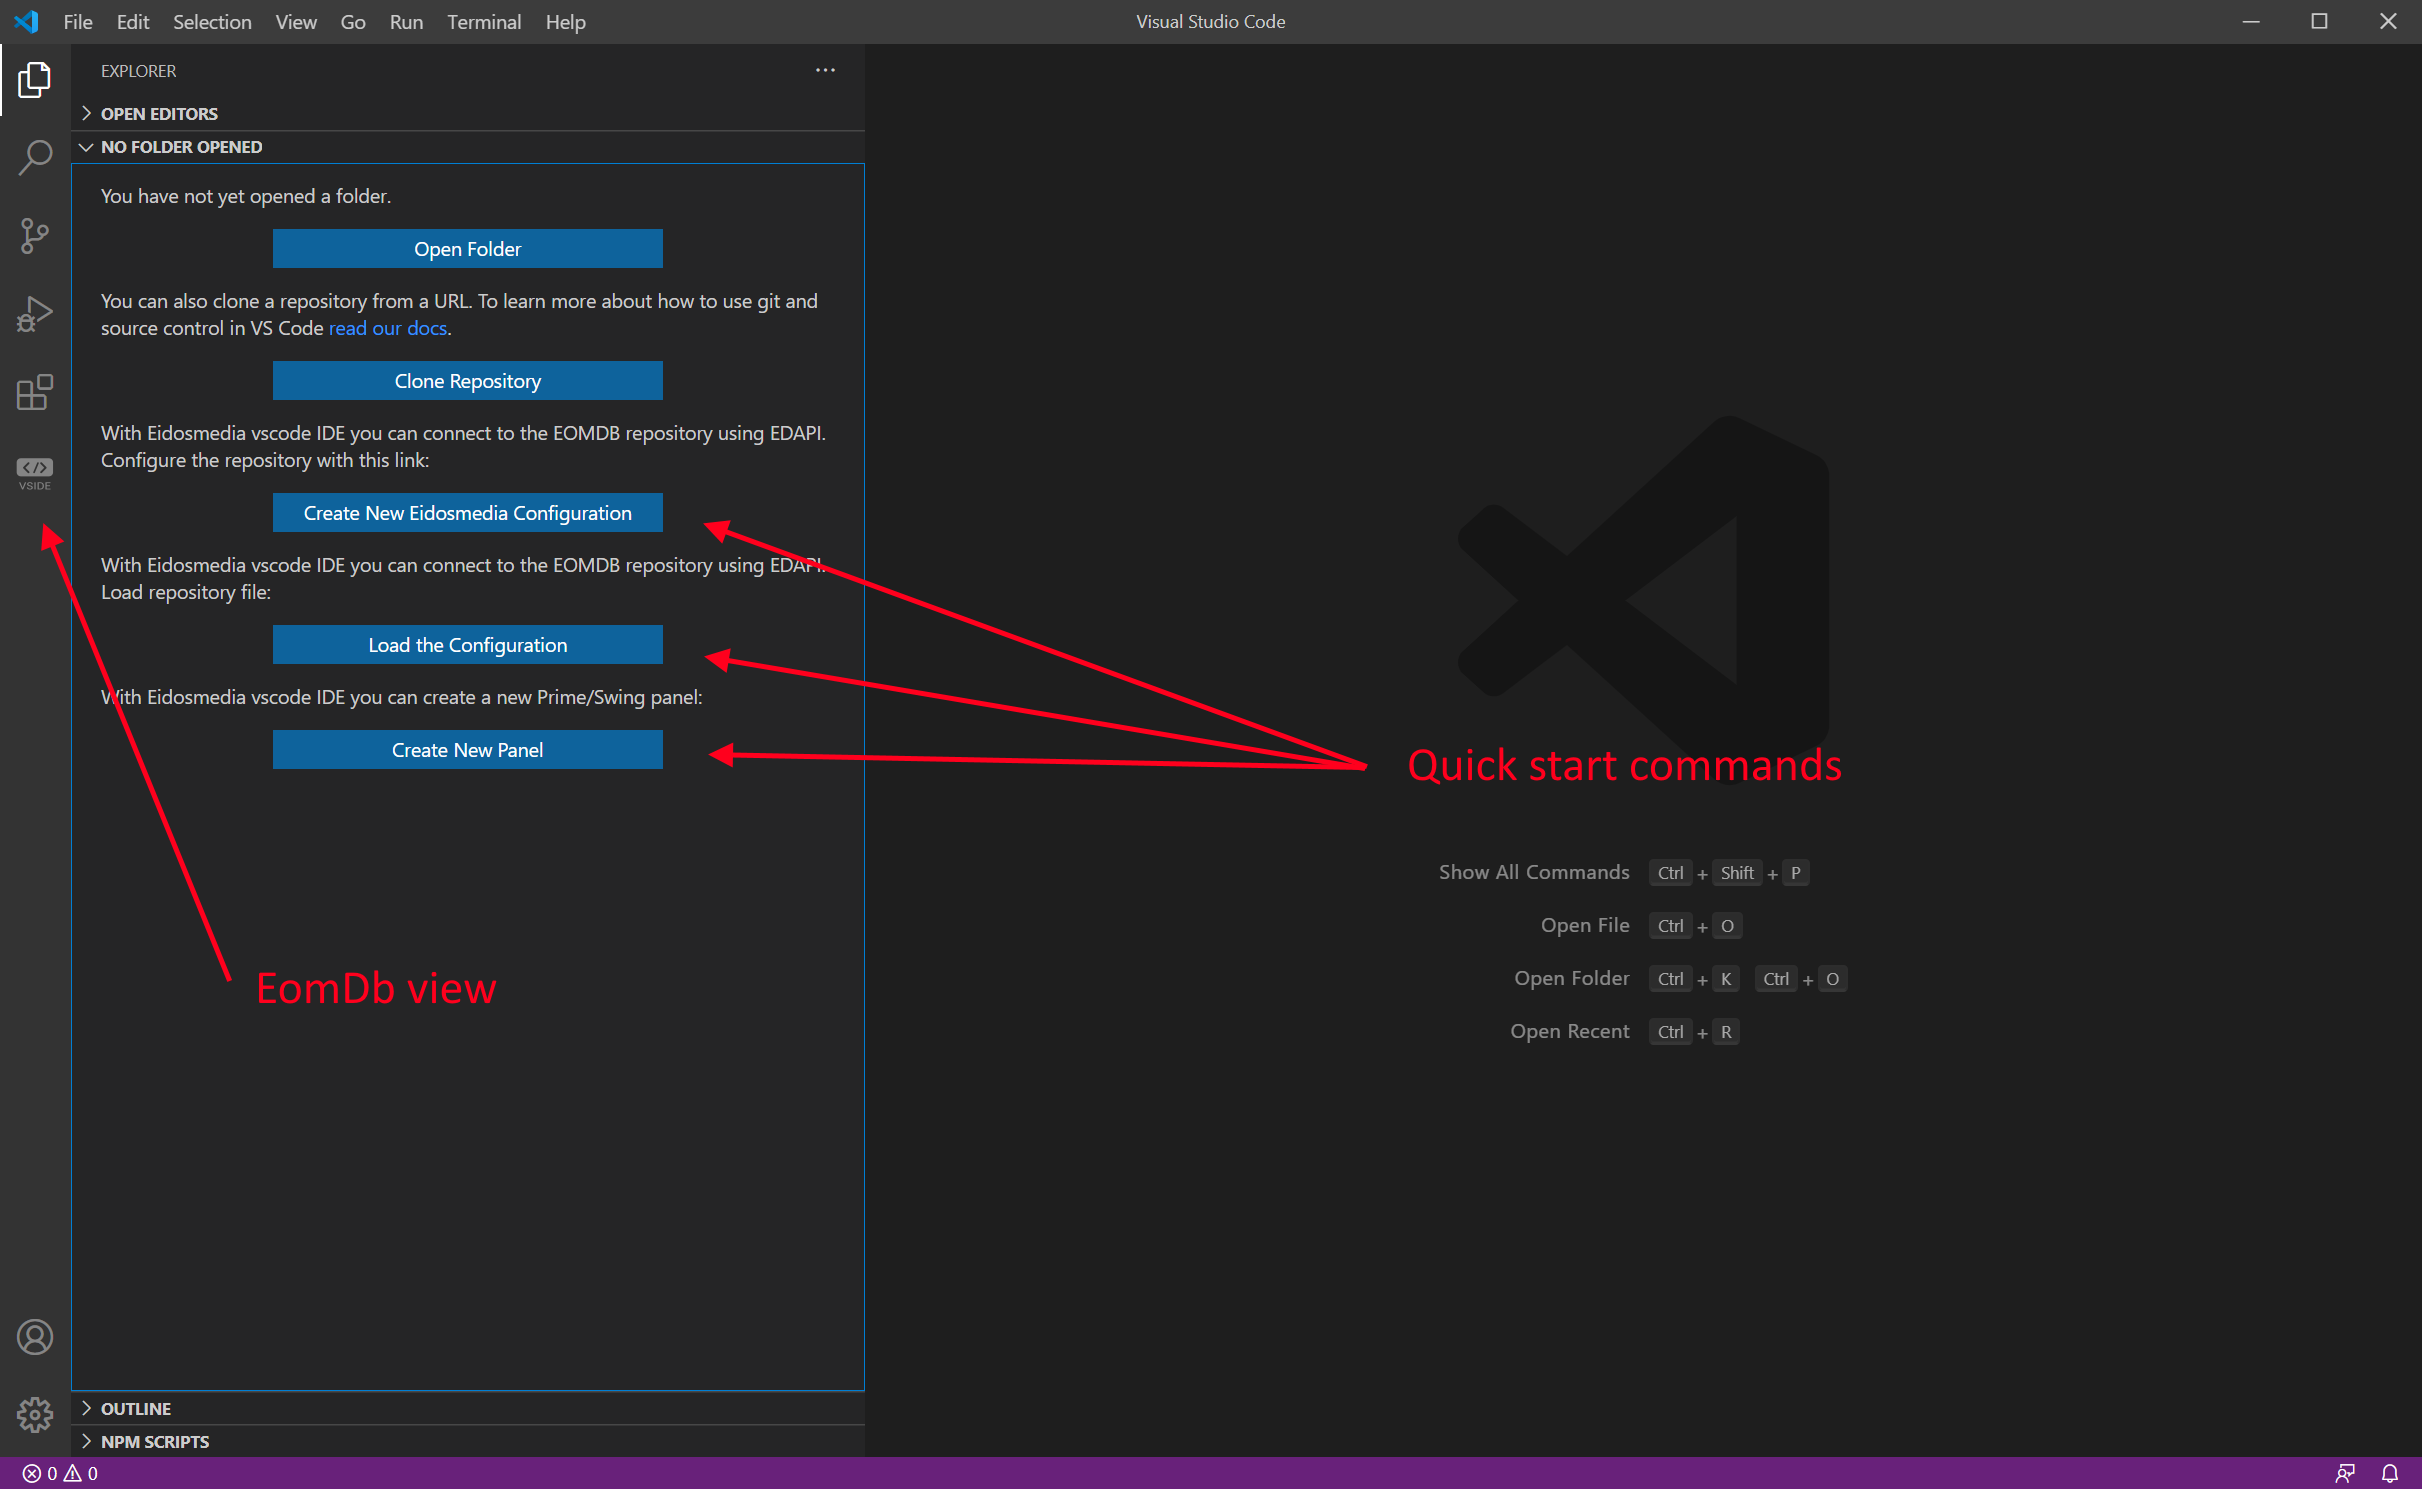
The EomDbView icon on the left side toolbar lets you open the panel where you see the tree of the configured EomDb repositories. The tree button in the VSCode Welcome page lets you start interacting with the extension.
Let’s start with the first step which allows you to create a first configuration file by using the extension wizard.
3.3. Creating the configuration file through the wizard
VSIDE provides a wizard that allows you to quickly create a repository configuration file. The wizard lets you go through 5 steps.
-
Clicking the "Create New VSIDE Configuration File" the wizard will start asking the name you want to assign to this repository.
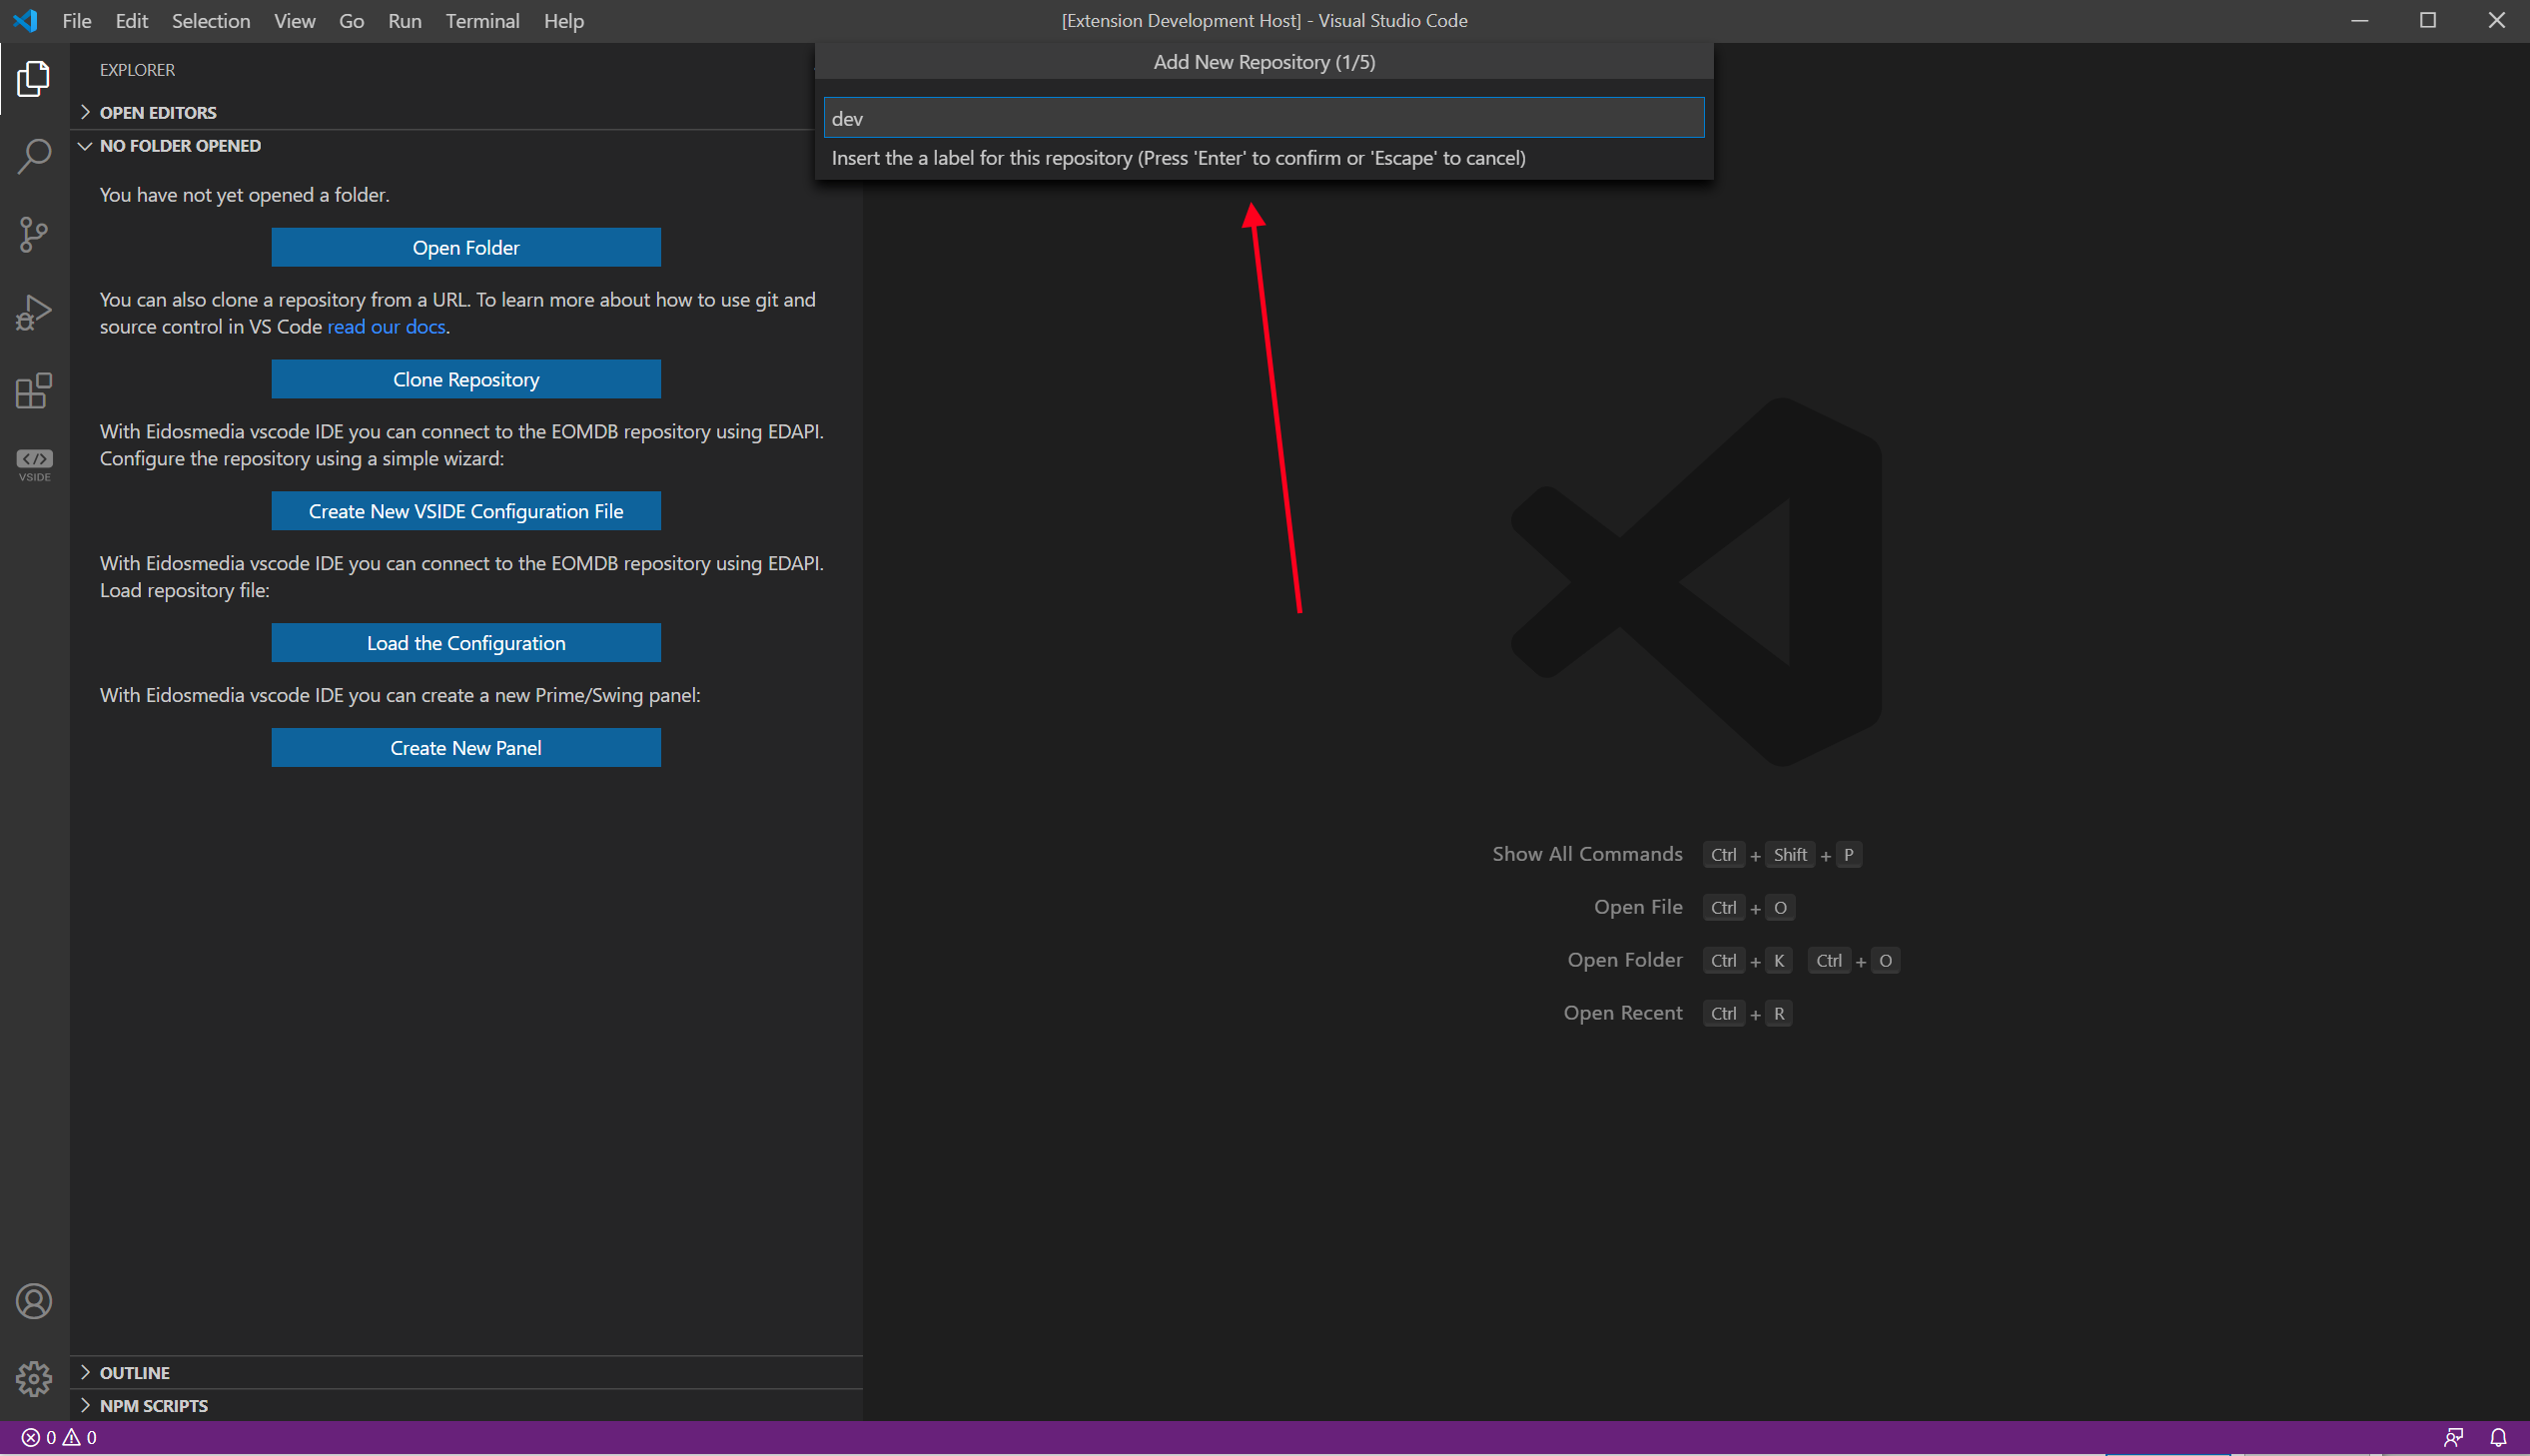
-
Press "Enter" to go to the second step and enter the EDAPI uri.

|
Warning
|
The minimum EDAPI server version supported is 6.x |
-
Press "Enter" so that the VISDE connects to the EDAPI you had inserted and returns the list of eomdb repositories configured by the EDAPI server.
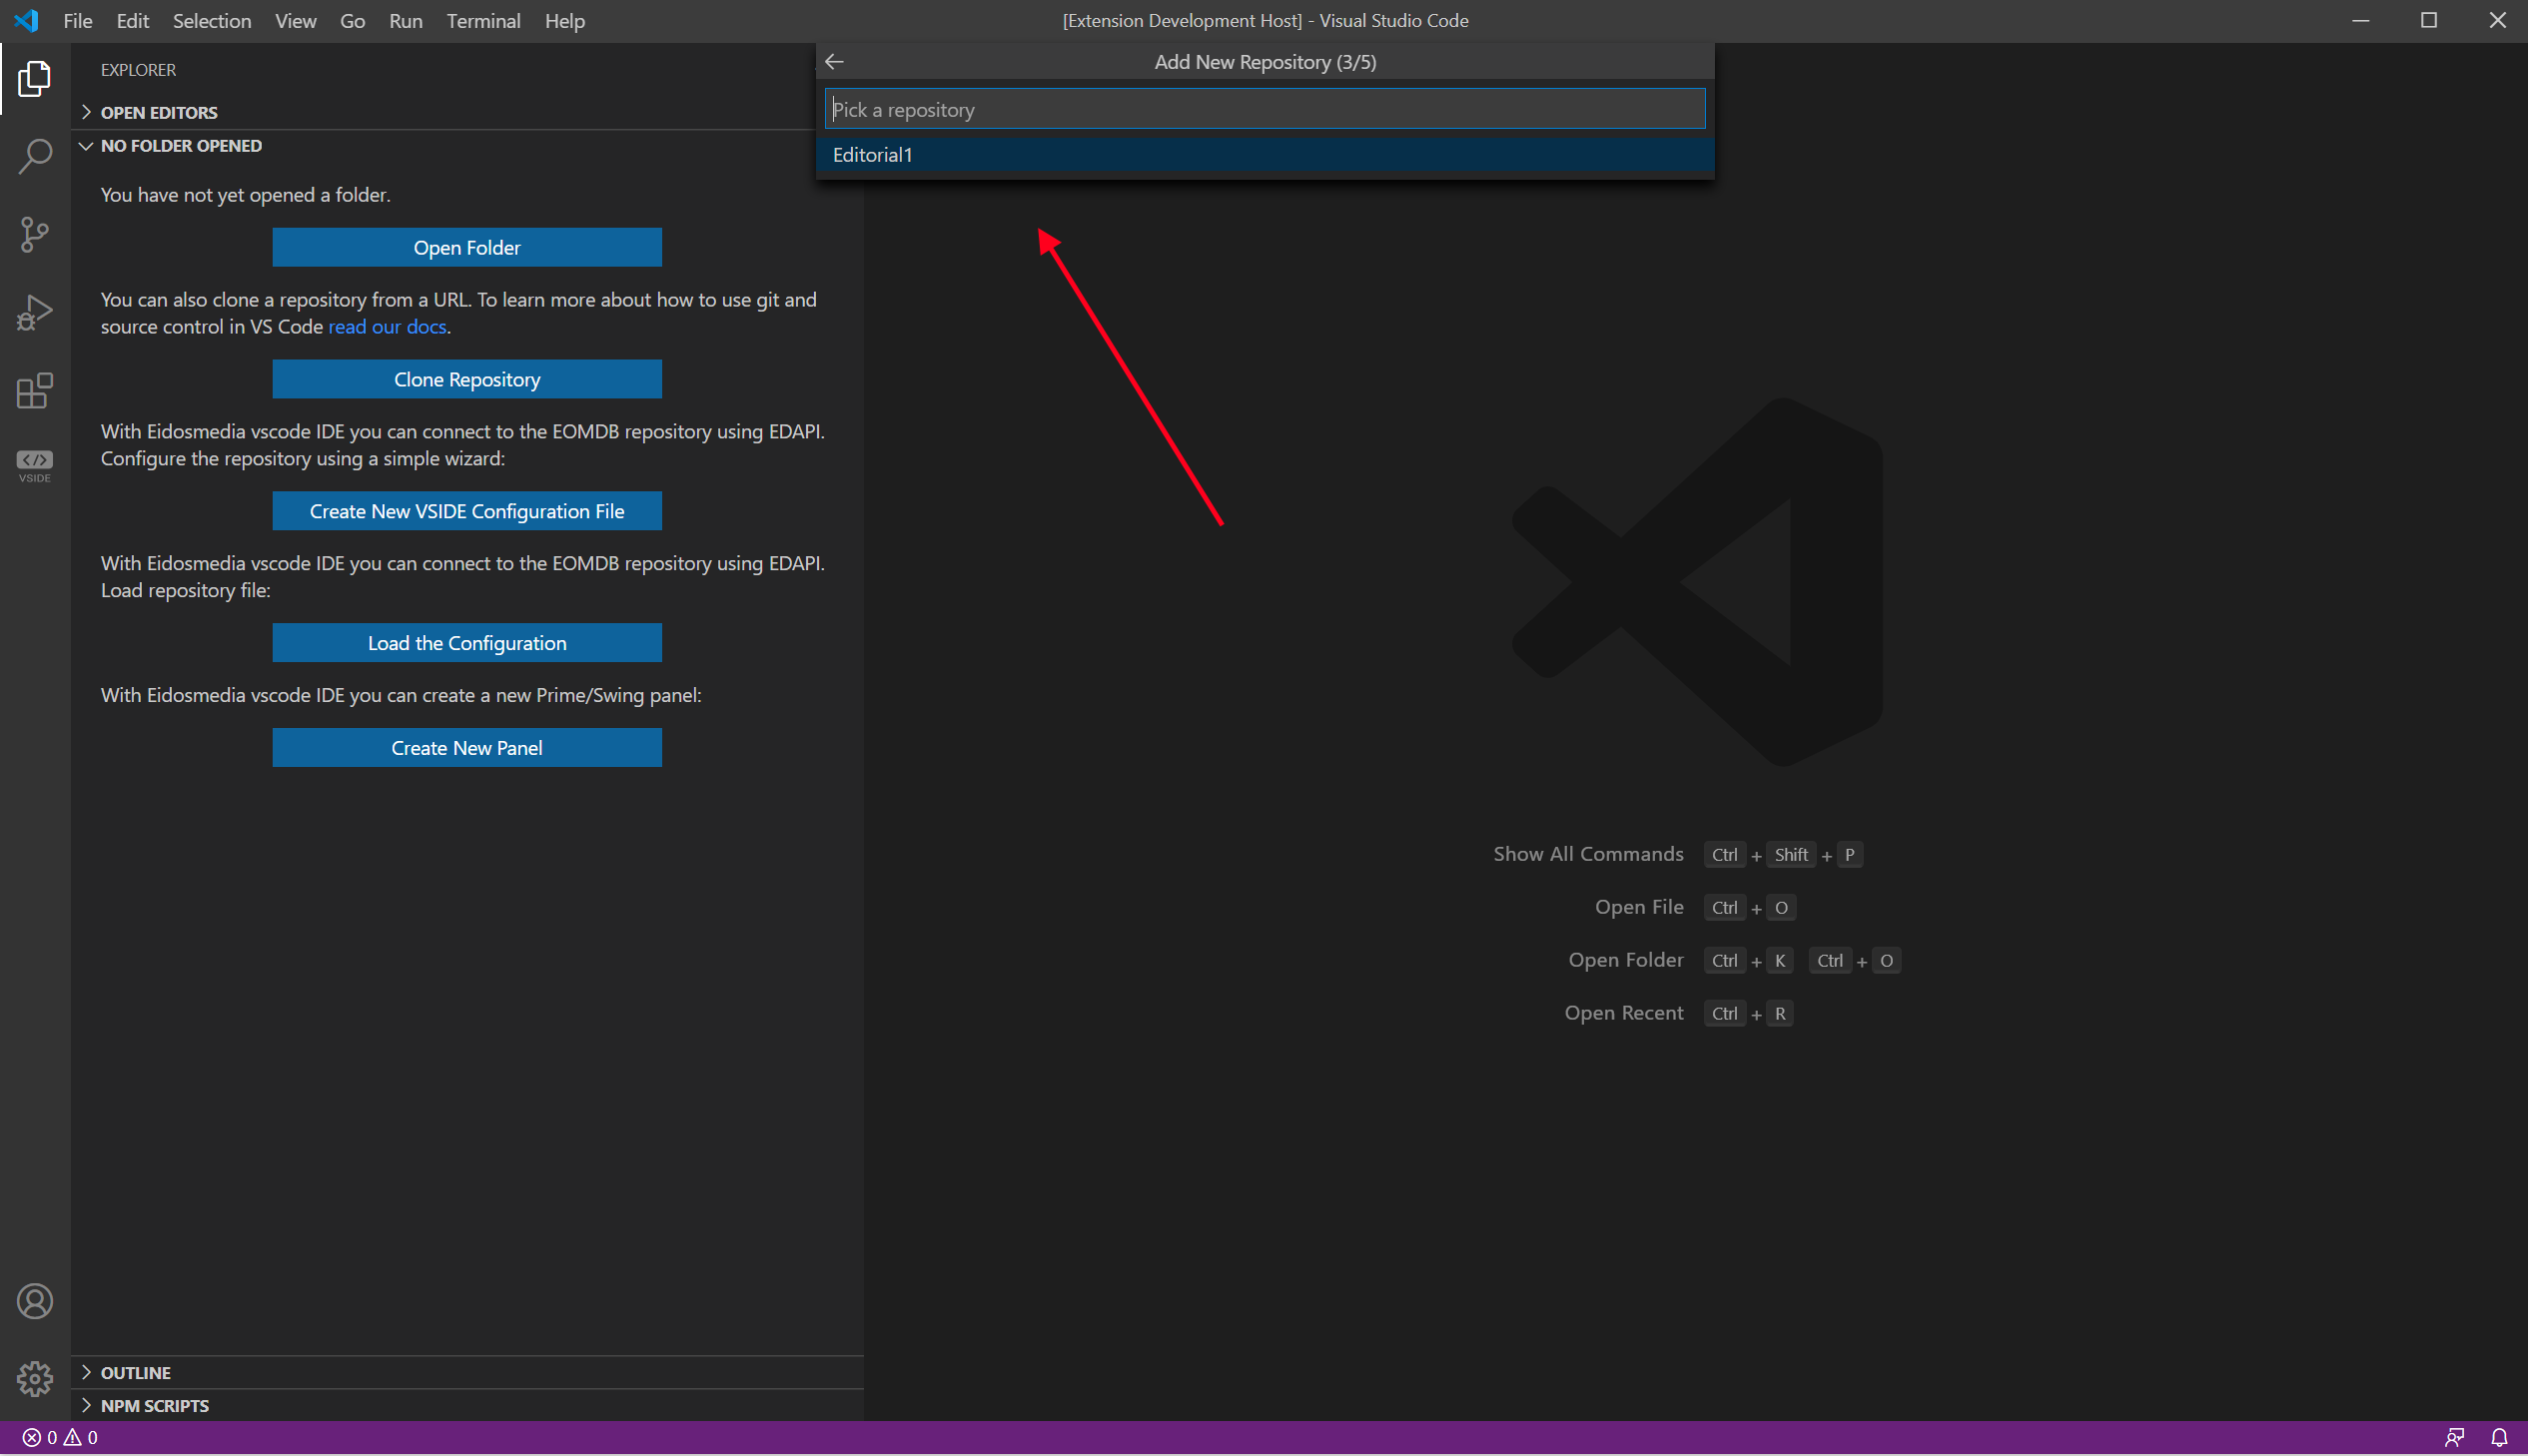
-
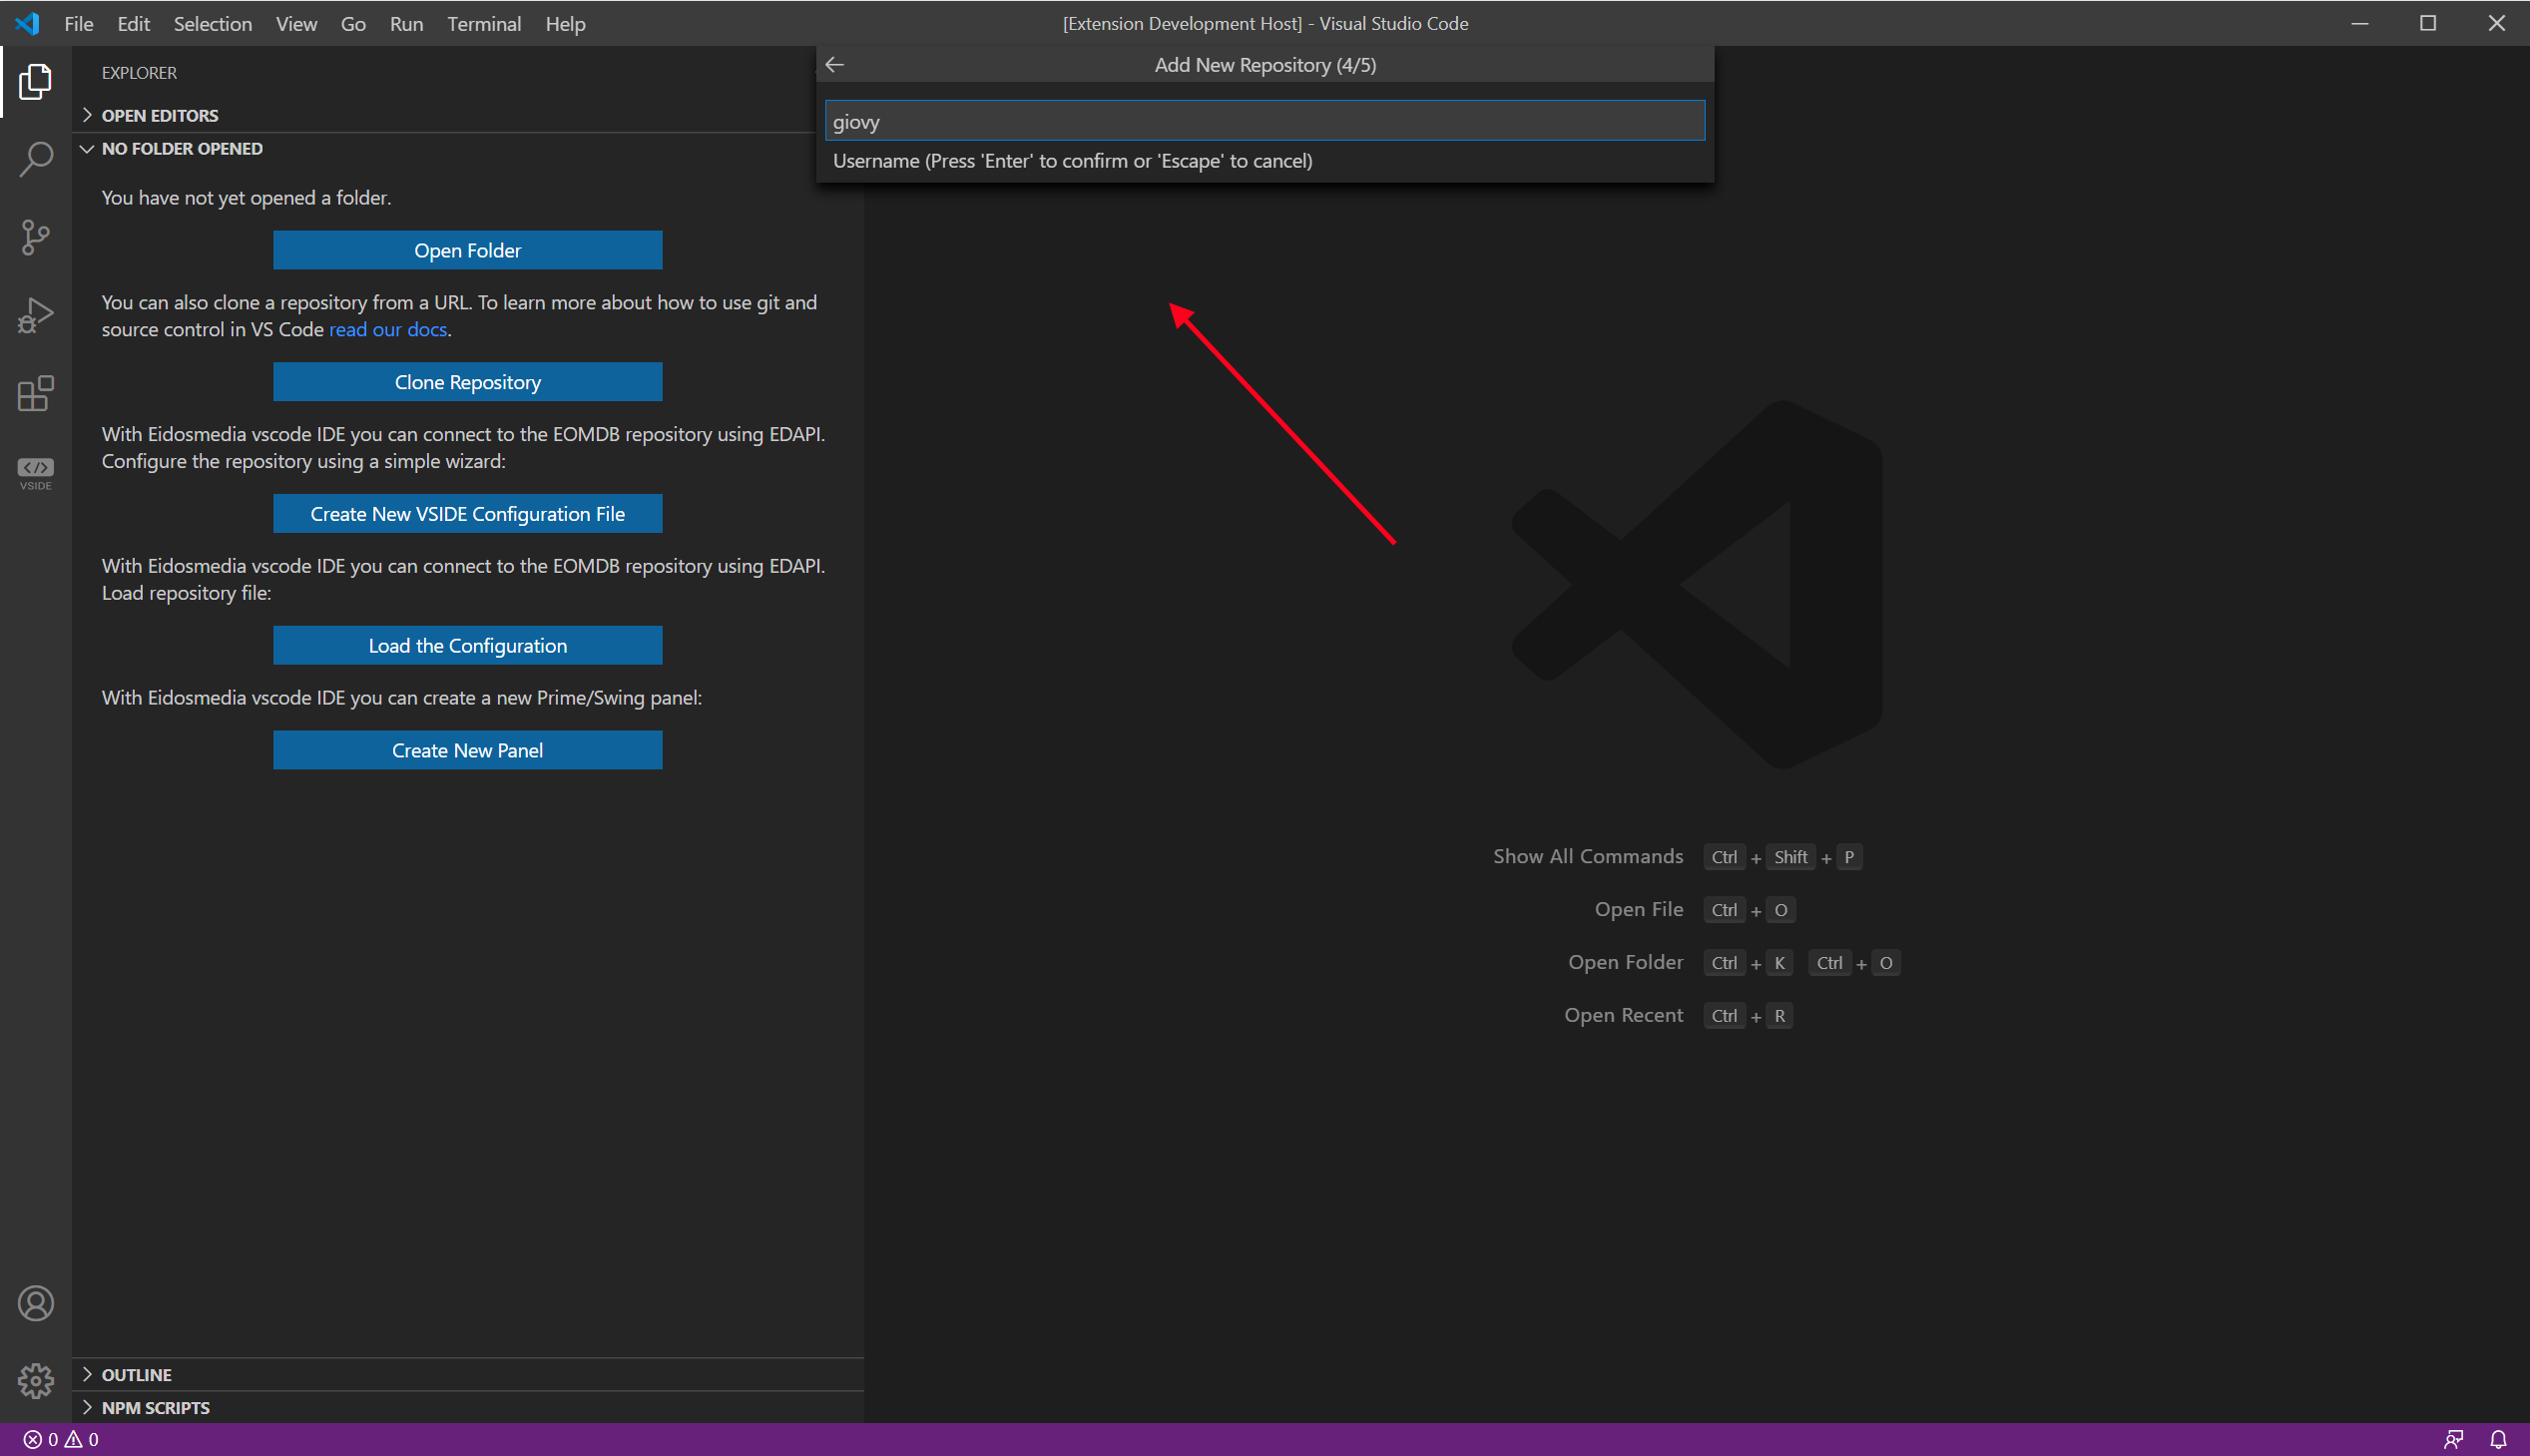
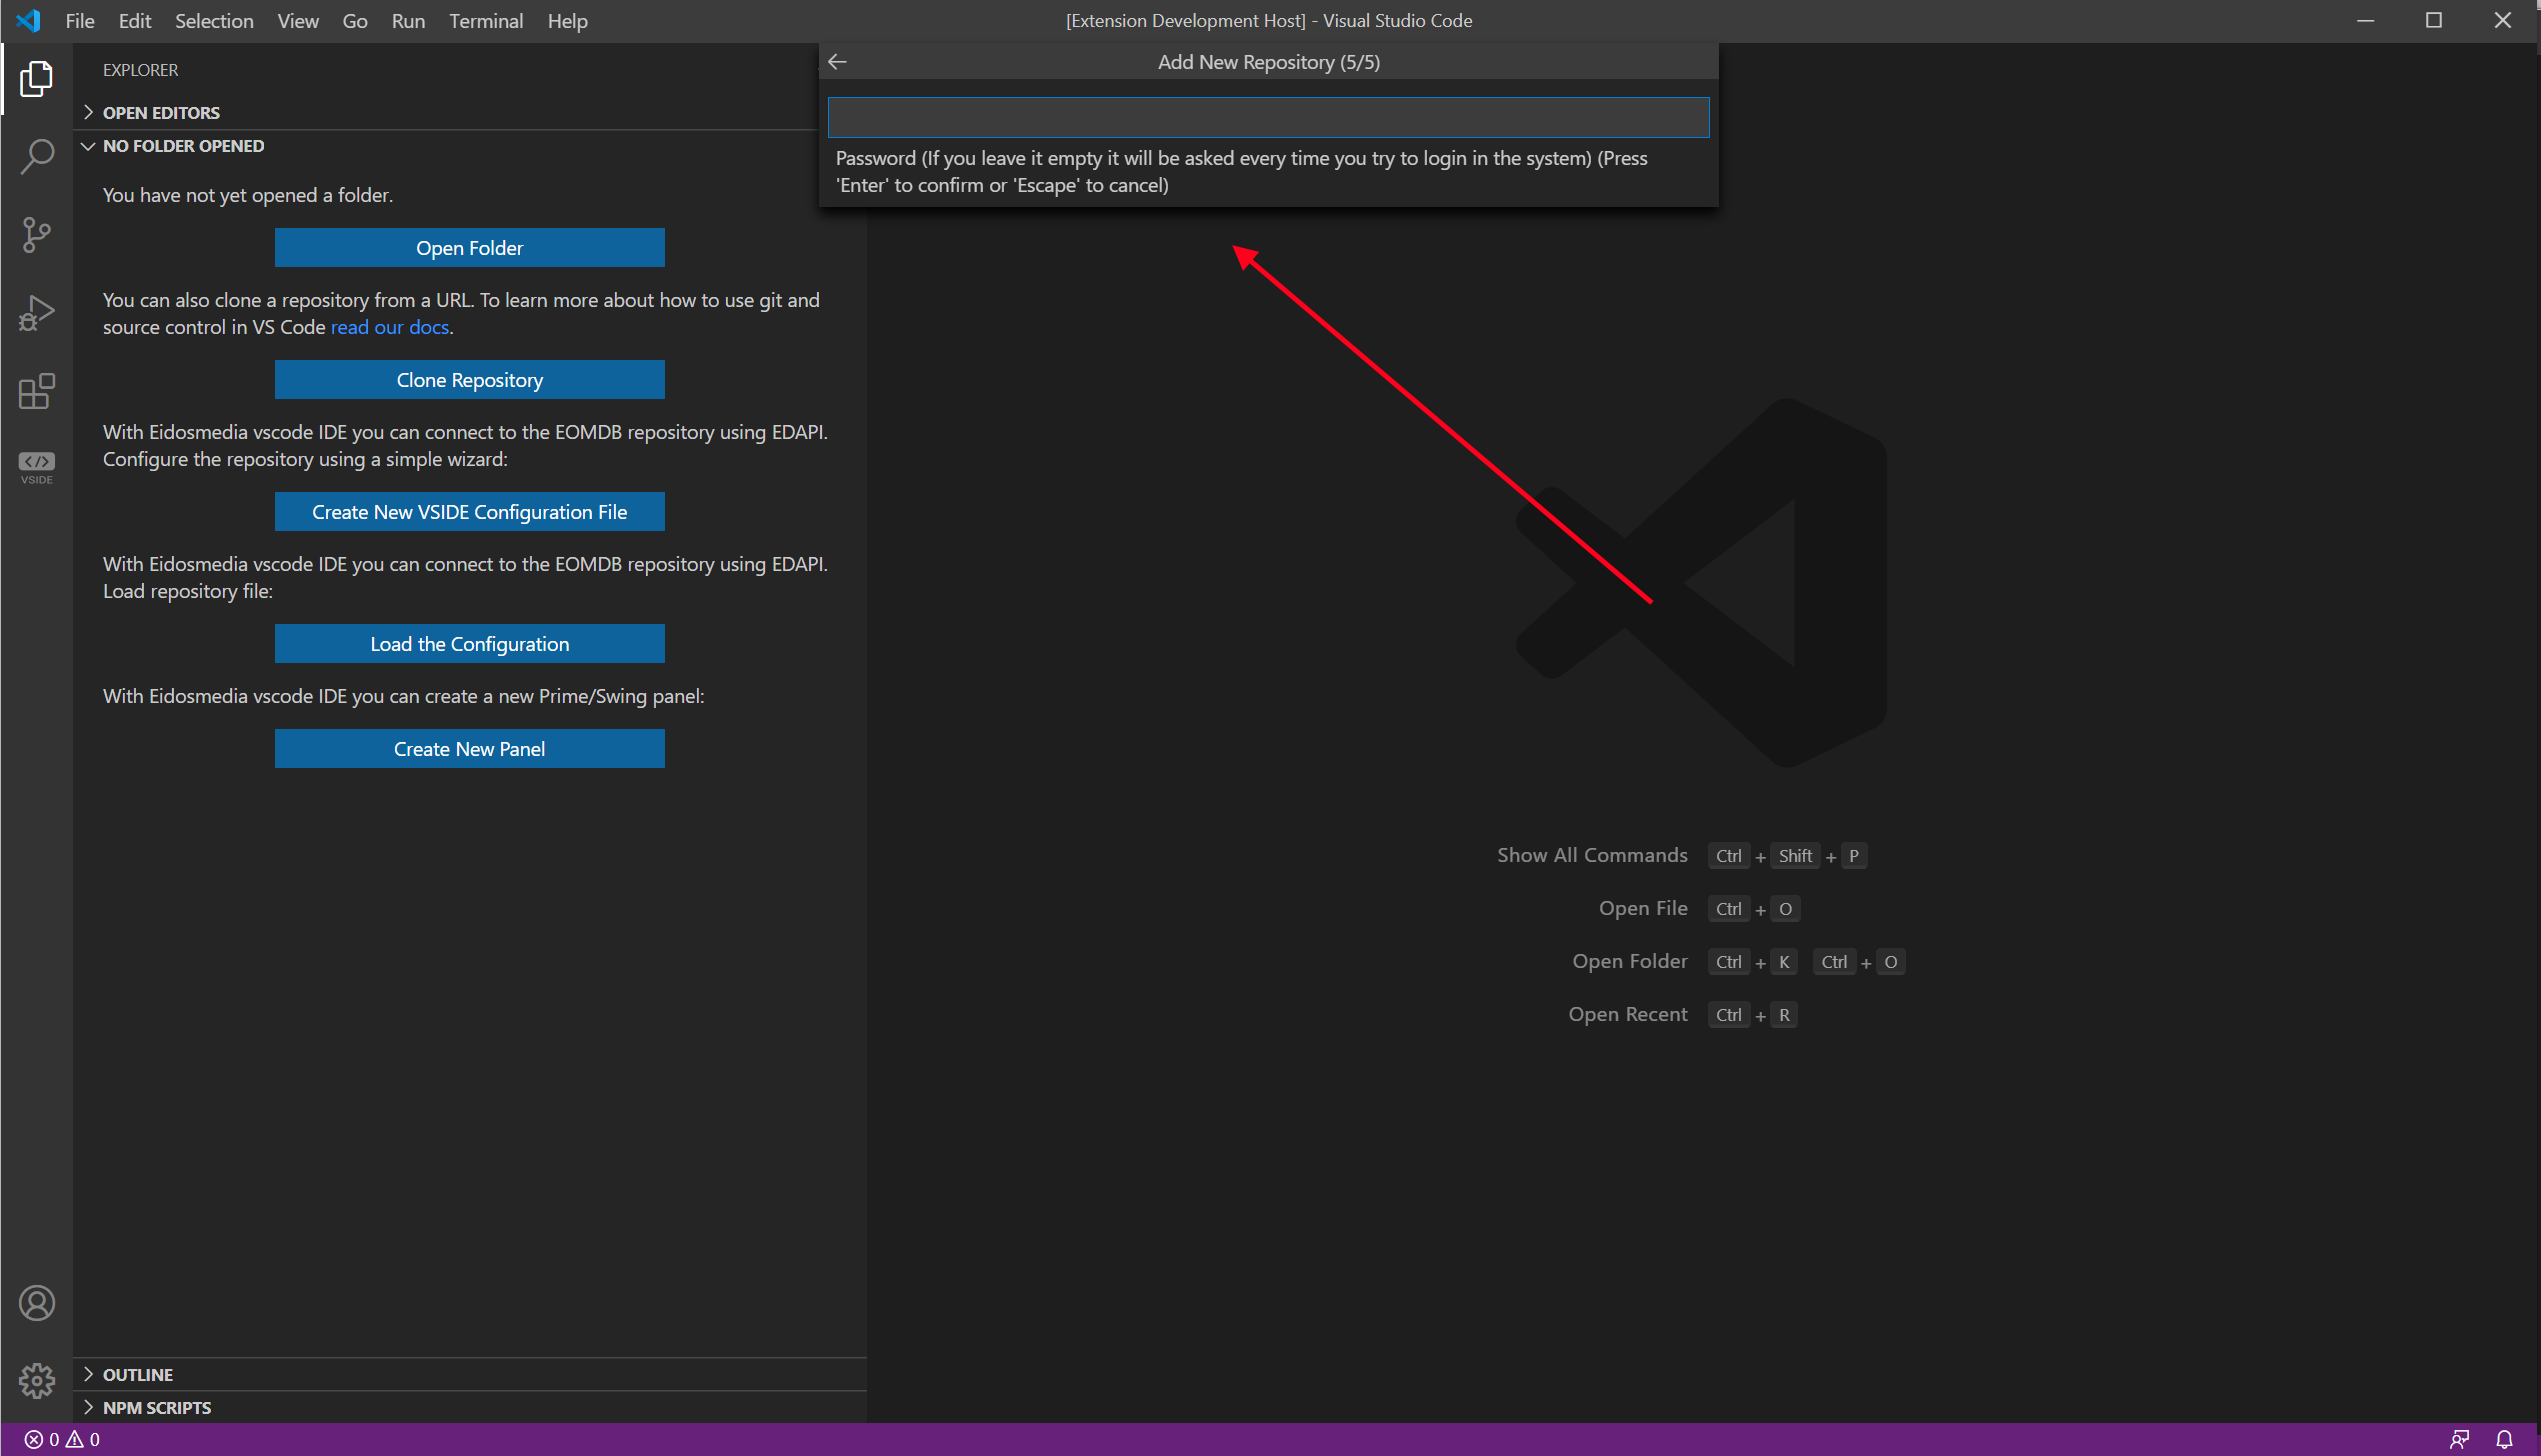
After selecting the repositoryId, the next two steps will ask you the Username and Password.
|
Warning
|
For security reason we suggest to do not insert the password. VSIDE will ask you every time you try to connect to this repository. |
-
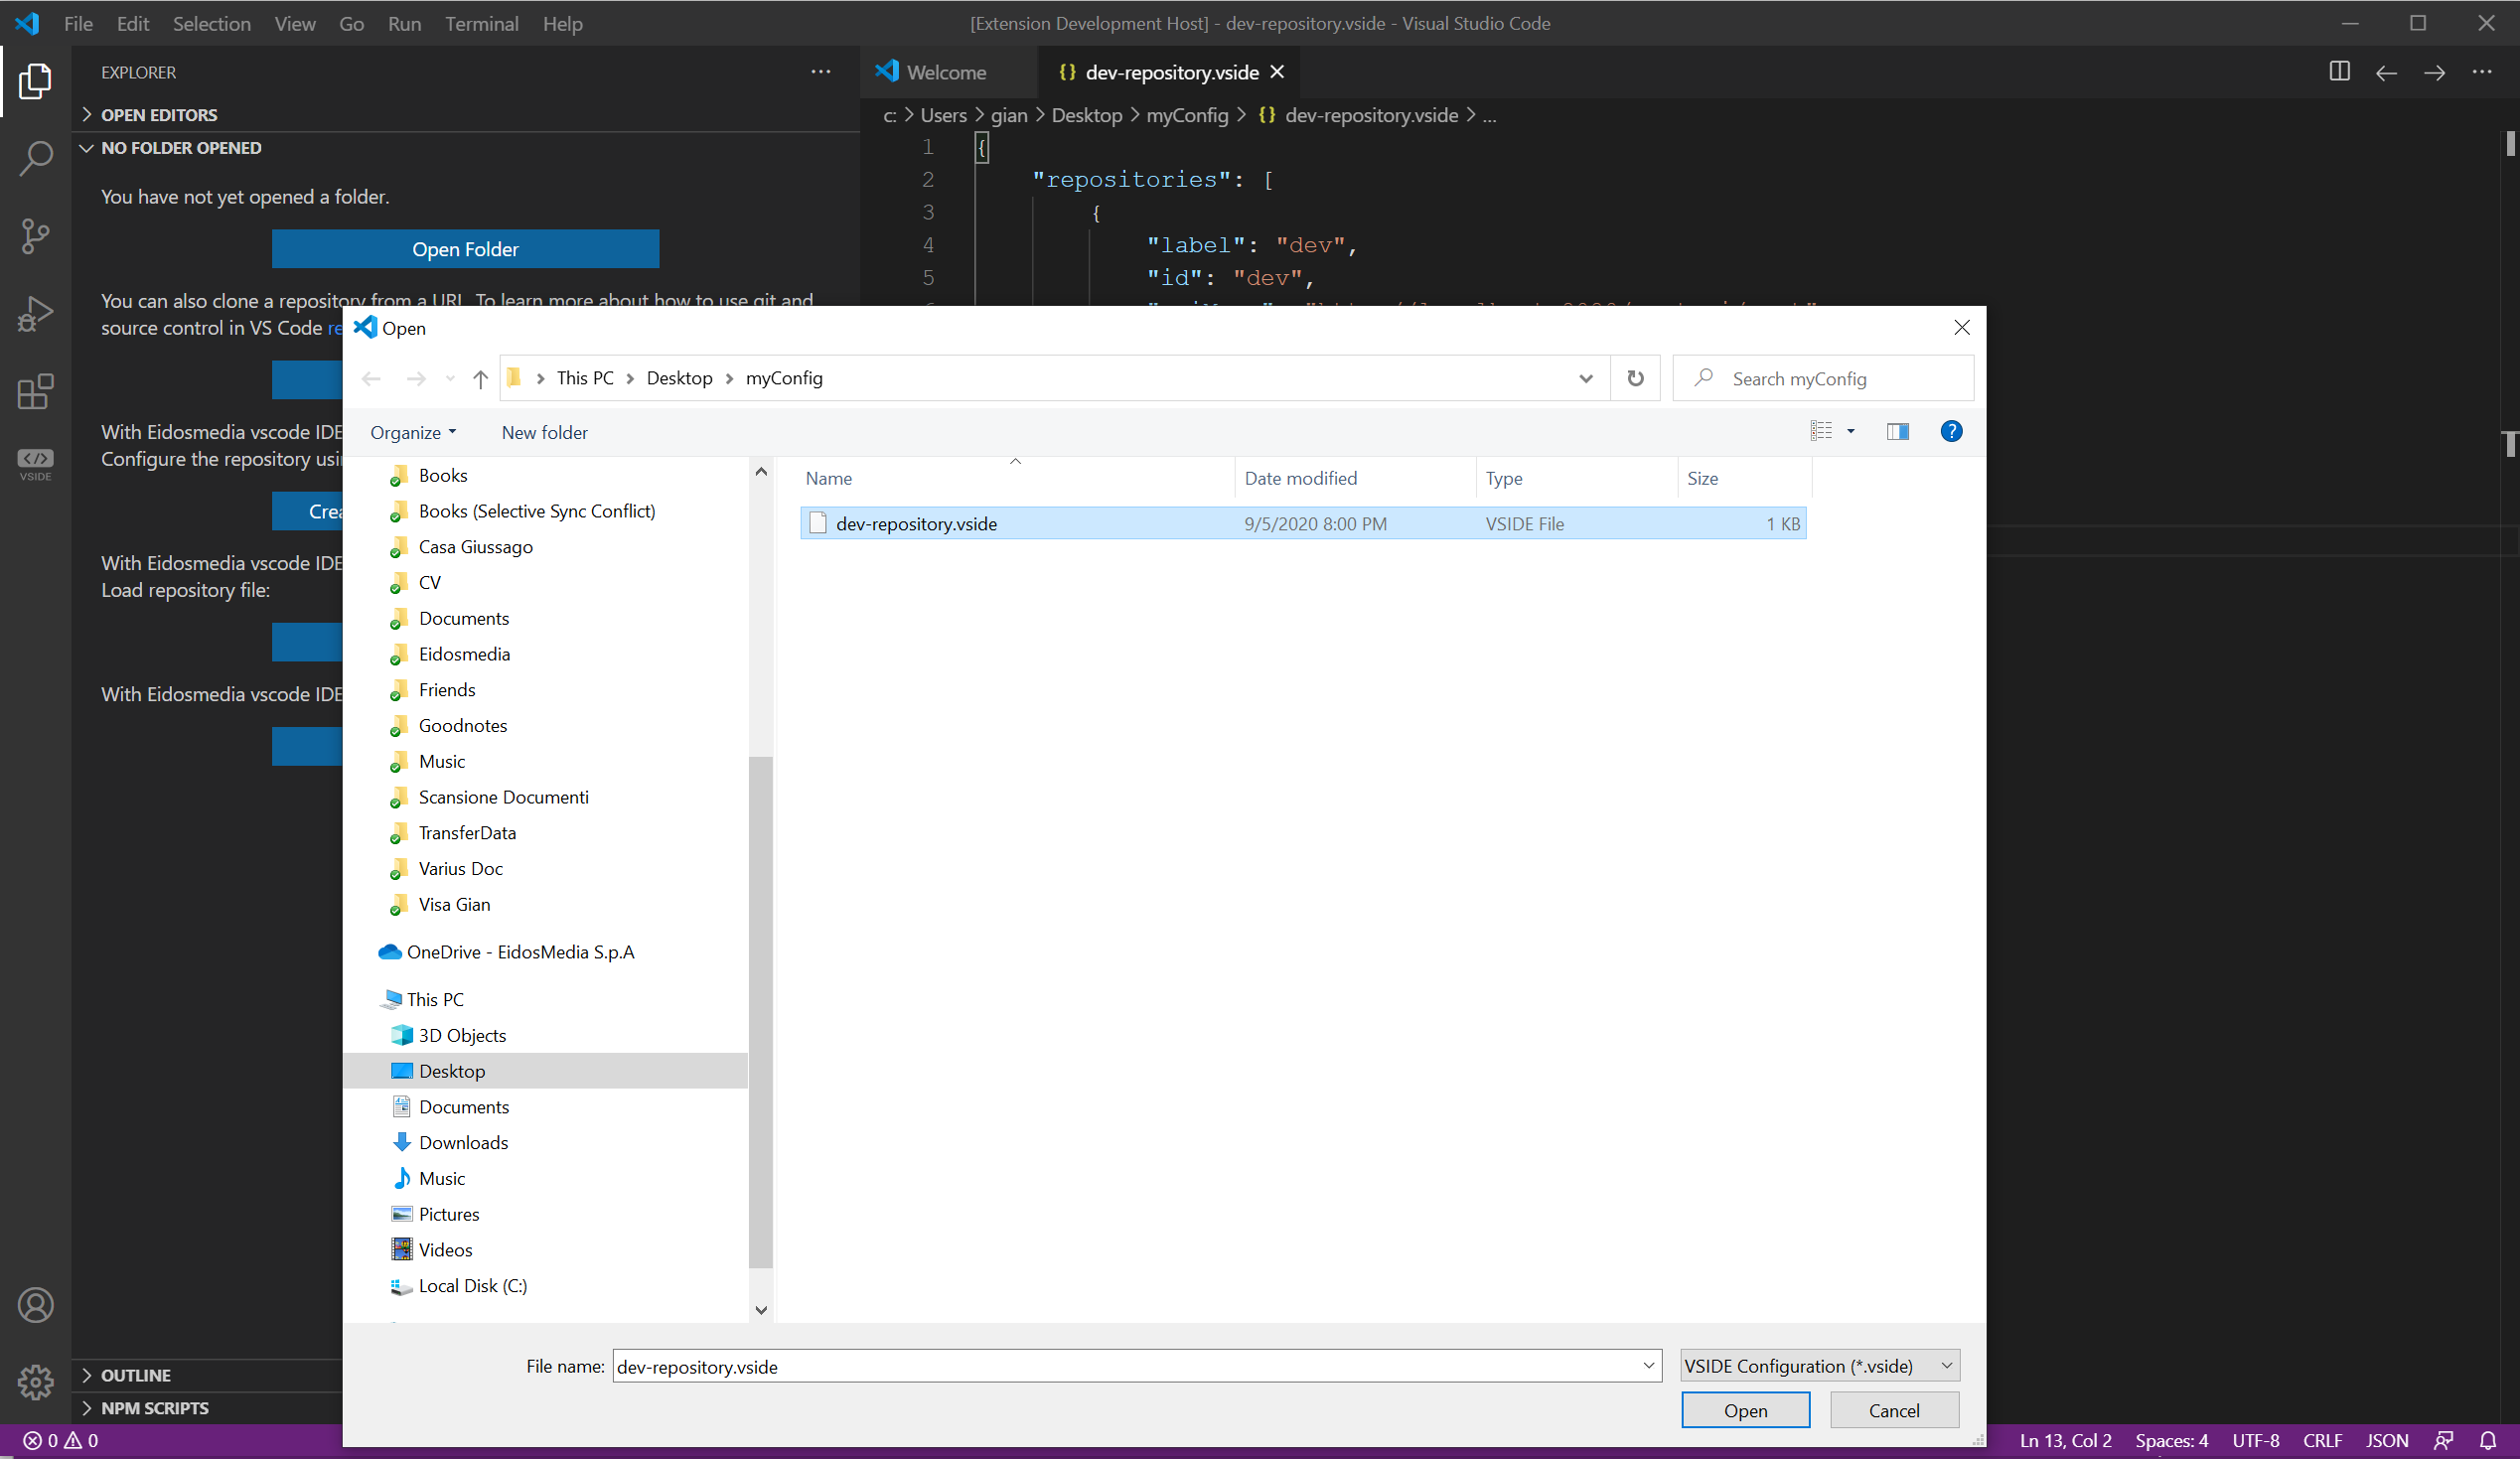
After having filled in all fields, VSIDE lets you browse a folder where you can save the new configuration file.
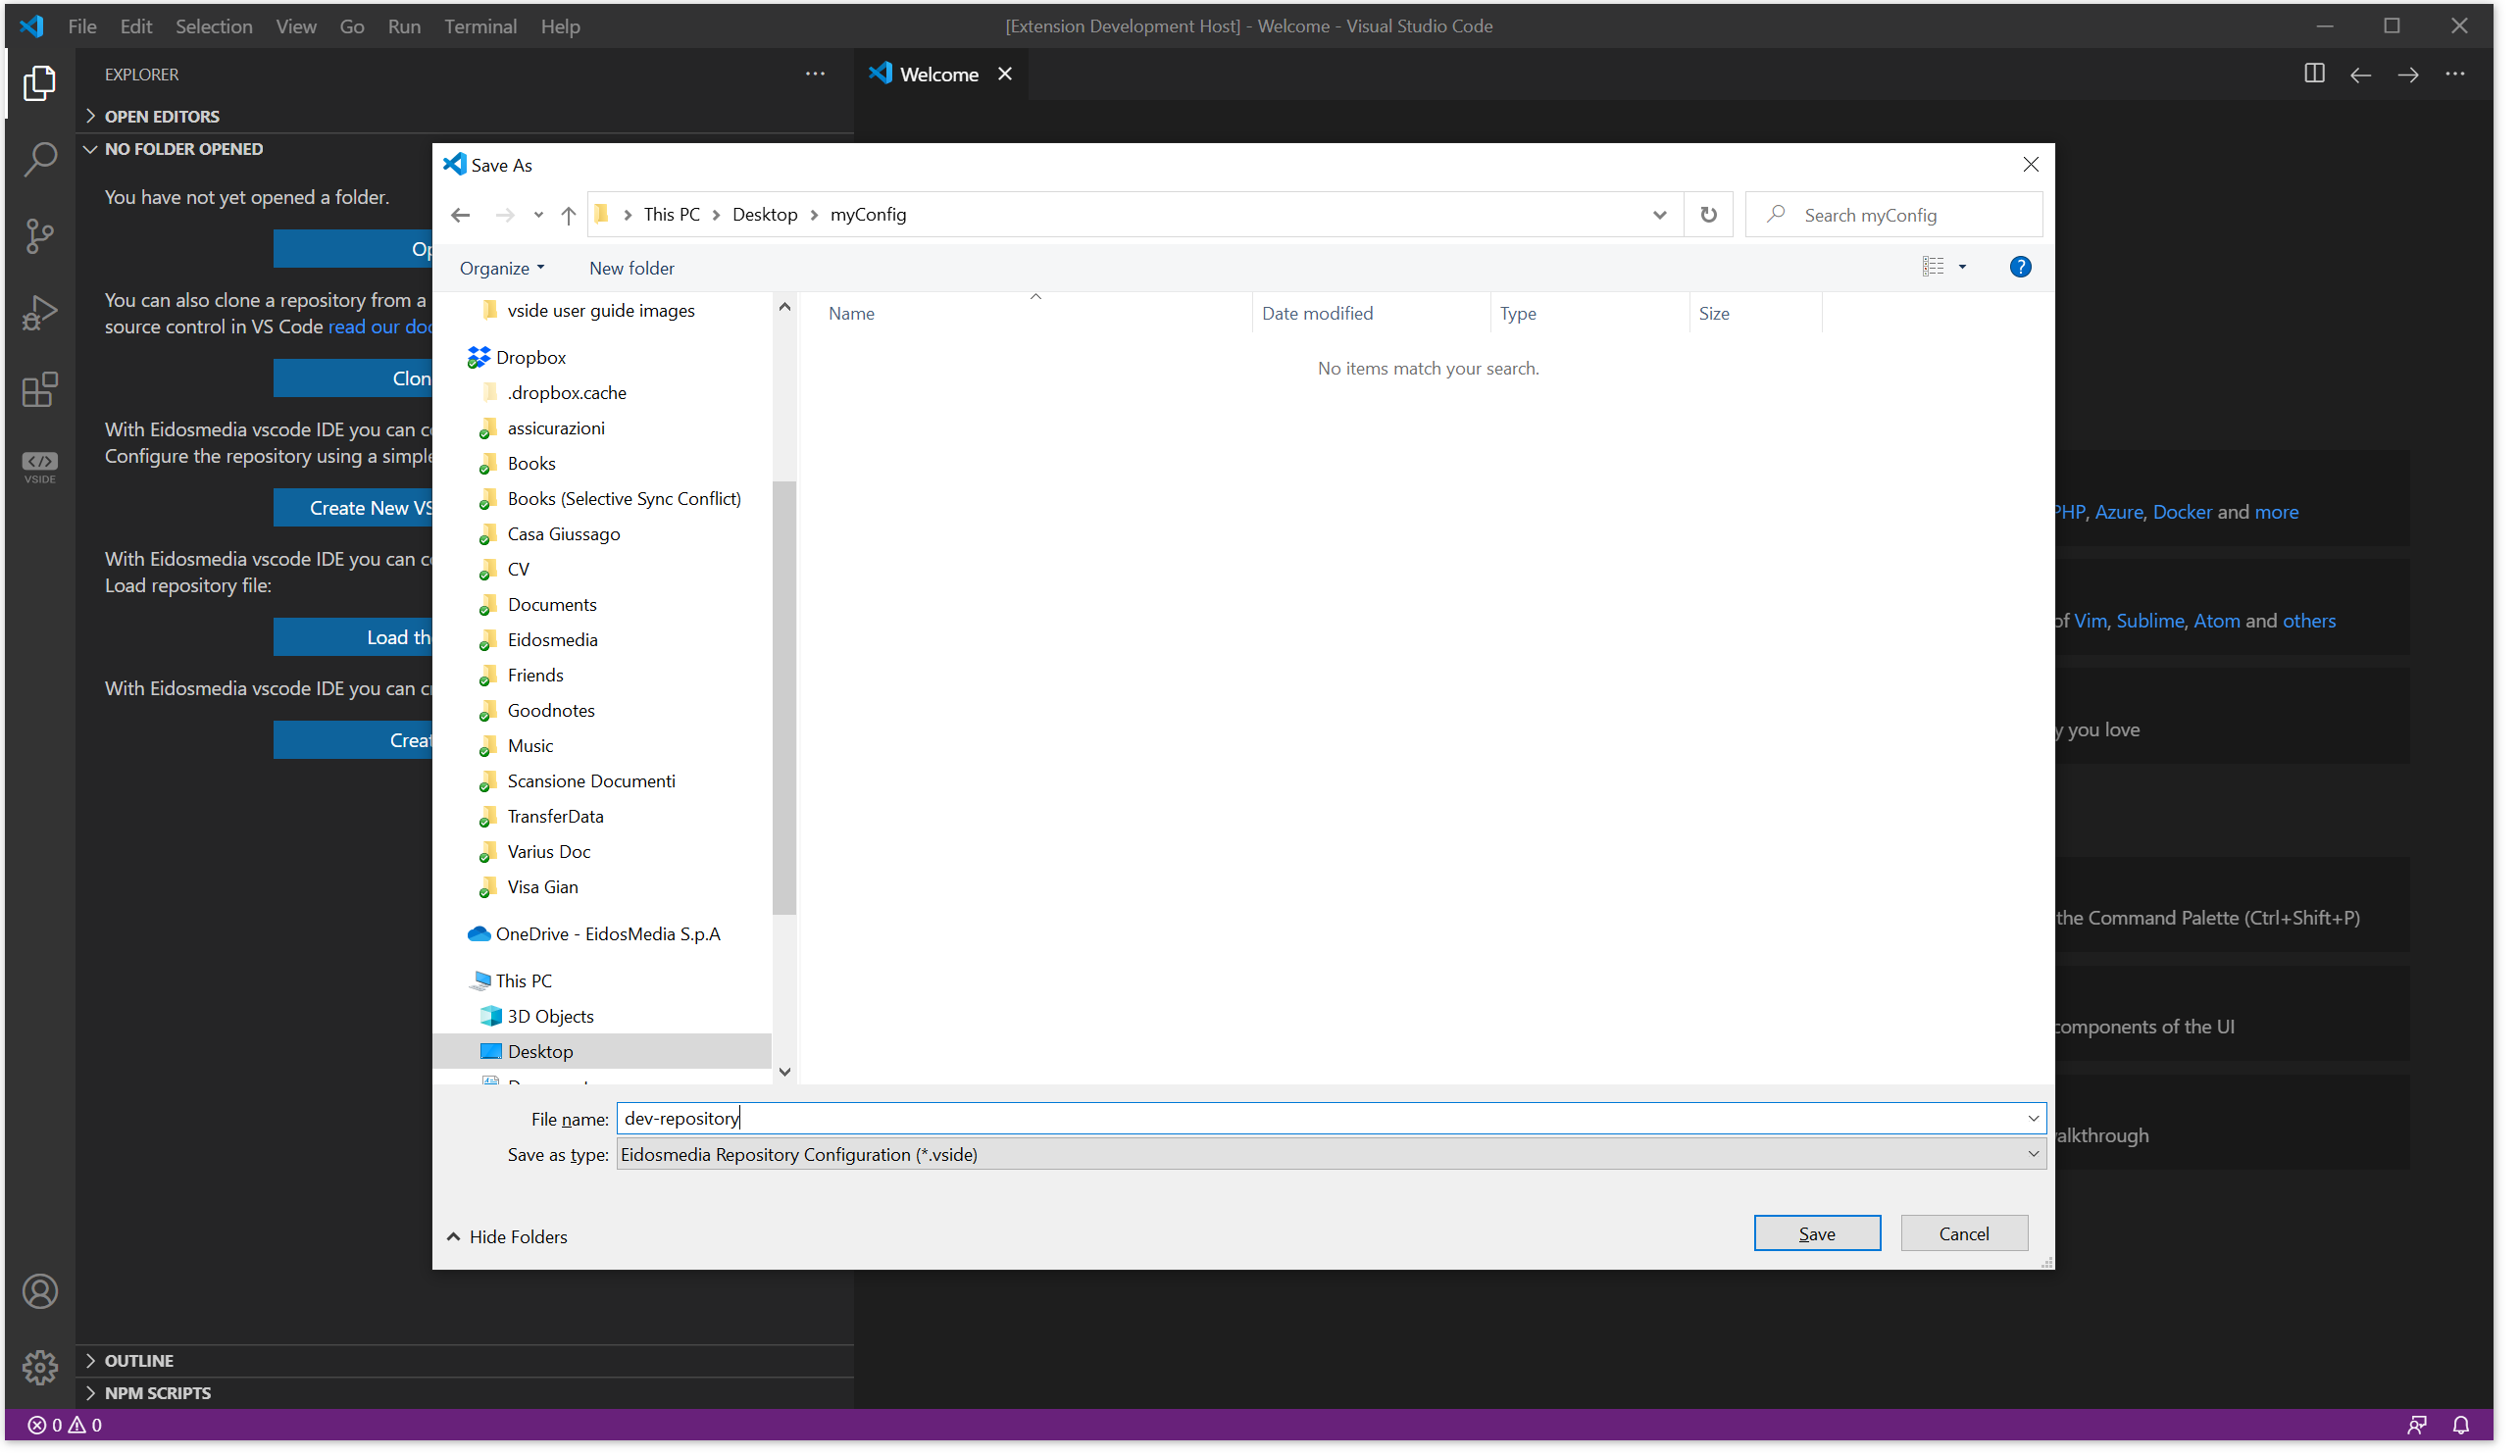
-
It is finally loaded inside the VSCode editor.
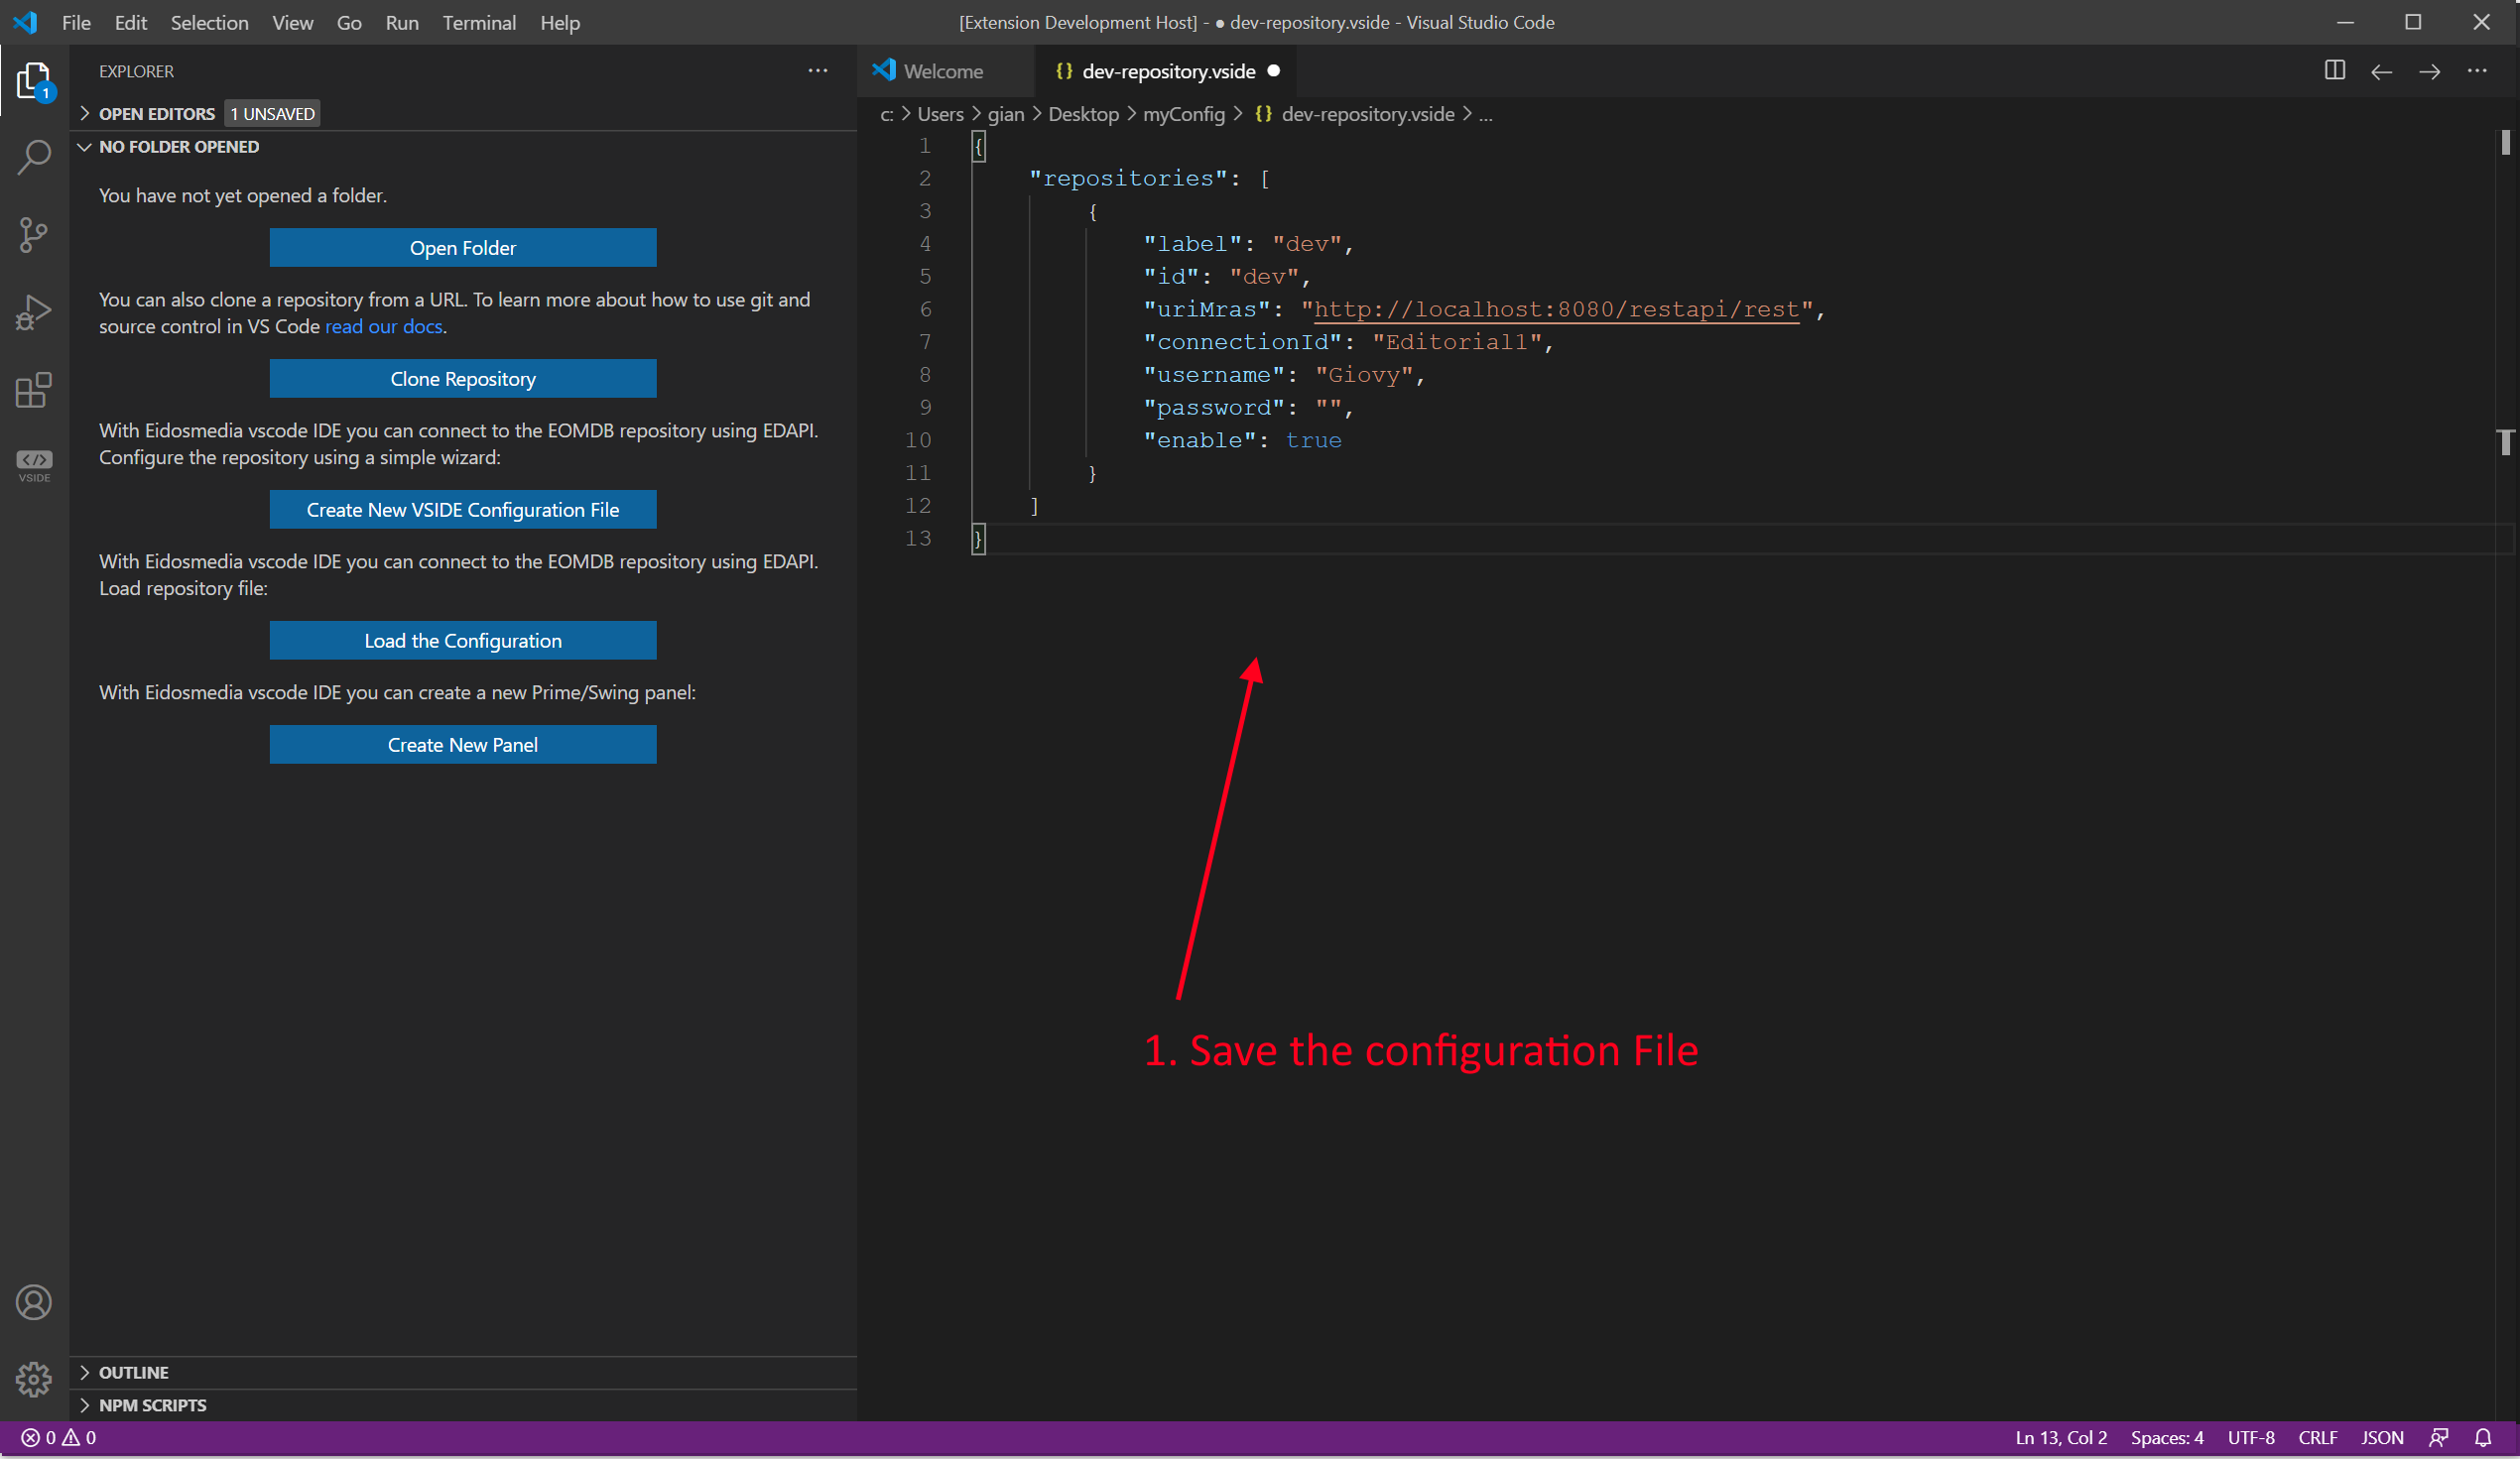
If you want, you can change some properties of the configuration and save it anew. You can also have different configuration files for different repositories and you must tell VSIDE that you want to use the last one you have created.
To load the configuration file you must simply click the "Load Configuration" button:
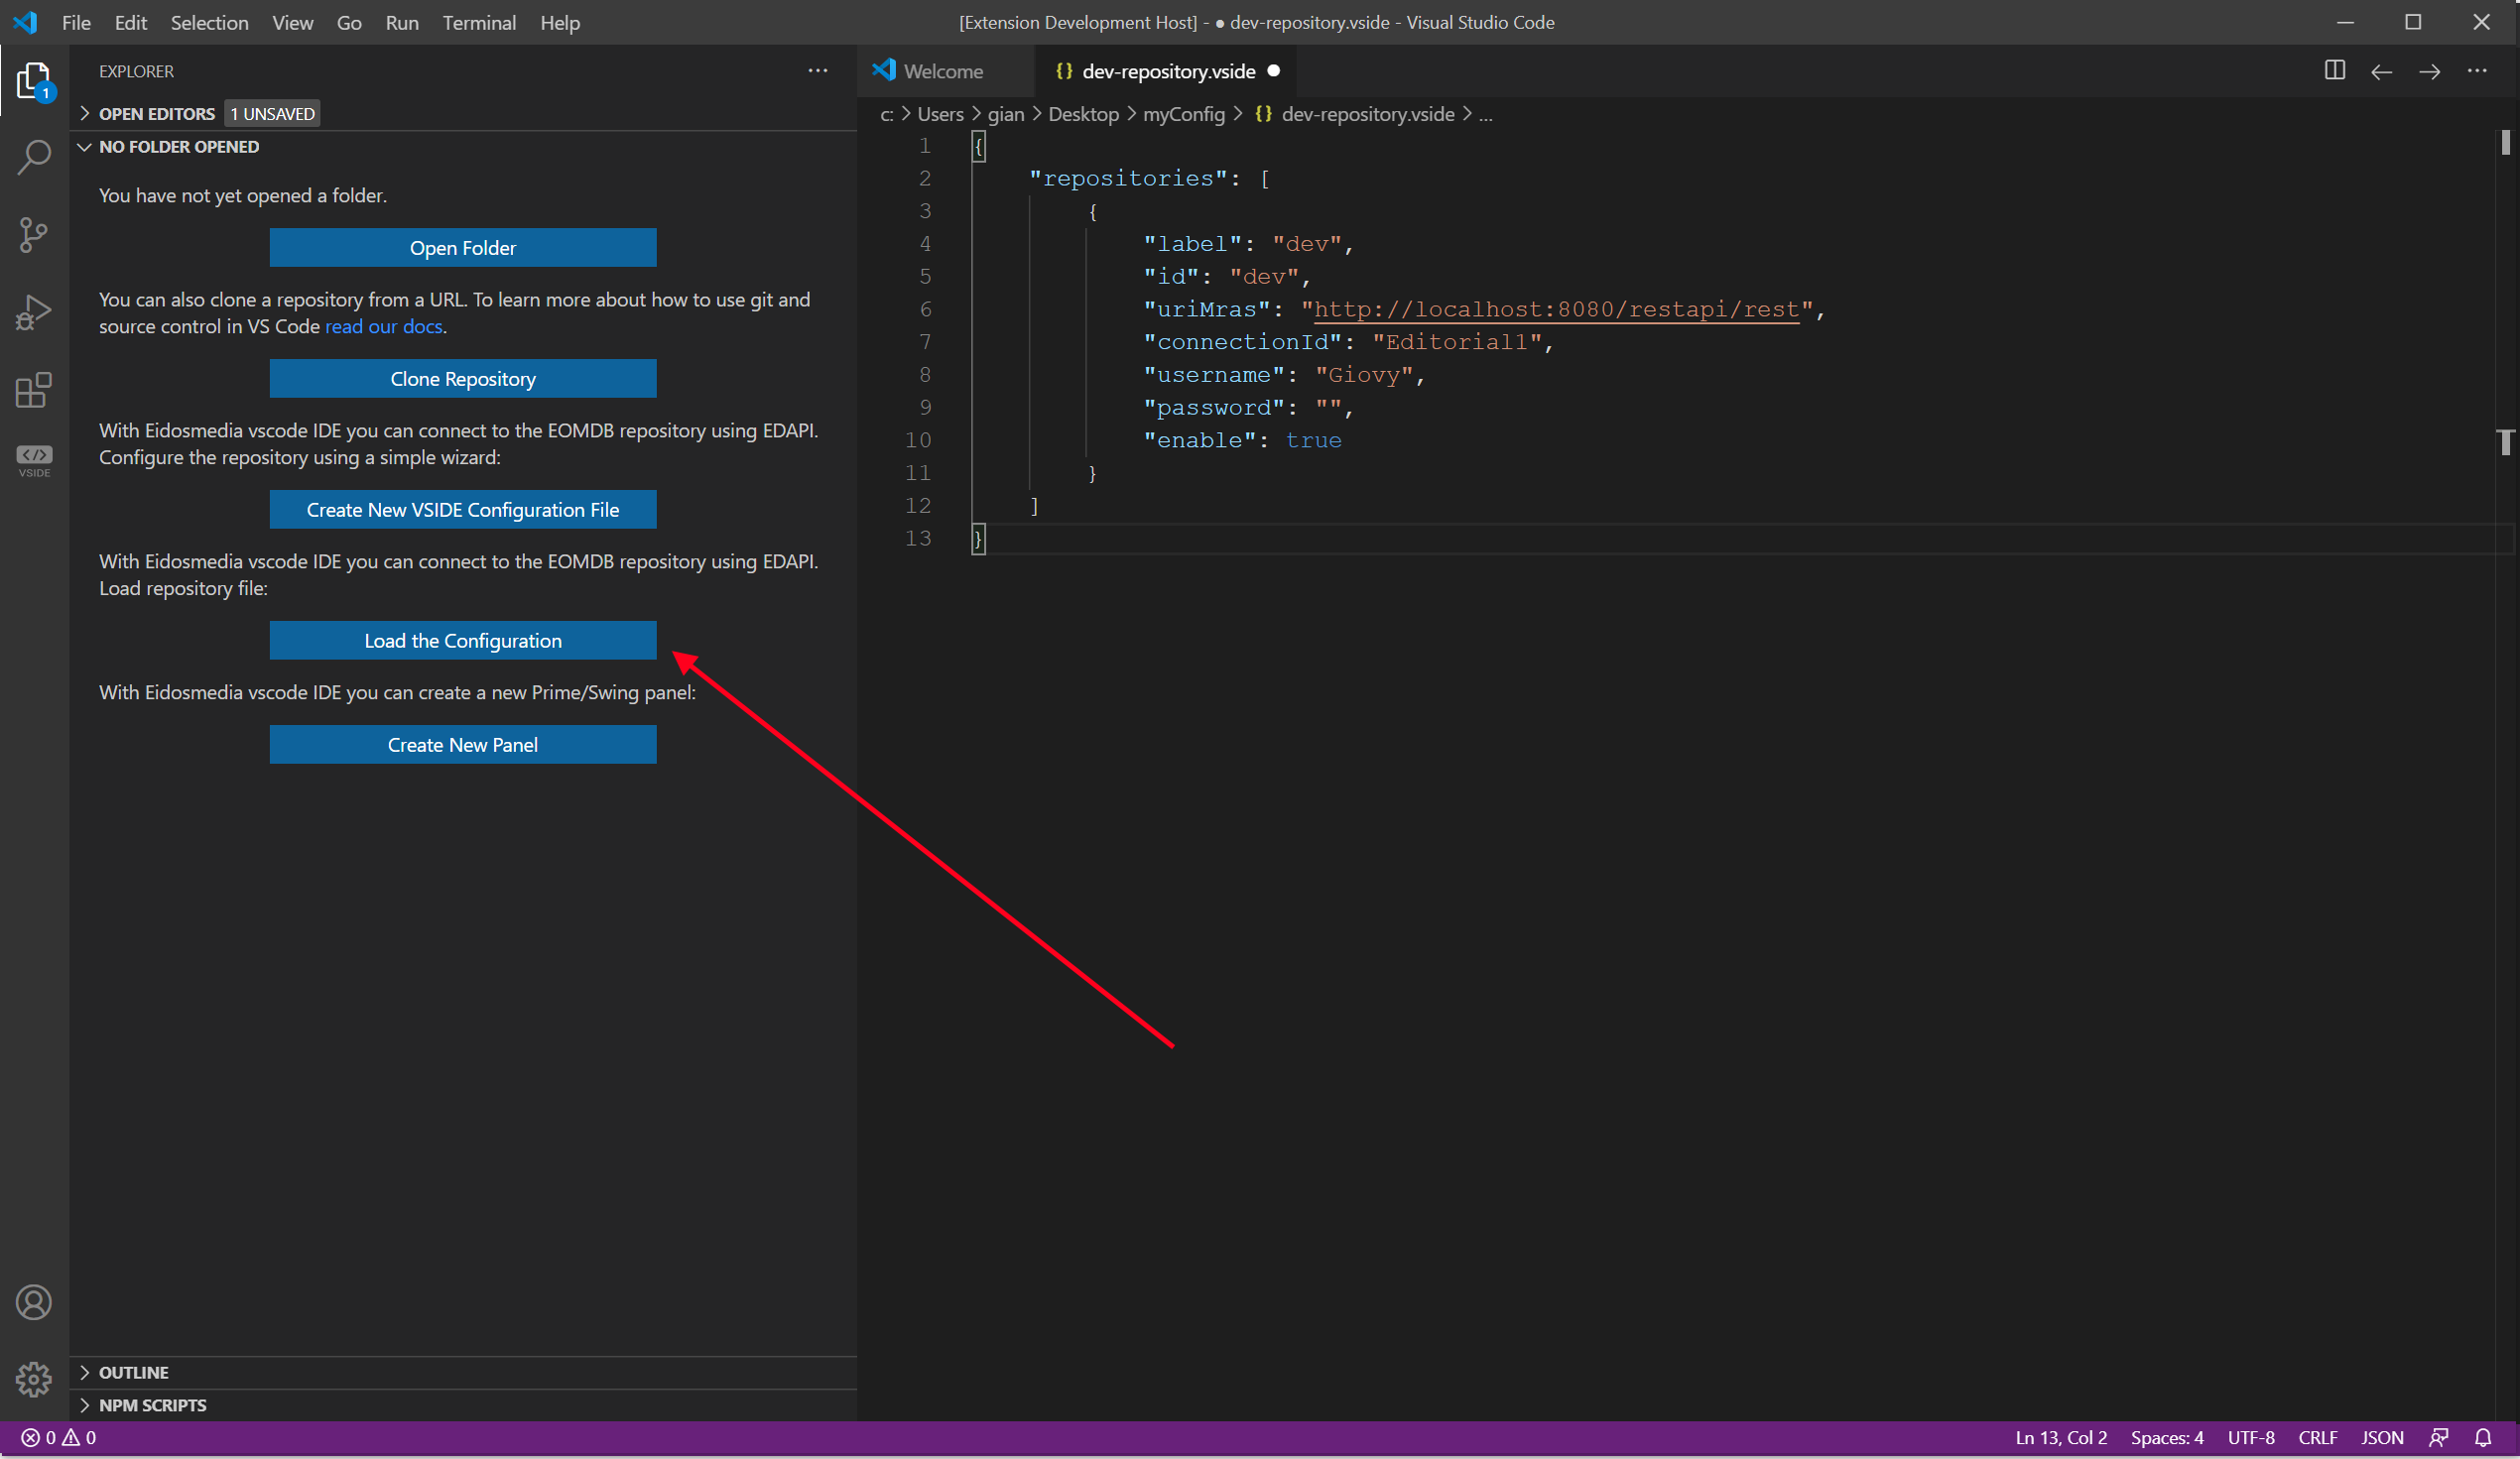
and select the file you have just saved.
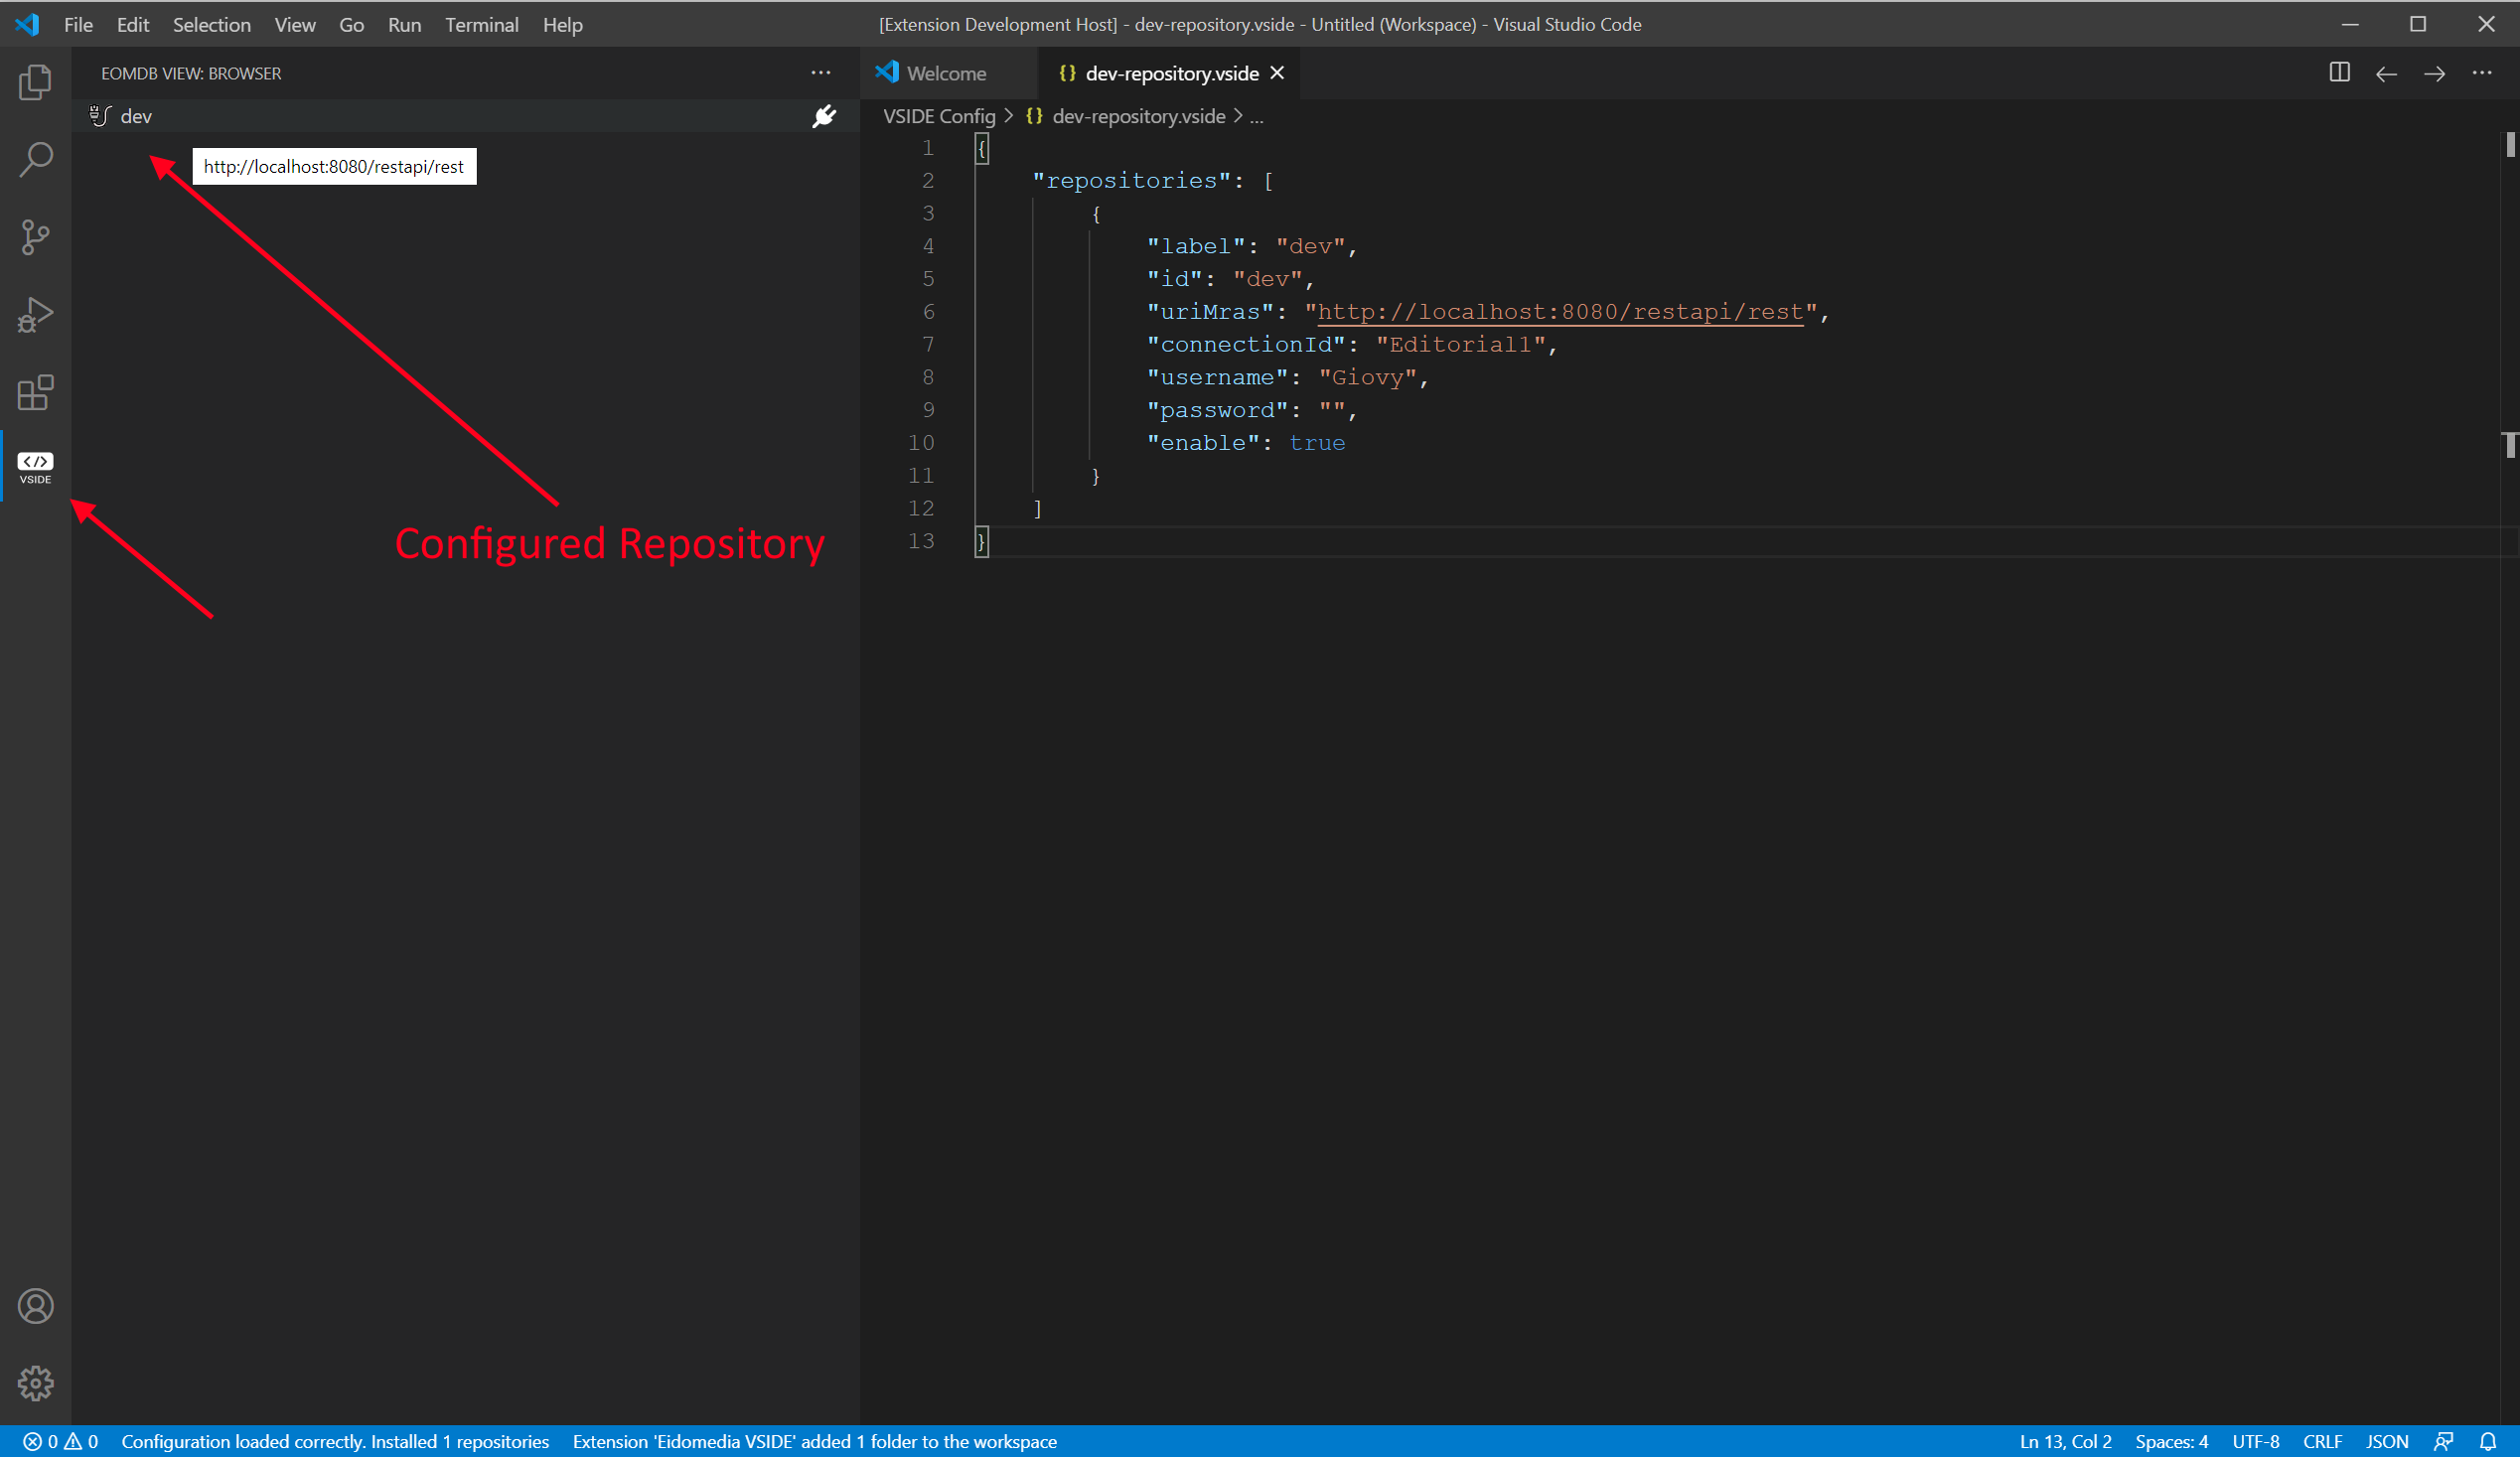
By clicking "Open", you will set the configuration file and you will have the confirmation of the correct loading with a message in the Status bar like this below.

Now, clicking on the "EomDb view" button you should see the panel with a row listing with your repository(ies).
To know how to connect to the repository, see the "Administration Tool" section.
3.4. Configuration File syntax
The configuration file is written in JSON format and it is an array of the repository object. Find an example here below.
{
    "repositories": [
        {
            "label": "dev",
            "id": "dev",
            "uriMras": "http://localhost:8080/restapi/rest",
            "connectionId": "Editorial1",
            "username": "Giovy",
            "password": "",
            "enable": true
        }
    ]
}
For each repository object the following parameters are defined:
-
label: the label which will be displayed in the eomdb view panel
-
id: the internal id of the repository
-
uriMras: the uri of the EDAPI server
-
connectionId: the connectionId configured in the EDAPI configuration
-
username: User
-
password: Password
-
enable: allowing to decide whether the repository will be displayed or not (possible values: true or false)
You can have multiple files for each repository or you can configure more repositories in one file, here is an example of a configuration with 4 repositories:
{
    "repositories": [{
            "label": "Dev - Ps02",
            "id": "ps02",
            "uriMras": "http://mastrodev01:8080/restapi/rest",
            "connectionId": "Editorial_Swing1",
            "username": "GiovyFinance",
            "password": "password",
            "enable": true
        },
        {
            "label": "Dev - QA",
            "id": "mylocal",
            "uriMras": "http://localhost:9080/restapi-war/rest",
            "connectionId": "Editorial1",
            "username": "analyst1",
            "password": "testpwd",
            "enable": true
        },
        {
            "label": "Dev1 - User: analyst1",
            "id": "mylocal-tower-analyst1",
            "uriMras": "http://tower-gian:8080/restapi/rest",
            "connectionId": "Editorial1",
            "username": "analyst1",
            "password": "testpwd",
            "enable": true
        },
        {
            "label": "Dev1 - User: system",
            "id": "mylocal-tower-system",
            "uriMras": "http://tower-gian:8080/restapi/rest",
            "connectionId": "Editorial1",
            "username": "system",
            "password": "yourpasswordhere",
            "enable": true
        },
        {
            "label": "Dev1 - User: system (NO PASS)",
            "id": "mylocal-tower-system-no-pass",
            "uriMras": "http://tower-gian:8080/restapi/rest",
            "connectionId": "Editorial1",
            "username": "system",
            "password": "",
            "enable": true
        }
    ]
}
3.5. Loading a different configuration file
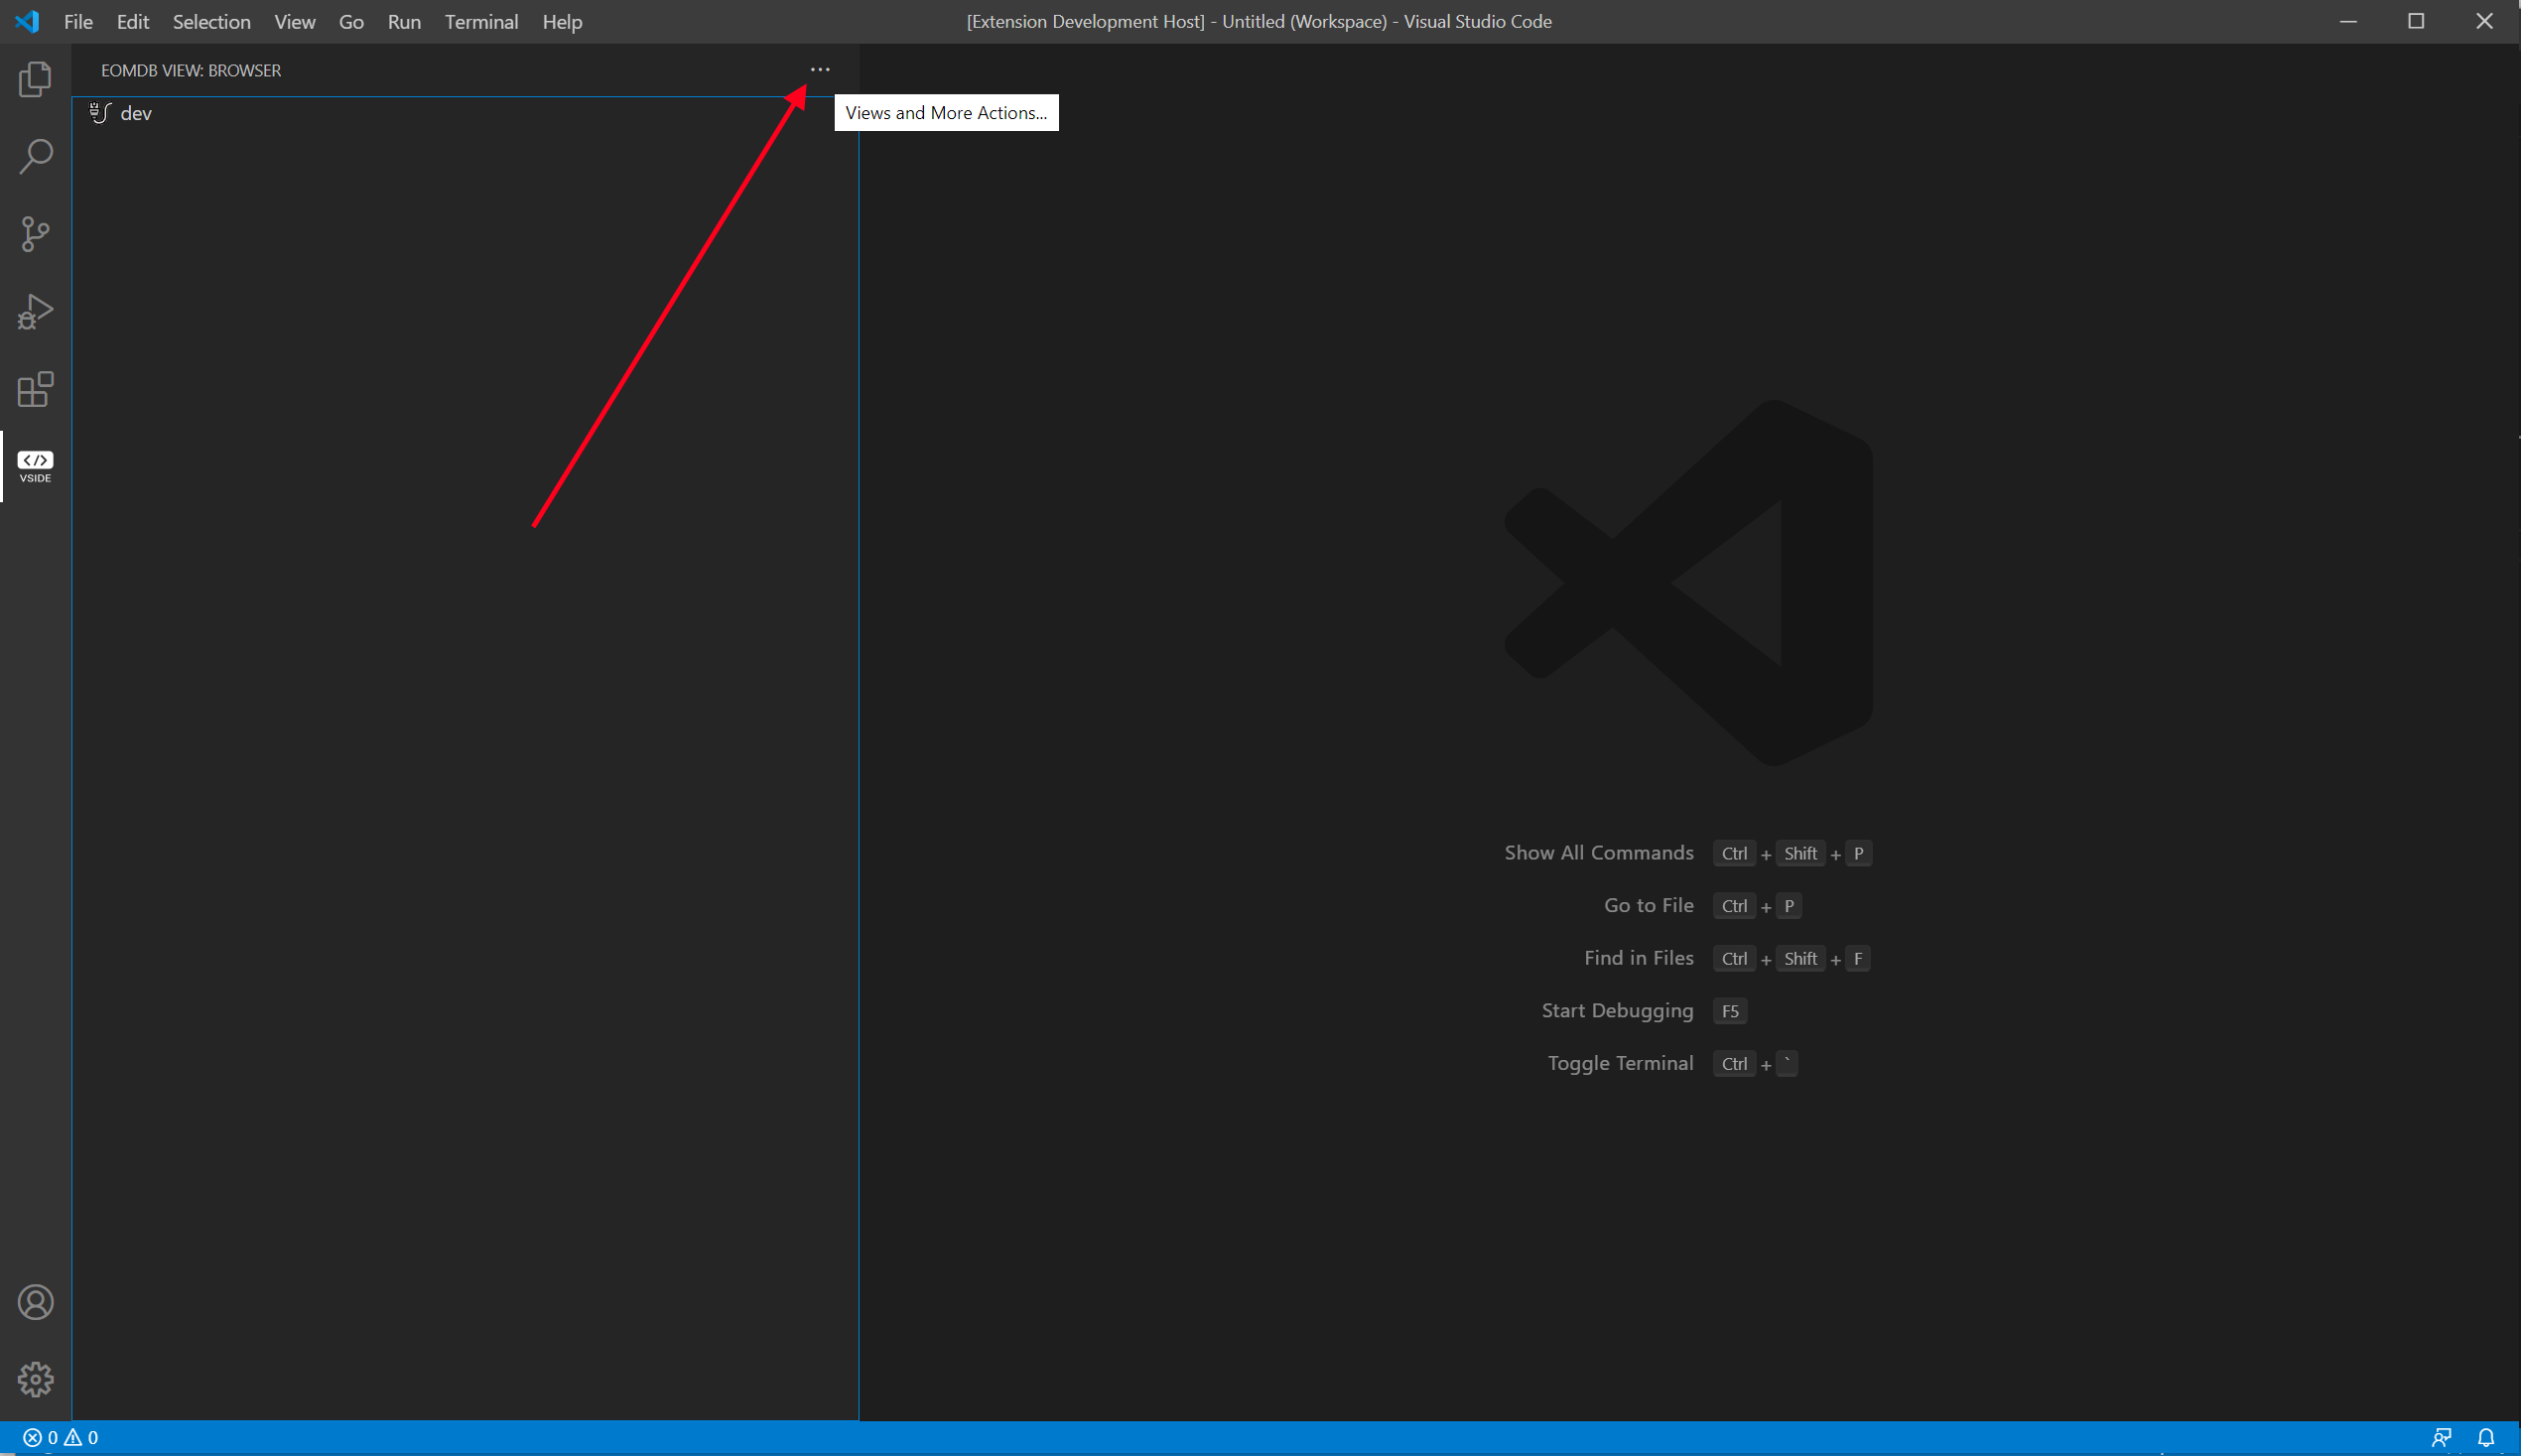
If you need to load a different configuration file with respect to the current one, you can use the two commands inside the browser view.
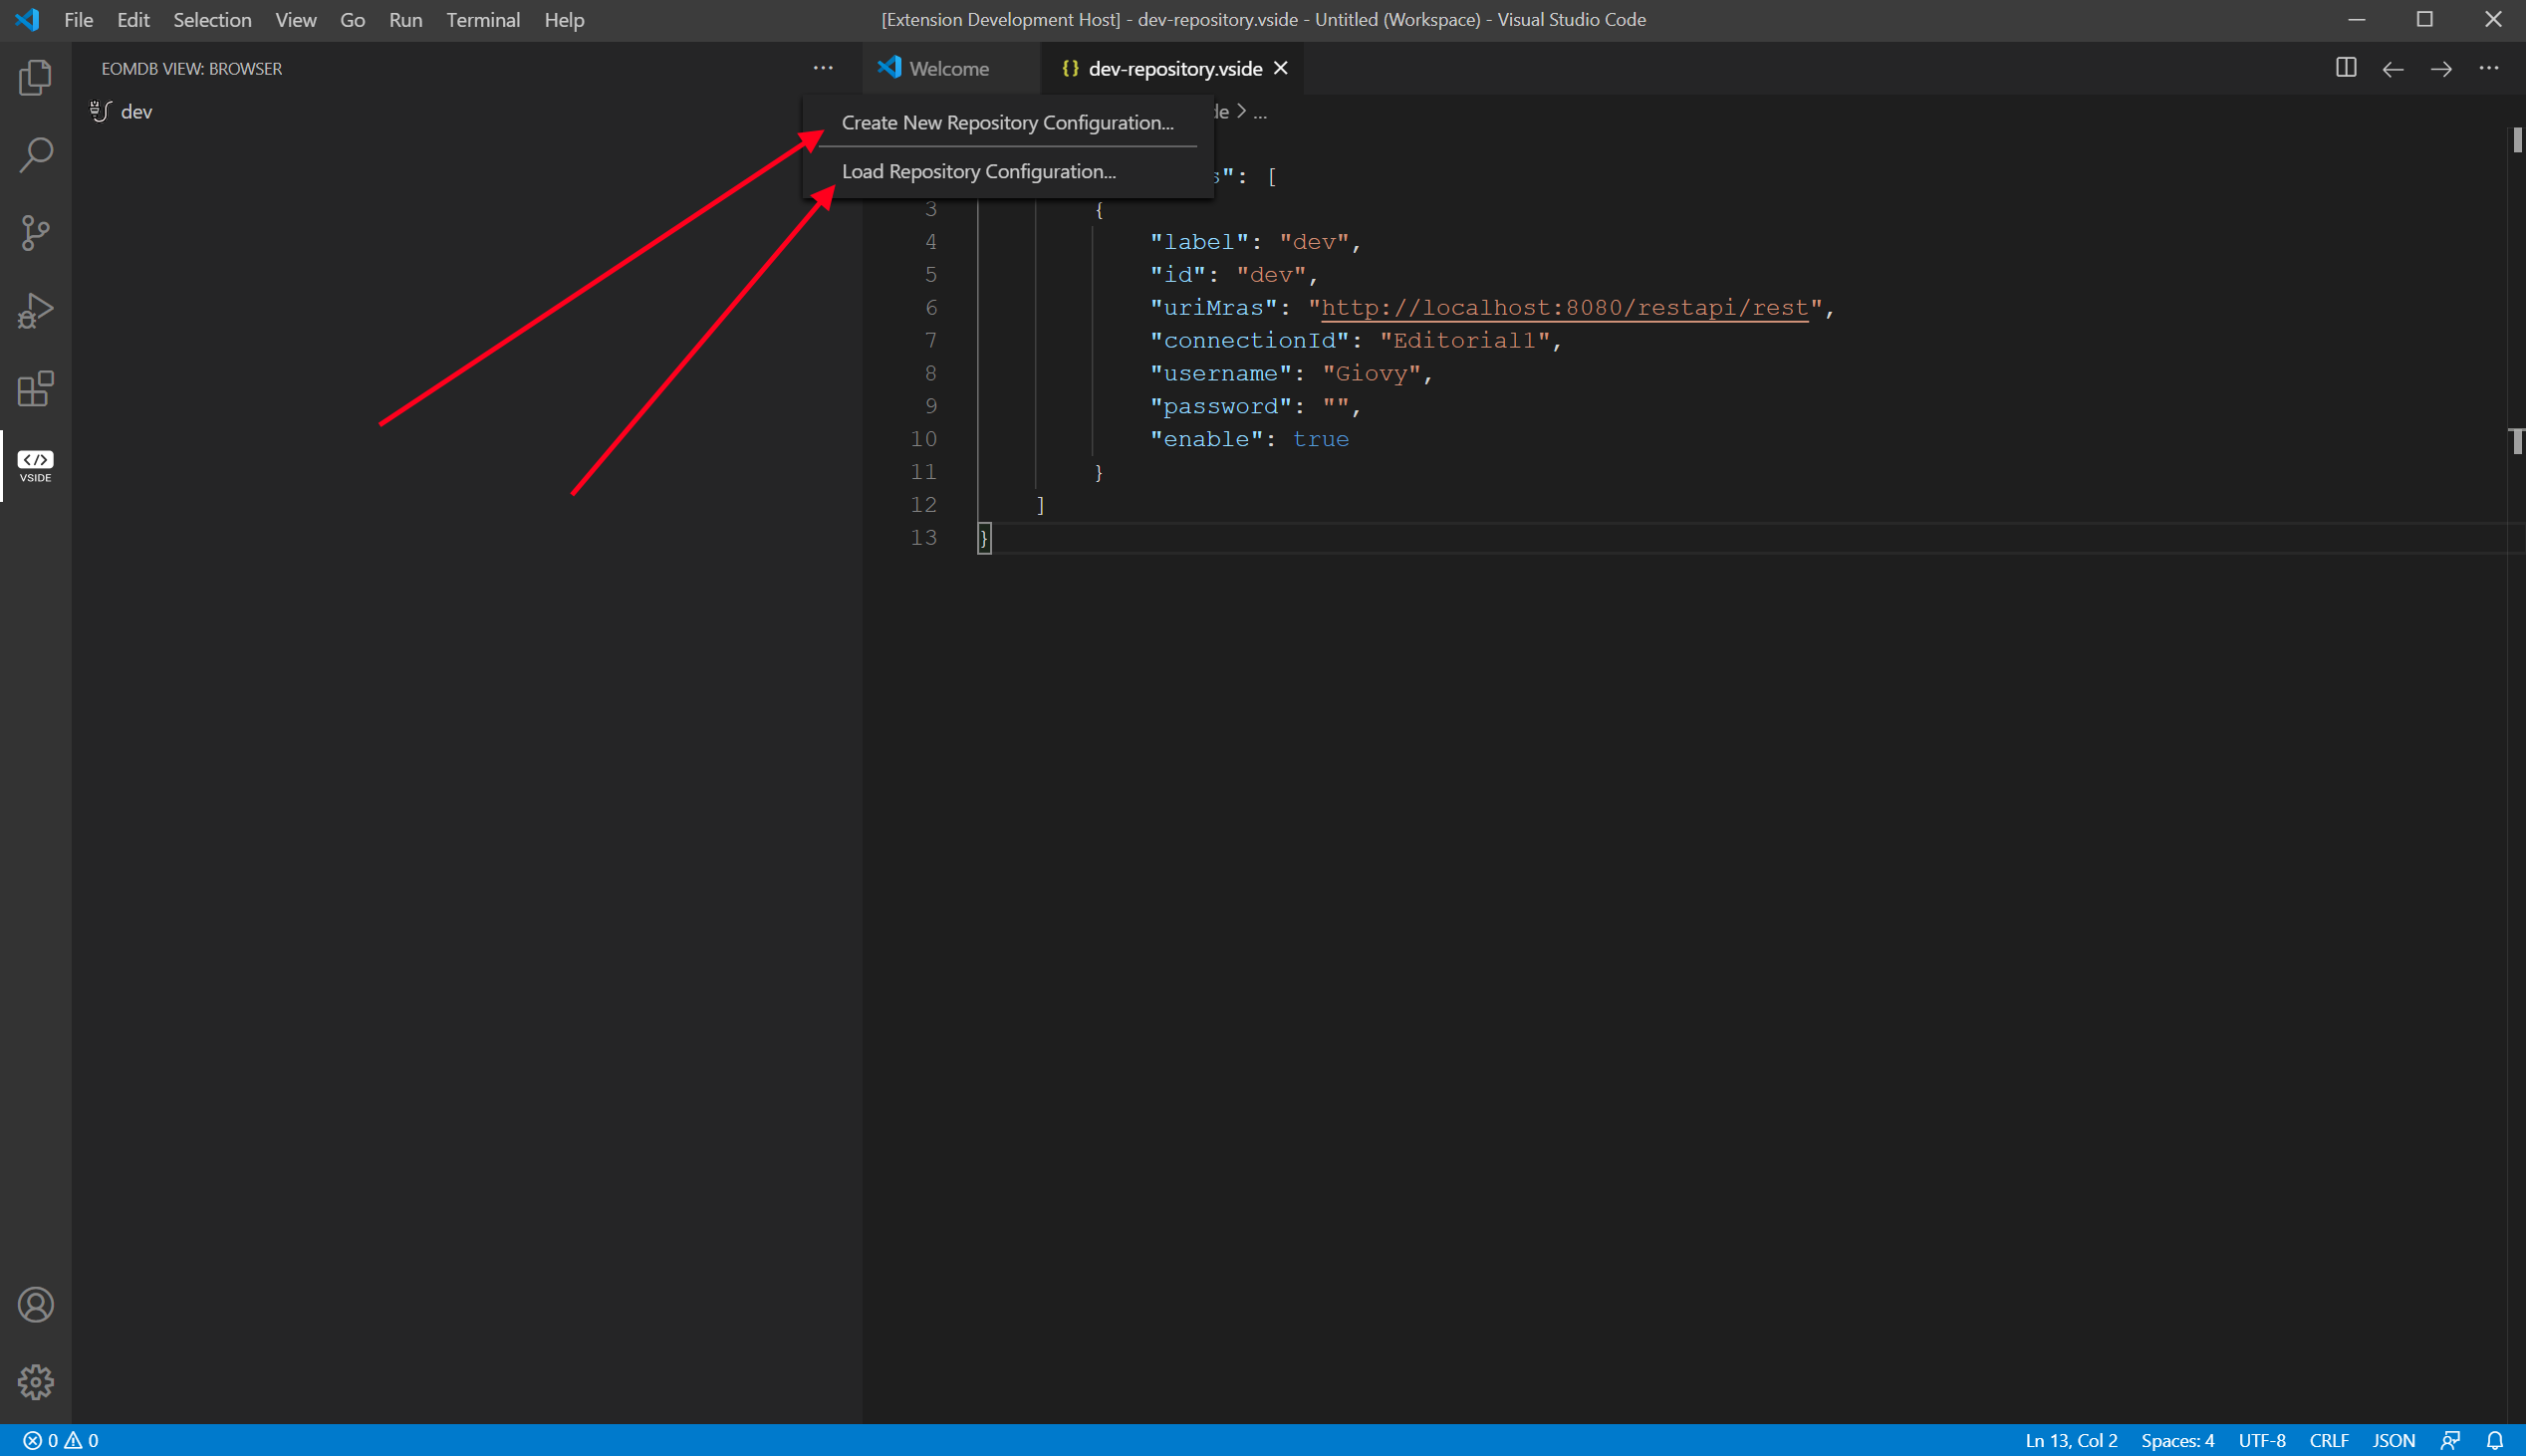
By clicking on the three horizontal dots "…" button, the same buttons you have seen in the welcome page when VSCode starts will be displayed.
Click on the "Load Repository Configuration" button to switch file.
4. Suggested Visual Studio Code Configuration
4.1. Suggested Settings
For a better user experience when using VSIDE inside Visual Studio we suggest to use the following settings
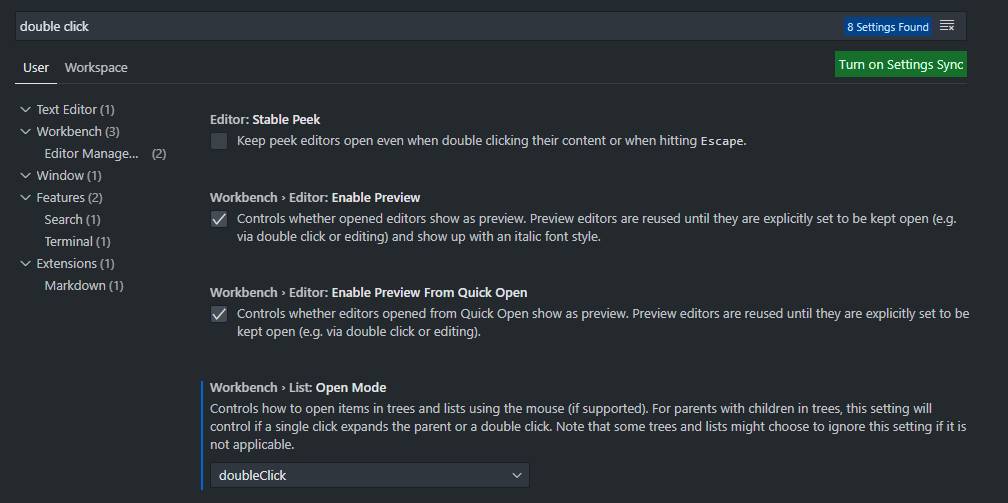
4.1.1. Double Click
"workbench.list.openMode": "doubleClick"
To let you open lists through double click. Inside the EomDbView browser this settings let you select the file in order to apply a correct selection when using the Context Menu.
5. Using VSIDE as an Administration Tool
5.1. EomDb Connection
Once you have configured at least one back-end connection (as described here), you need to explicitly open a connection to the selected repository. To connect, click on the icon on the right of the connection name as shown in the image below
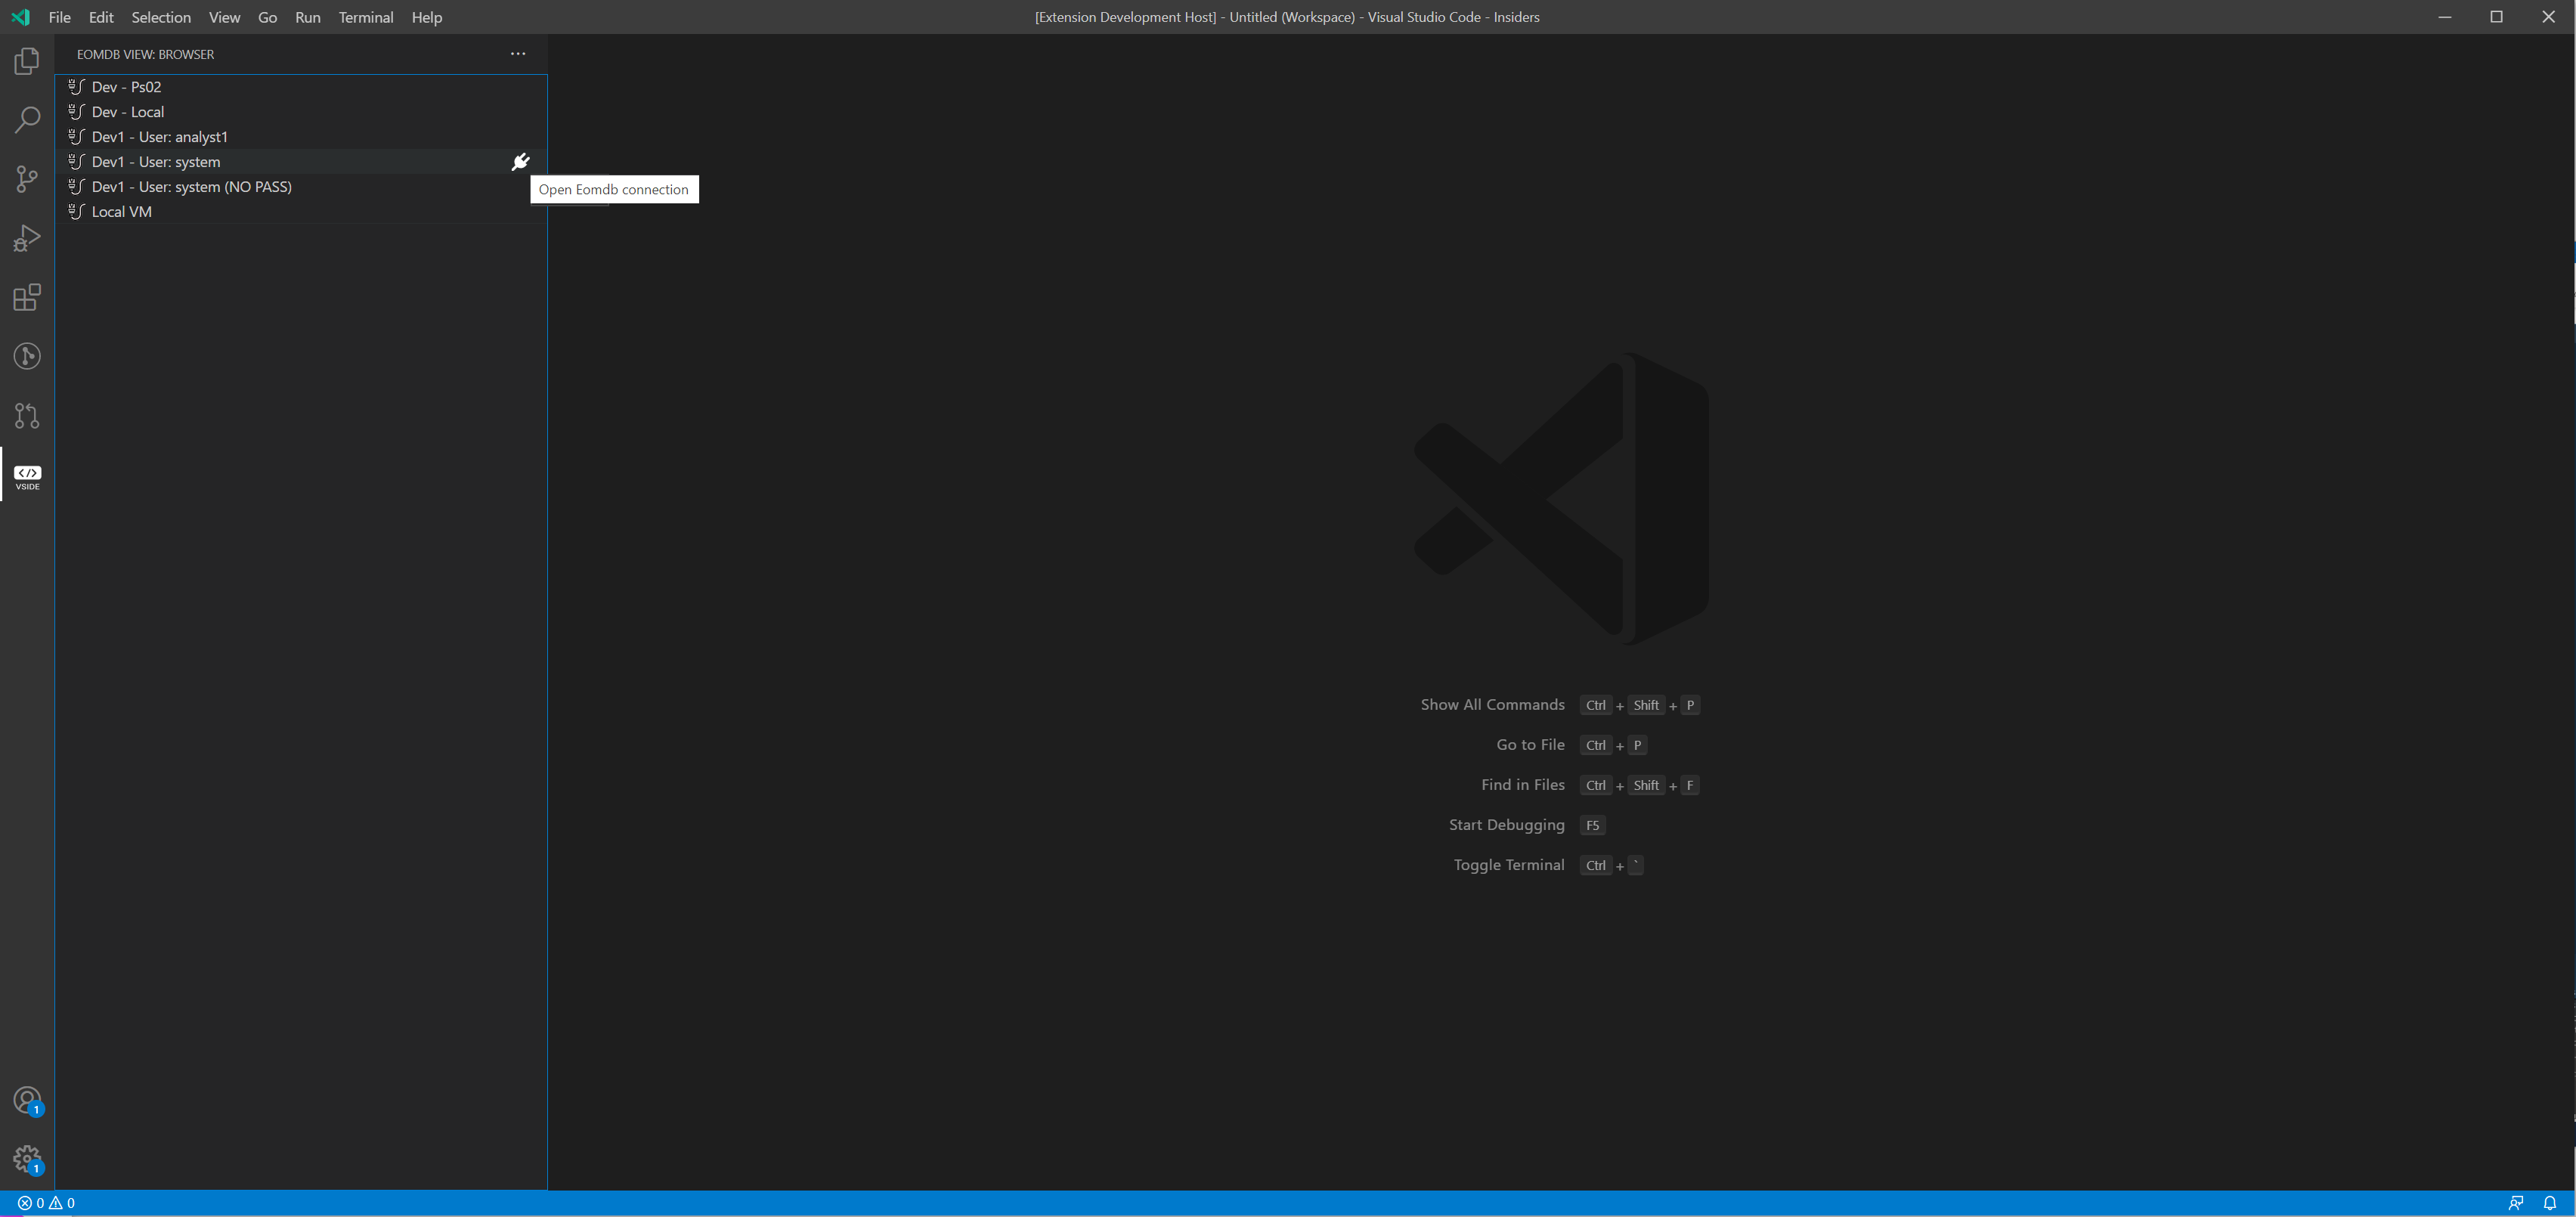
If everything is properly configured and the repository is reachable, you will see the icon on the left of the connection name turn green.
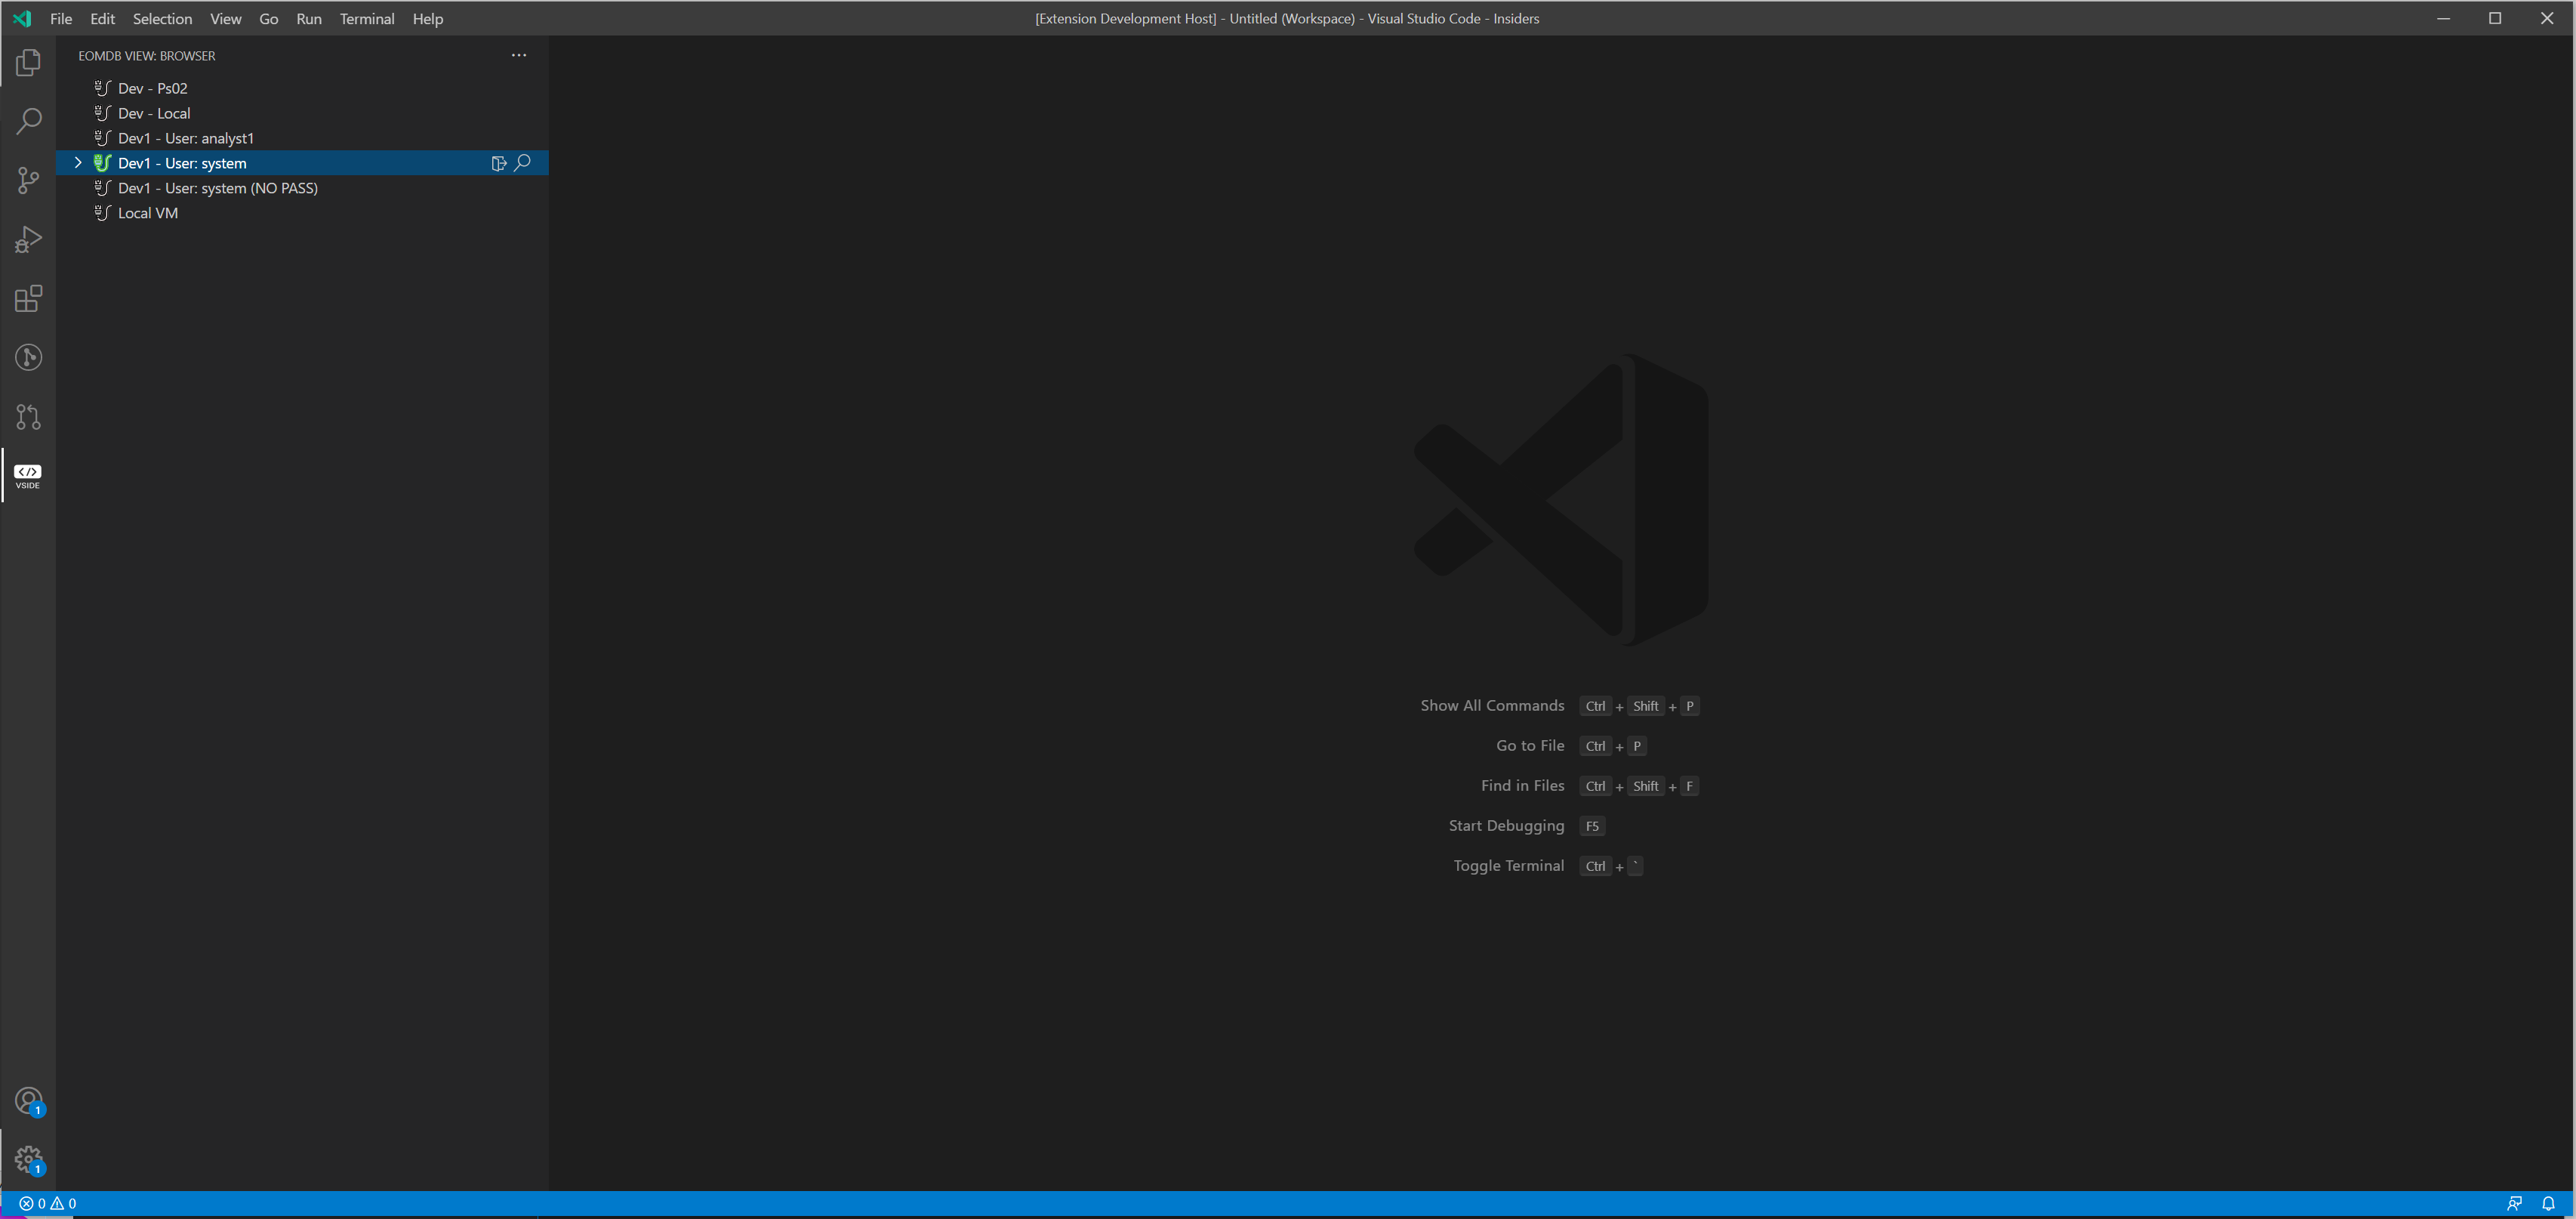
Once you are connected, you can navigate the EomDb like any other filesystem
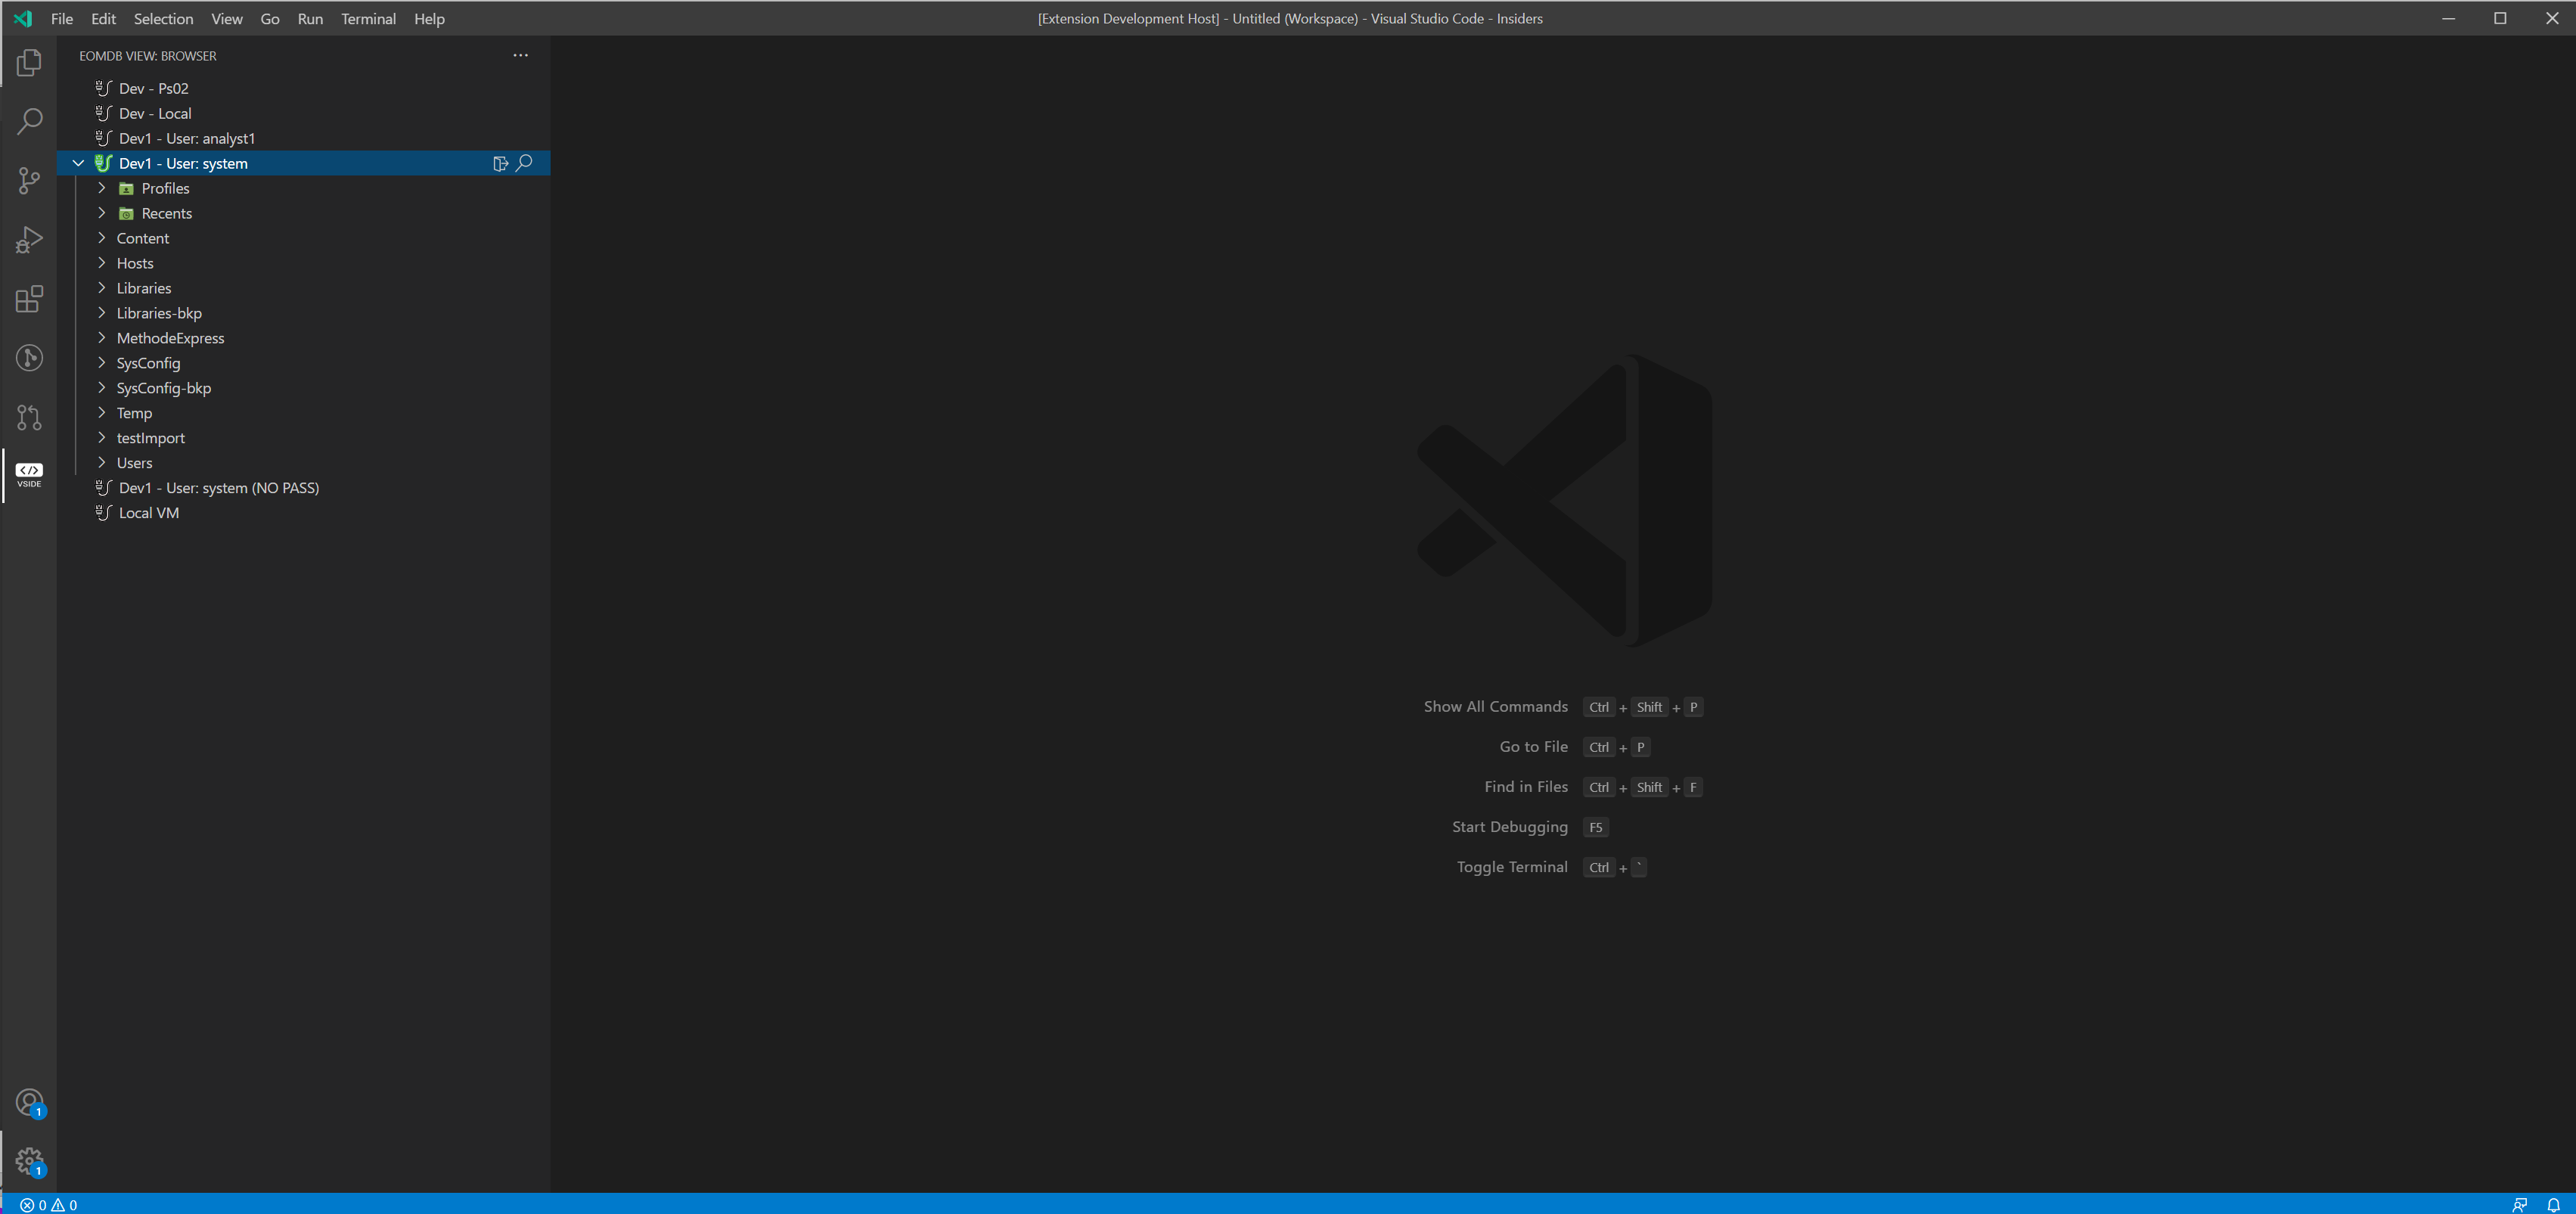
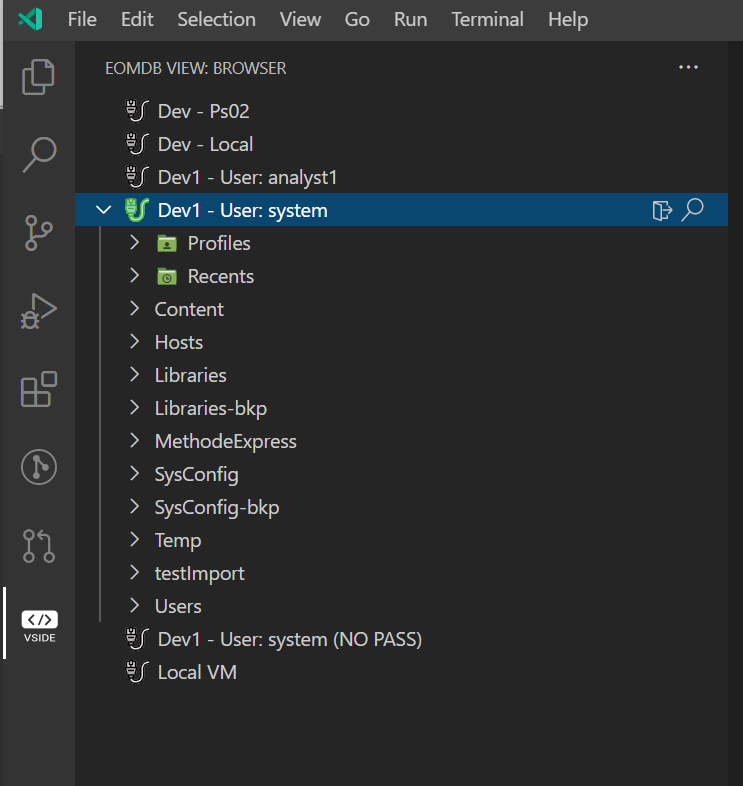
5.2. EomDb Tree Details
The tree structure of the EomDb does not include only the folder/files coming from the EomDb but also "special" folders that give you access to:
-
Profiles: the profiles of the groups/users configured inside the EomDb.
-
Recents: a list of the recently opened files that will help you to easily recall them
5.3. Managing objects
5.3.1. Editing
To edit an object, simply double click on it.
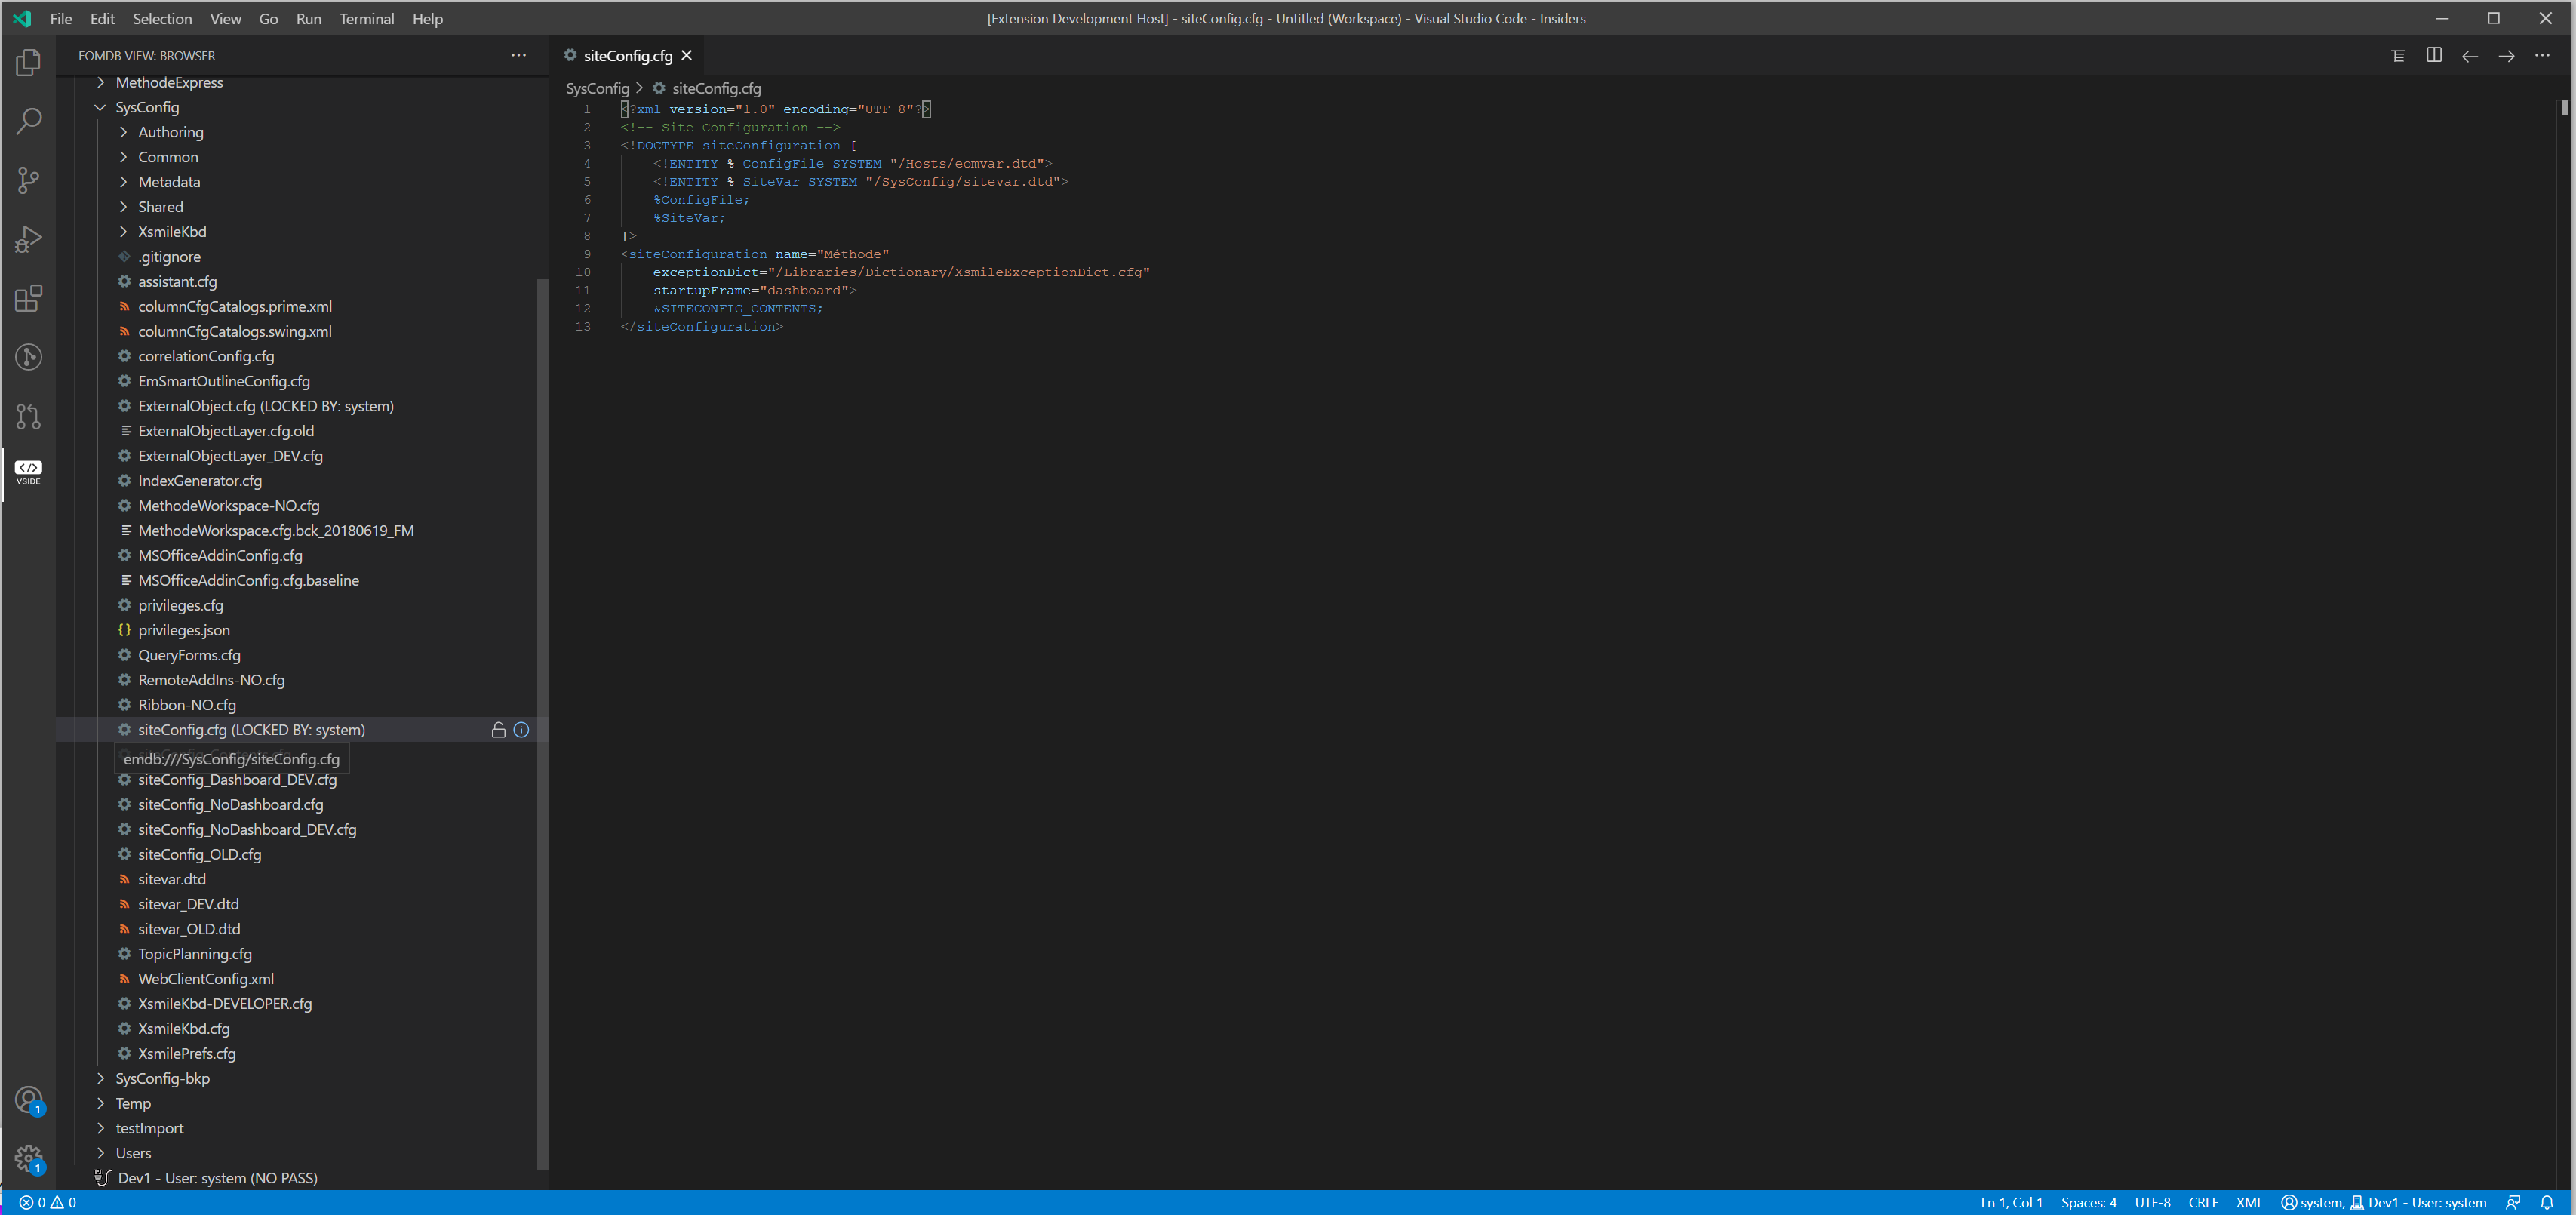
As you can see from the above screenshot, the file will be locked until you finish your editing.
5.3.2. Viewing properties
To access the object properties, just right click it.
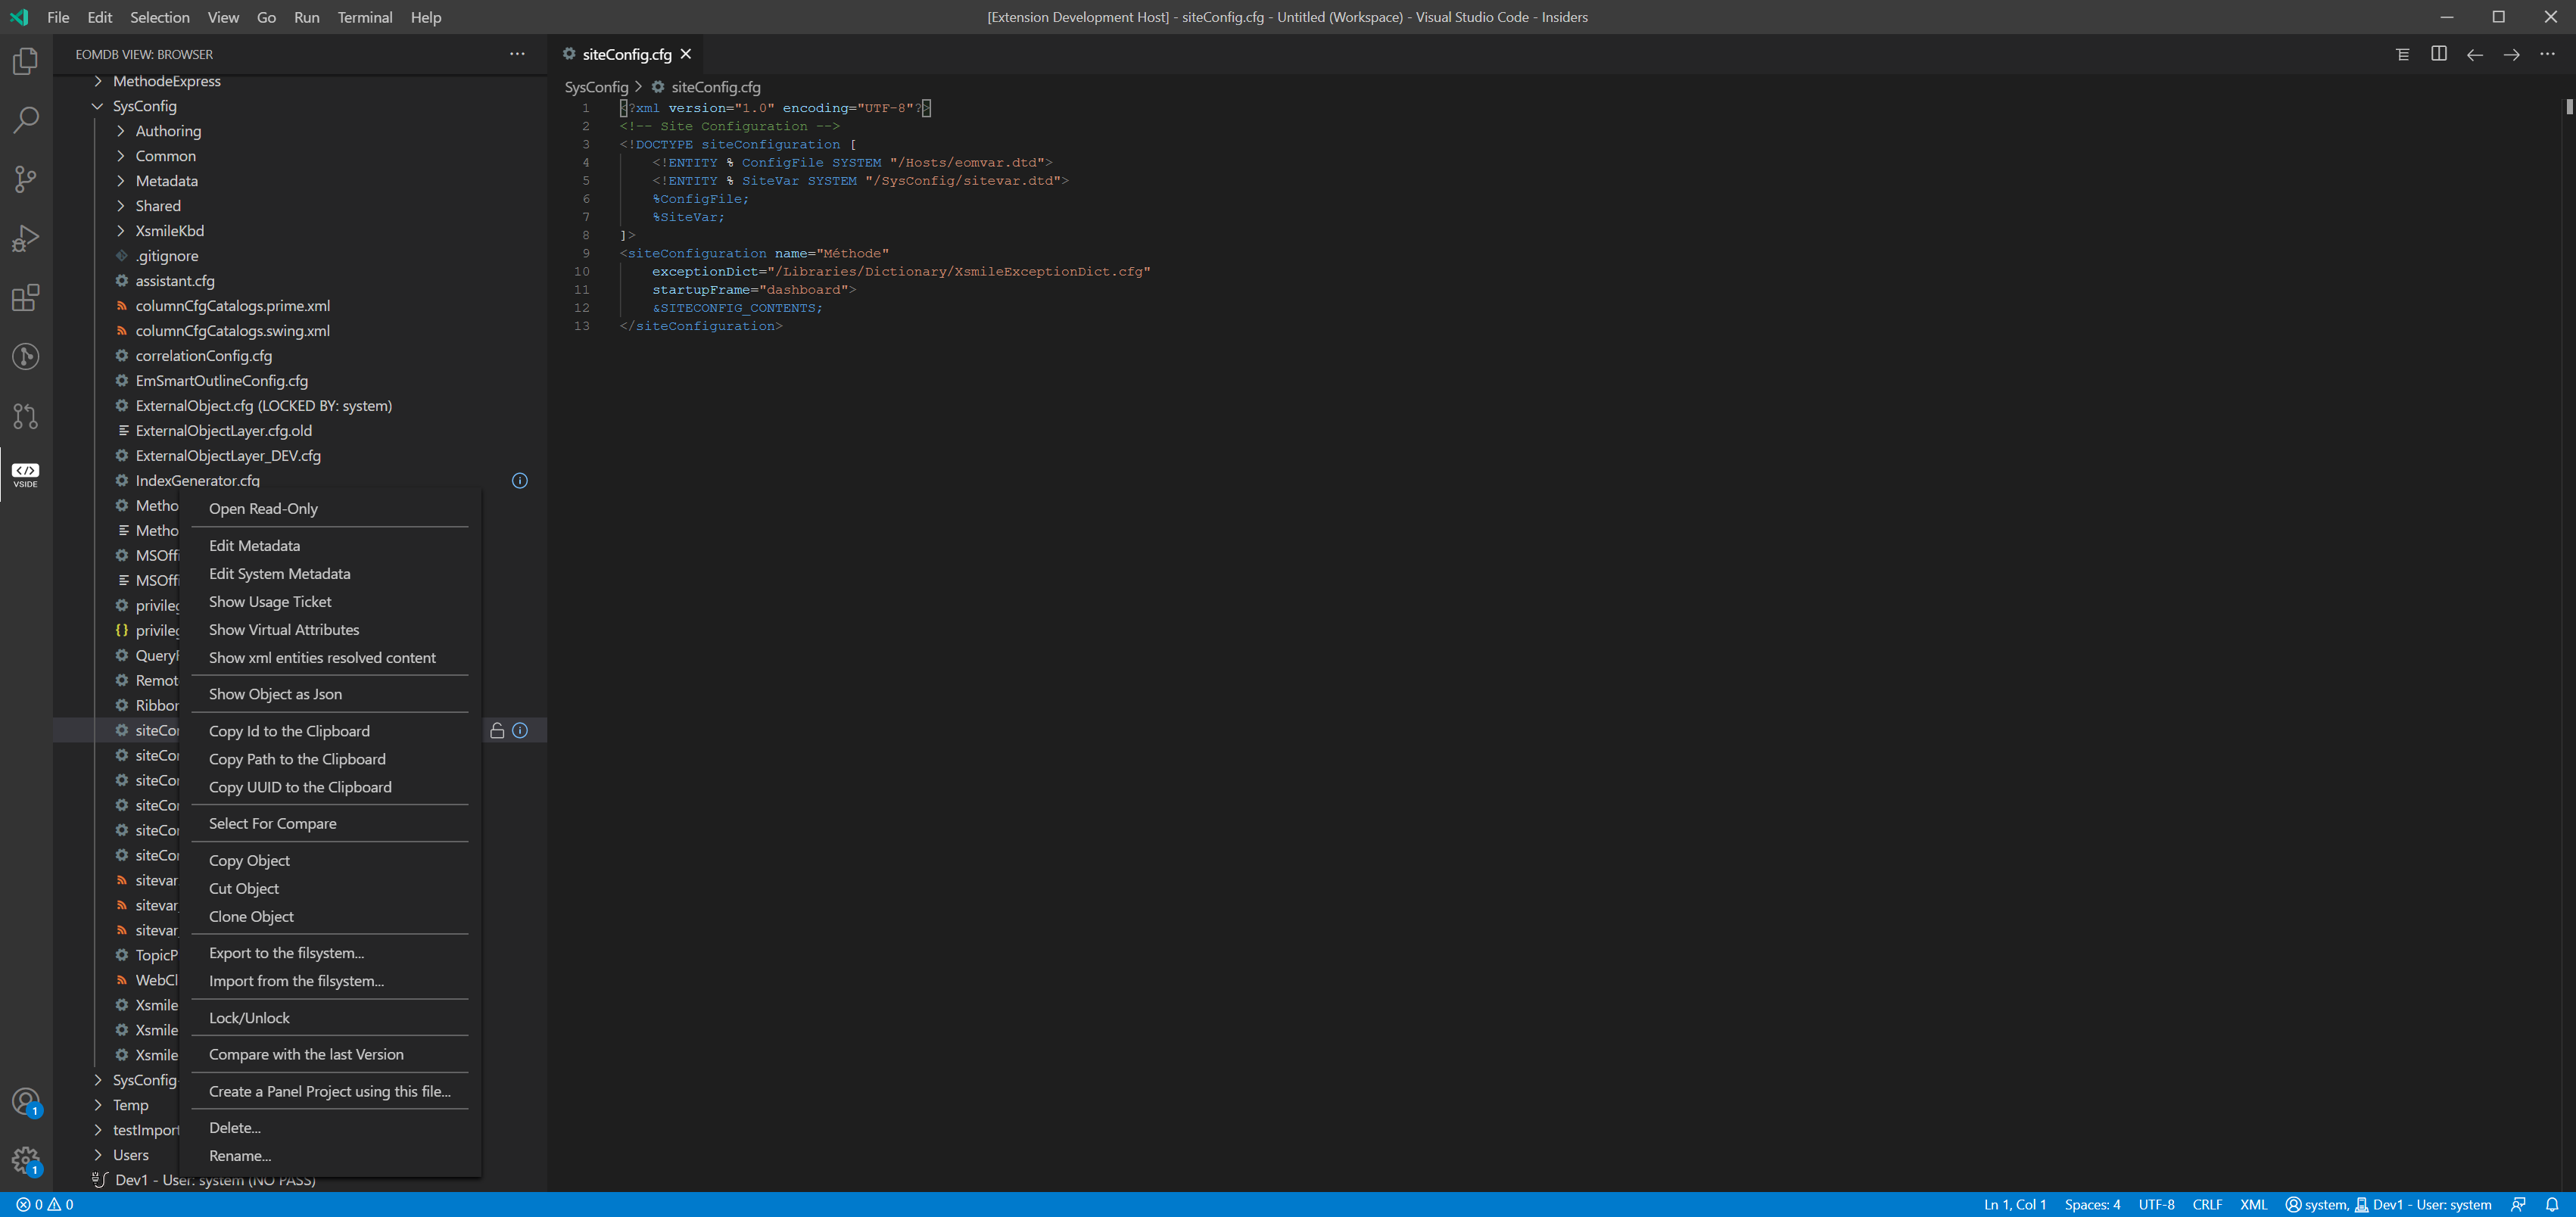
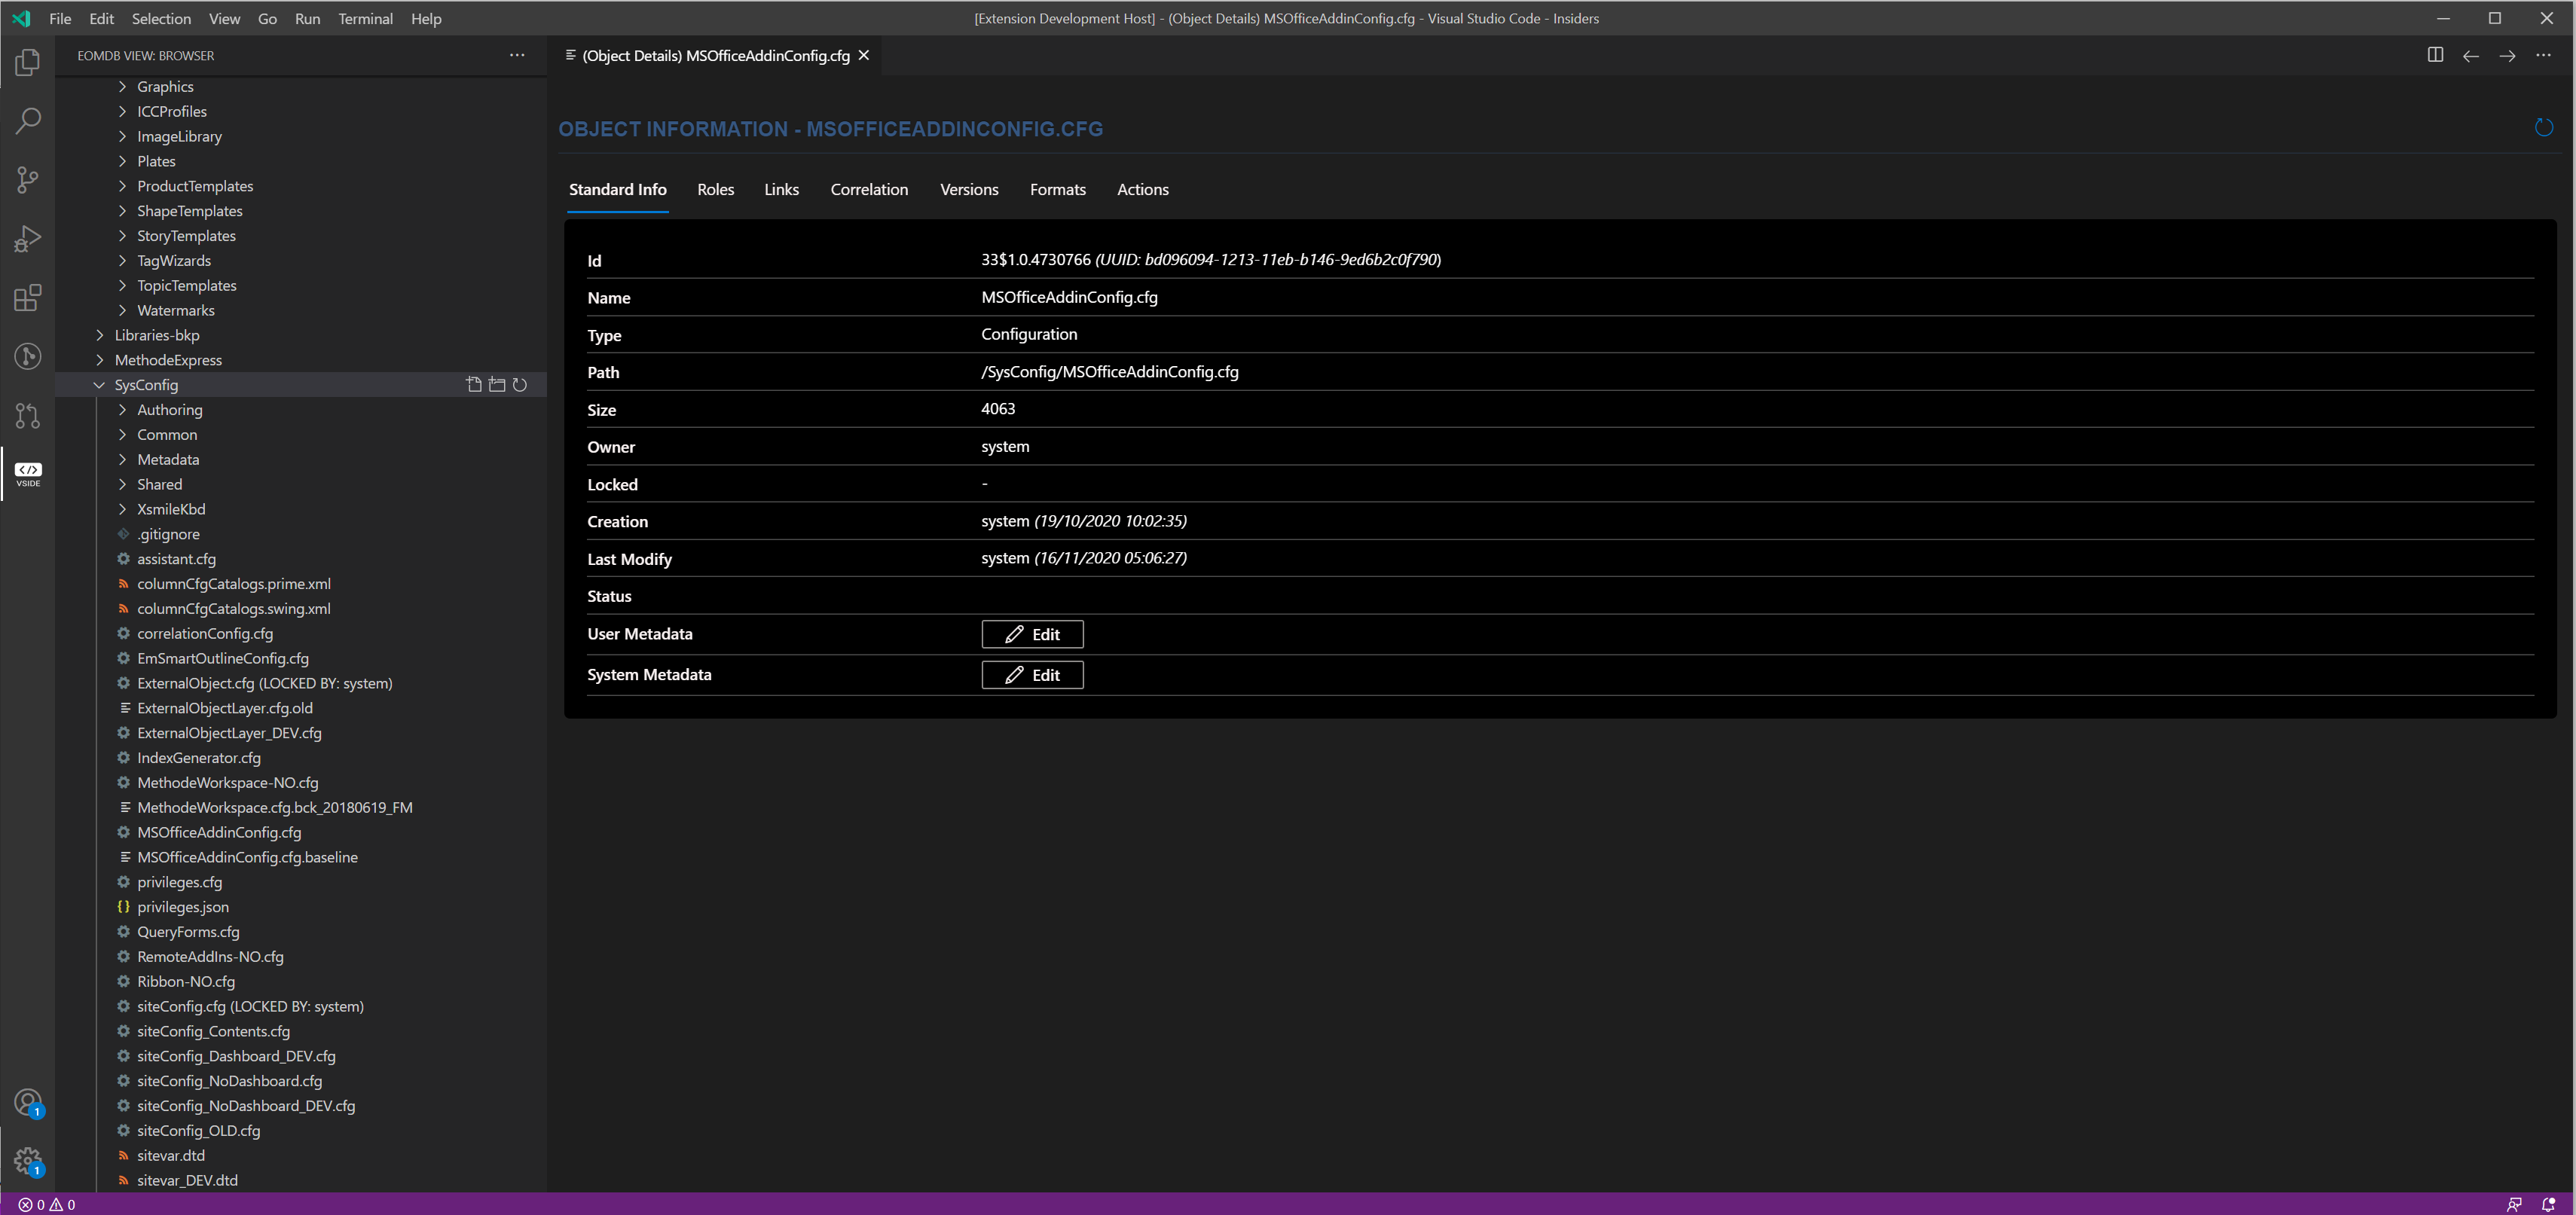
You can also have access to some advanced properties of an object just clicking on the (i) icon available on the right of the file name.
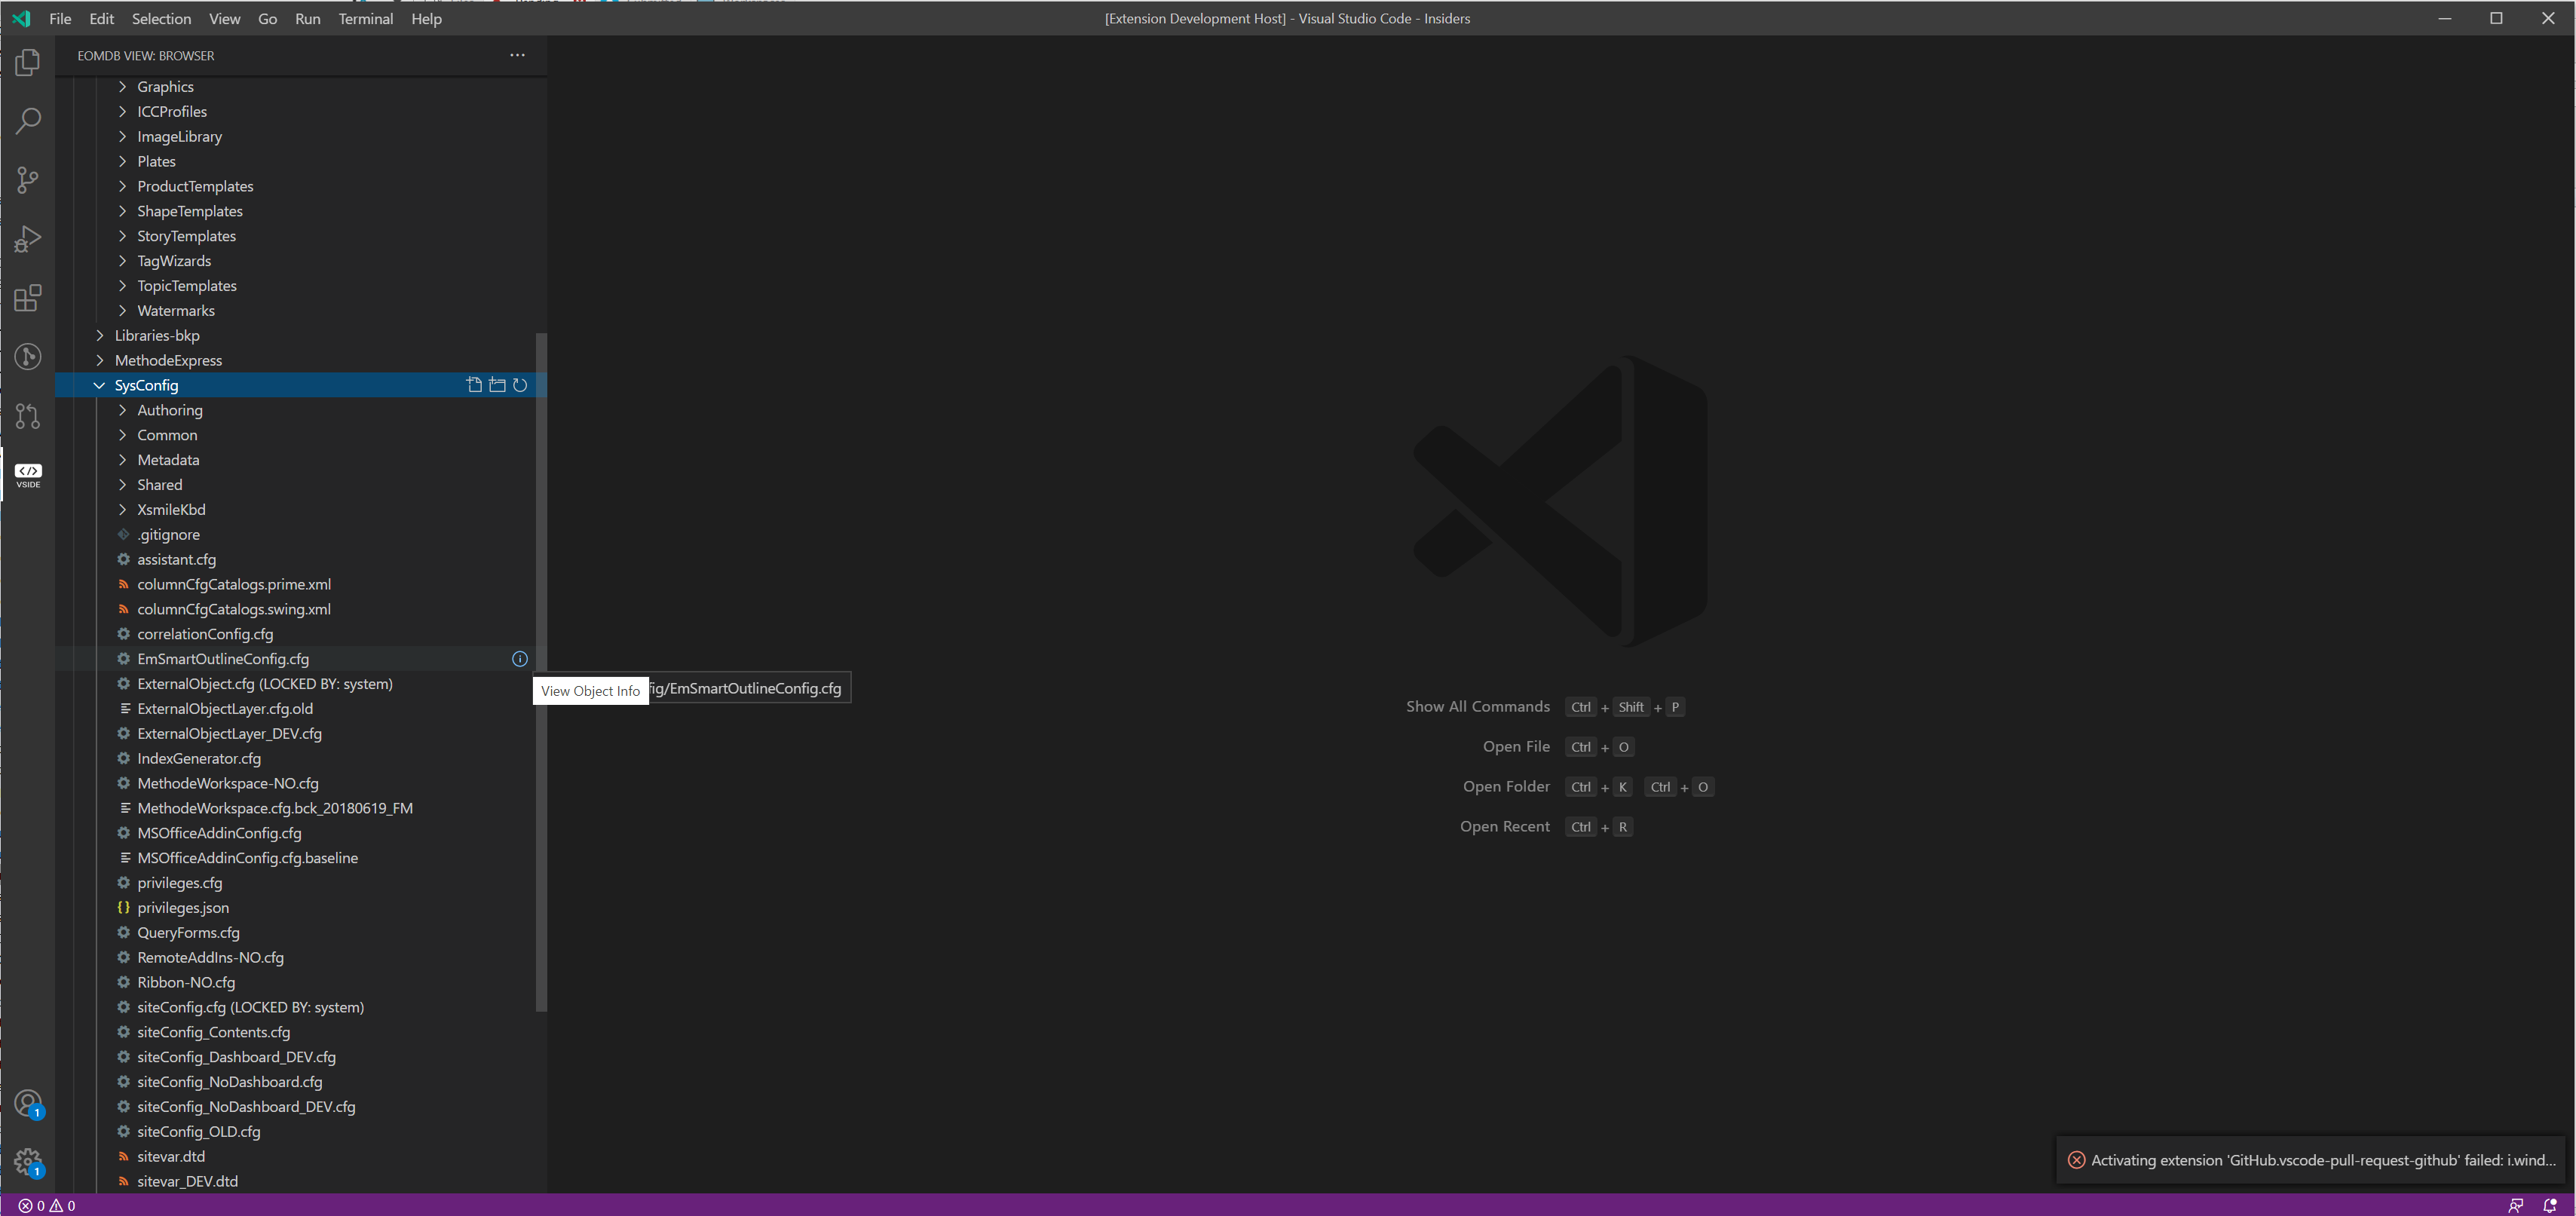
As you can see in the screenshot below, this way you have access to some EomDb properties such as: Roles, Correlations, Formats, Versions, etc…
6. IDE: a Development Tool
6.1. Introduction
The IDE part of the VSIDE provides you with a "controlled" environment where you can build some Méthode extensions. In details, VISDE, through the use of the native EM Shared Framework, allows you to build an extension panel which can run in both Prime and Swing with the same code.
VSIDE lets you develop your extensions directly inside Visual Studio Code without having to go back and forth to Prime or Swing for the testing activity, which would be a very time consuming task.
6.2. Supported Panels
Currently VSIDE supports the creation of two types of panel: the Object Panel and the Generic Panel.
Object Panel
The Object Panel is used to modify the object metadata. It works "connected" with a single object and you can have multiple Object panels based on the object type (you can have an object panel for images and another one for stories).
Generic Panel
The generic panel is a multipurpose extension panel and it can be used to any extension you want to add to Prime or Swing.
6.3. The Development Process: the benefits of using React and NodeJS
As you you will see in the next chapter, if you choose to use React, a NodeJS project will be created. NodeJS is becoming very popular in the web development as it brings along a lot of benefits:
-
better efficiency and overall developer productivity
-
code sharing and reuse
-
speed and performance
-
easy knowledge sharing within a team
-
a huge number of free tools
We want to highlight the power of the re-usability you can have with the React-NodeJS combination. React will let you create and share a lot of UI components. Moreover, using the Eidosmedia React Library you can start building your own user interface without any external inclusion. NodeJS on the middleware side lets you create shared modules which are more easy to test and maintain (for instance an XML parser module or a web service connector module).
6.4. Creating a panel through the Wizard
VSIDE comes along with a Wizard that will help you through the steps of the creation process. The screenshot below shows the main screen of the Wizard. The numbers on the screenshot will guide you through the various sections of the screen to be used to create your extension
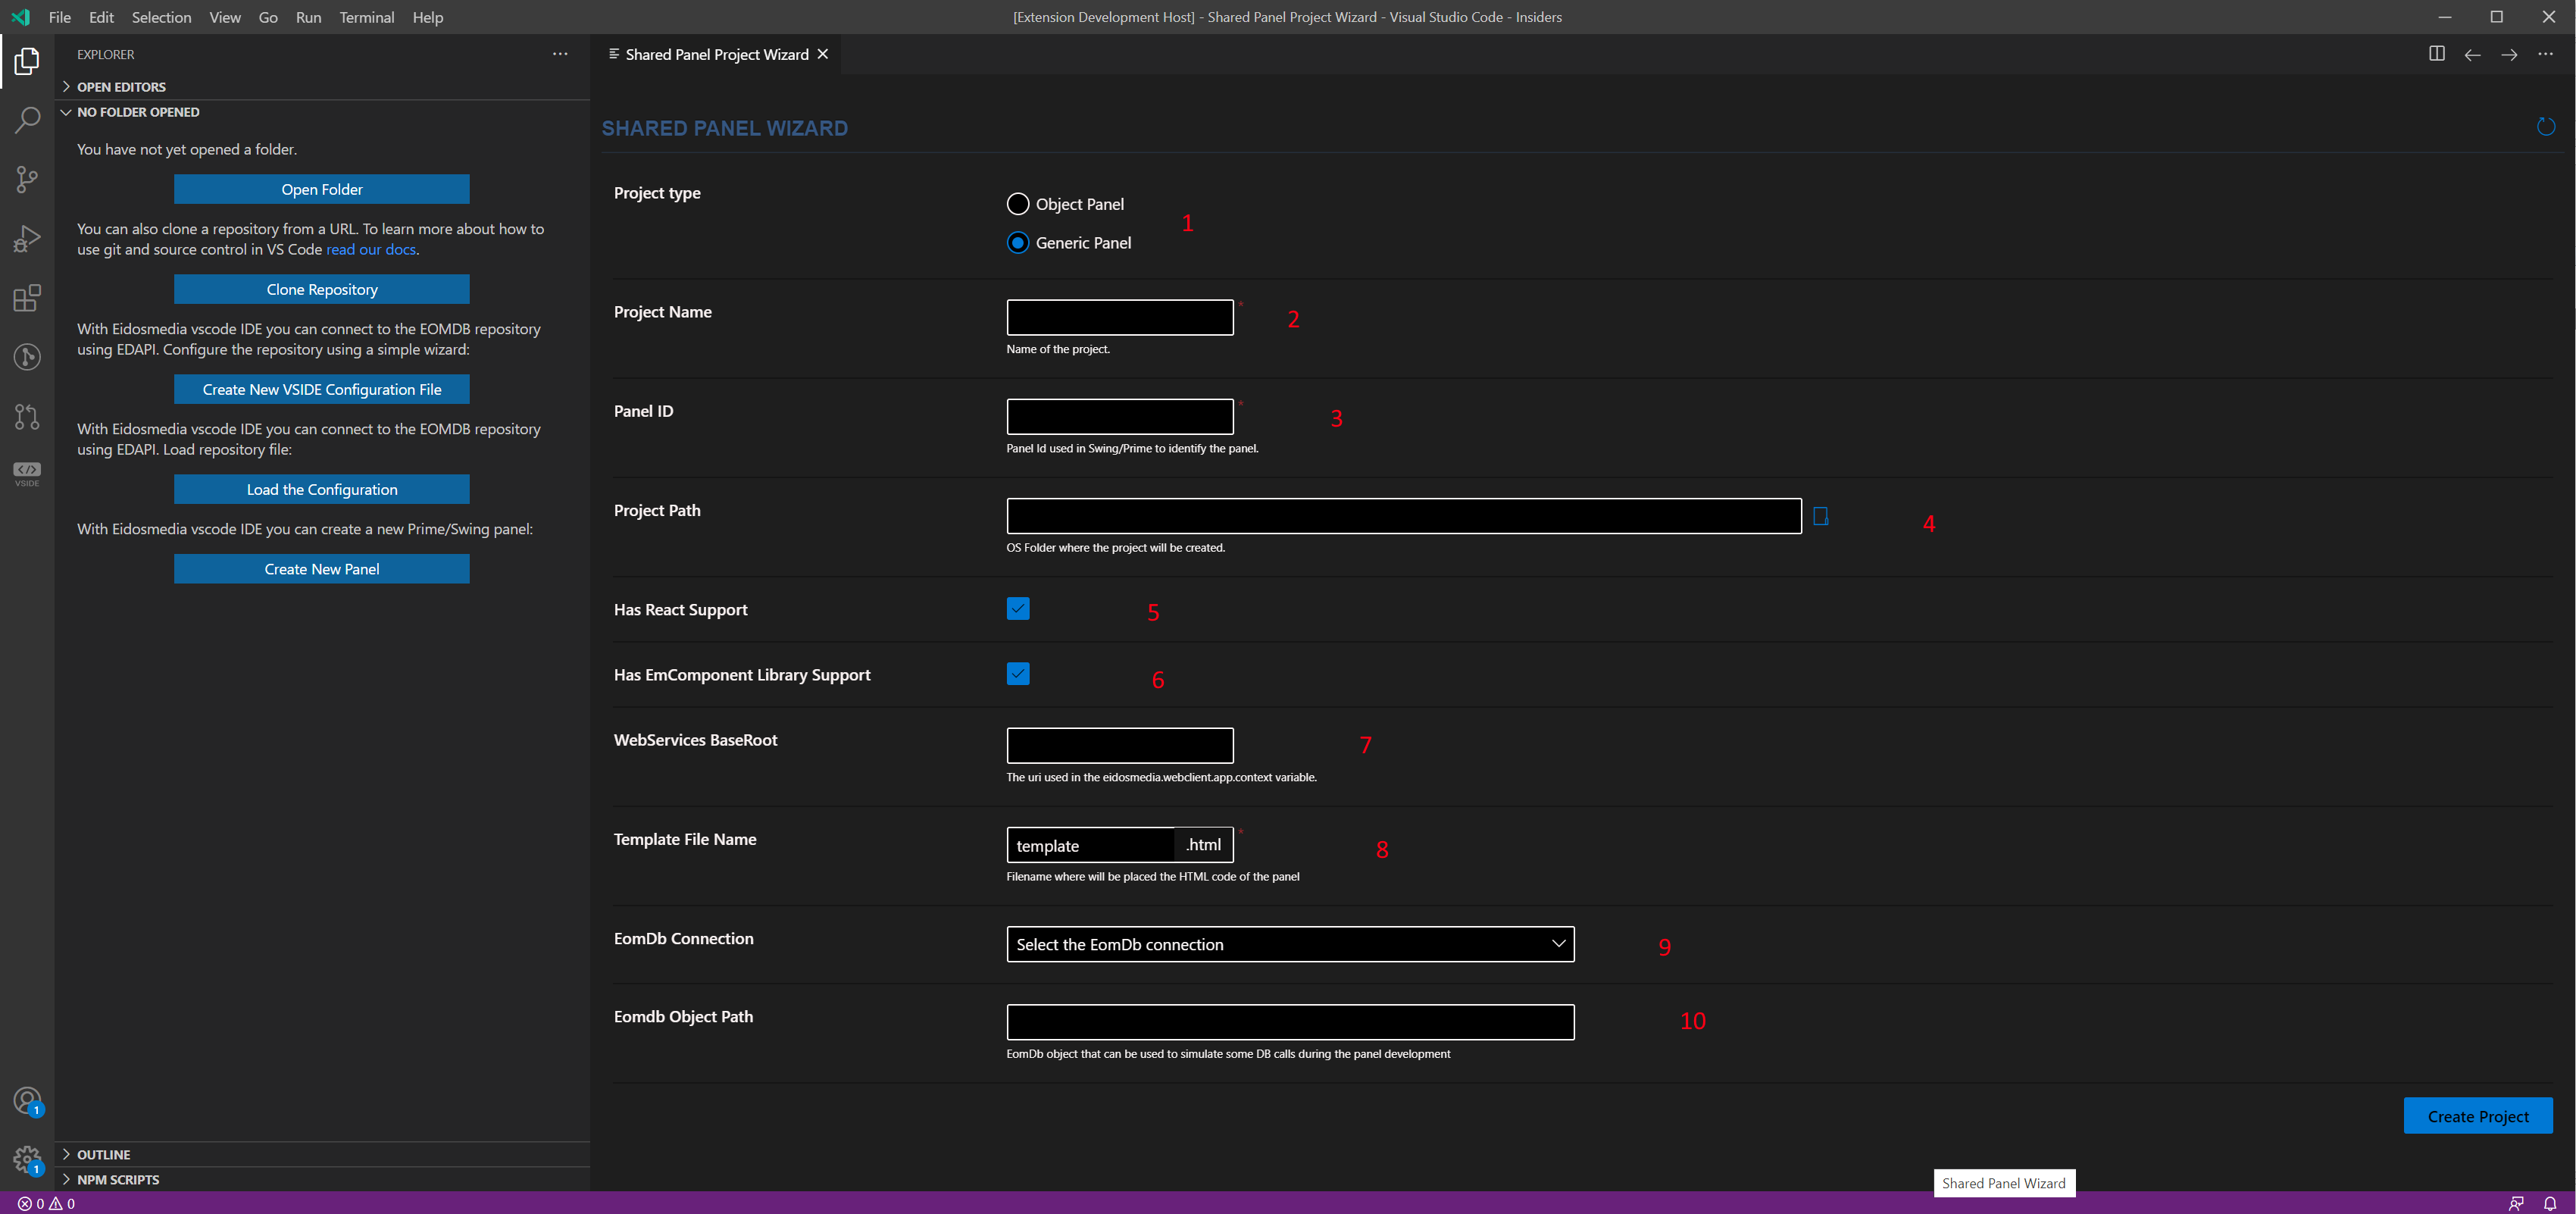
1 - Project Type
As anticipated in the introduction paragraph, VSIDE lets you create two types of panel: Object Panel and Generic Panel. In the "Project Type" section of the screen, choose the type of panel you want to create. Note that the generated code will change according to the chosen type of panel.
2 - Project Name
Type here a name to identify your project.
3 - Panel ID
Here you must enter the unique name (ID) of the panel. This id will be internally used by Prime and Swing in order to load the panel in the user interface. Since, as you will see later on, a project can have multiple panels, having a unique ID will bring along several benefits:
it lets you share the UI Components and NodeJS modules developed for one panel in all other panels it lets you have only one project for all your extensions (one repository, one deploy, etc.) it lets you have a clearly defined project so that multiple developers can work together at the same code
4 - Project Path
Enter here the path where the project will be saved.
5 - Has React Support
This option allows you to enable the react support into your project. React needs a complex development environment to be set up, by enabling this option, VSIDE will create it for you, therefore it is recommended to flag it.
6 - Has EmComponent Library Support
If you choose to have the React Support enabled (see previous step), you can also enable the inclusion of the Em React Library which lets you have a ready-to-use components that have the unique capability to follow the UI/UX of the client where the panel will run. Note that in Prime the UI will be office-like, while in Swing it will be more web oriented.
7 - WebService BaseRoot
This is a parameter used in case Prime should call external web services, it lets Prime know how to easily access them (for further information, please see the documentation of the EM Shared Panels here).
8 - Template File Name
Specify here the name of the HTML template file which will then be used to implement the panel.
9 - EomDb Connection \ 10 - Eomdb Object Path
The power of the IDE of VSIDE is that you can develop your panels directly inside the Visual Studio Code without having to go to Prime or Swing.
By enabling this feature, choosing the connection to be used, VSIDE emulates the same environment of Prime or Swing. This emulation not only starts a UI/UX but it is completed by a real back-end connection in order to let you use all the APIs that extract information from the EomDb objects.
Through these options, you will provide a back-end connection and a real EomDb object you can use as a "pilot" in your development.
For example, if you provide a path of your "pilot" report, VSIDE will emulate the same scenario you would have having the report loaded in Prime or Swing and the panel opened alongside the editor.
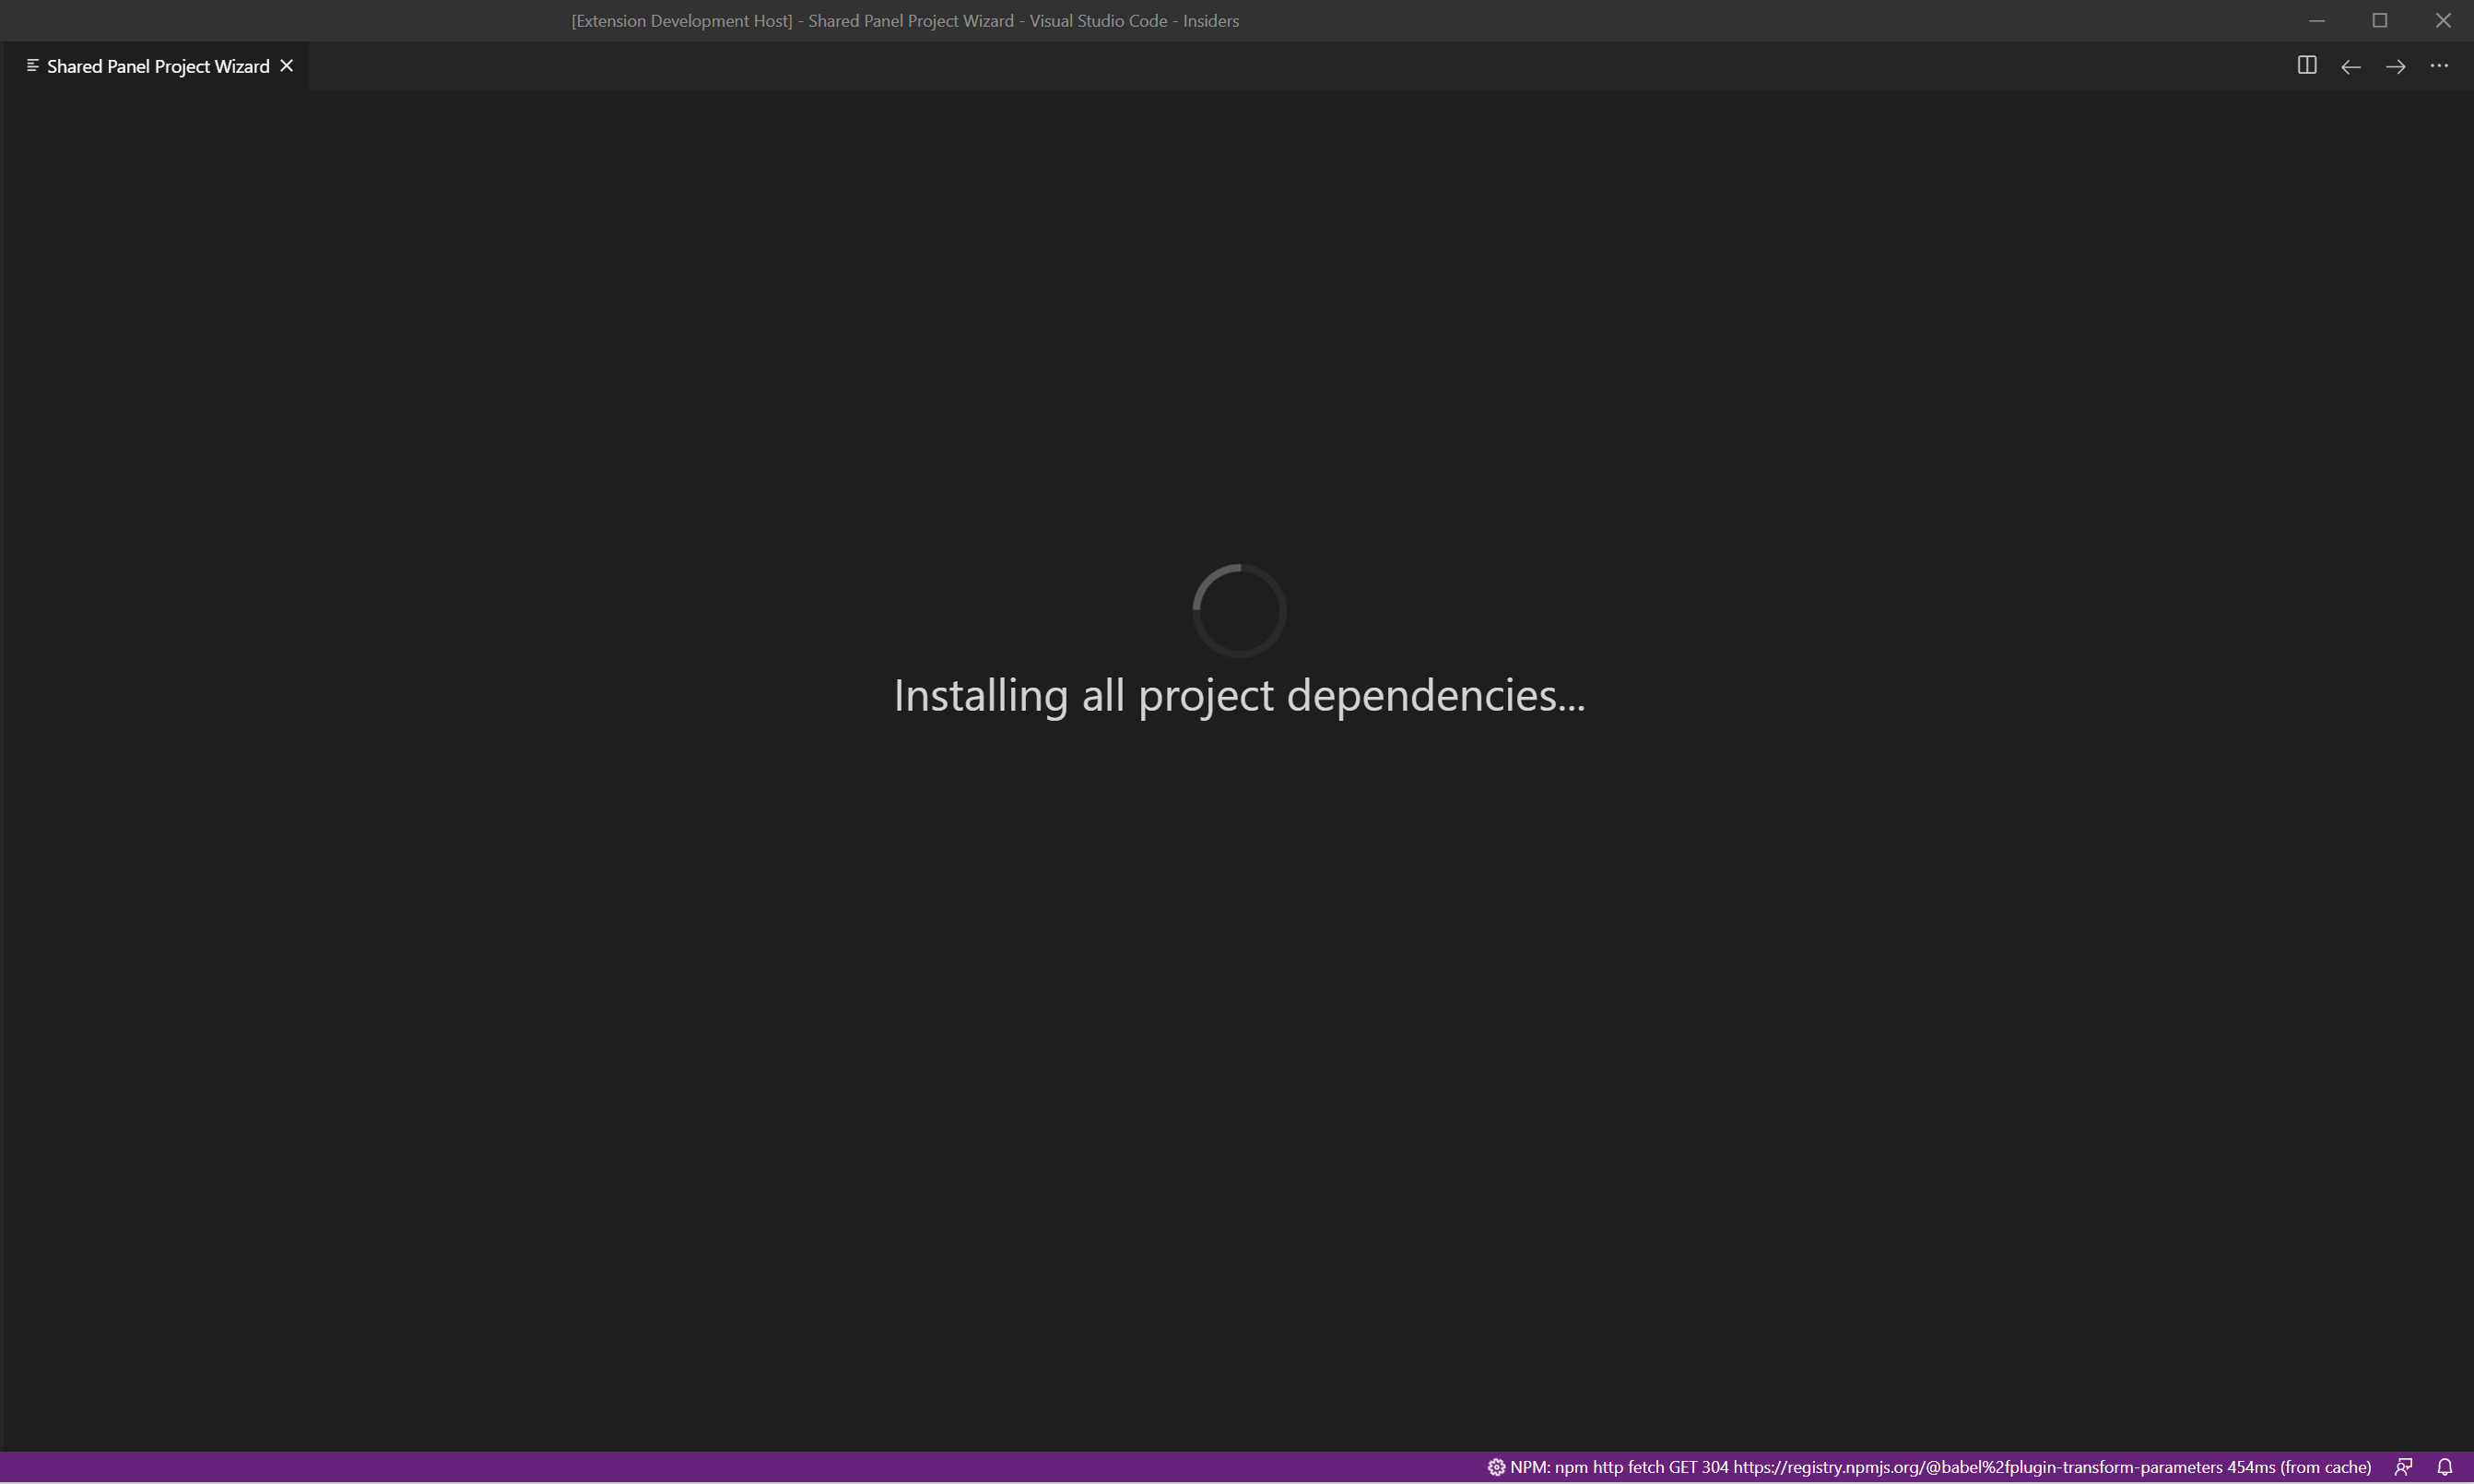
Once you have inserted all the requested data, as per the guidelines above, you can click on the "Create Project" button in the bottom right corner of the Wizard screen.
VSIDE will start to download all the NPM modules; note that this process can take a while.
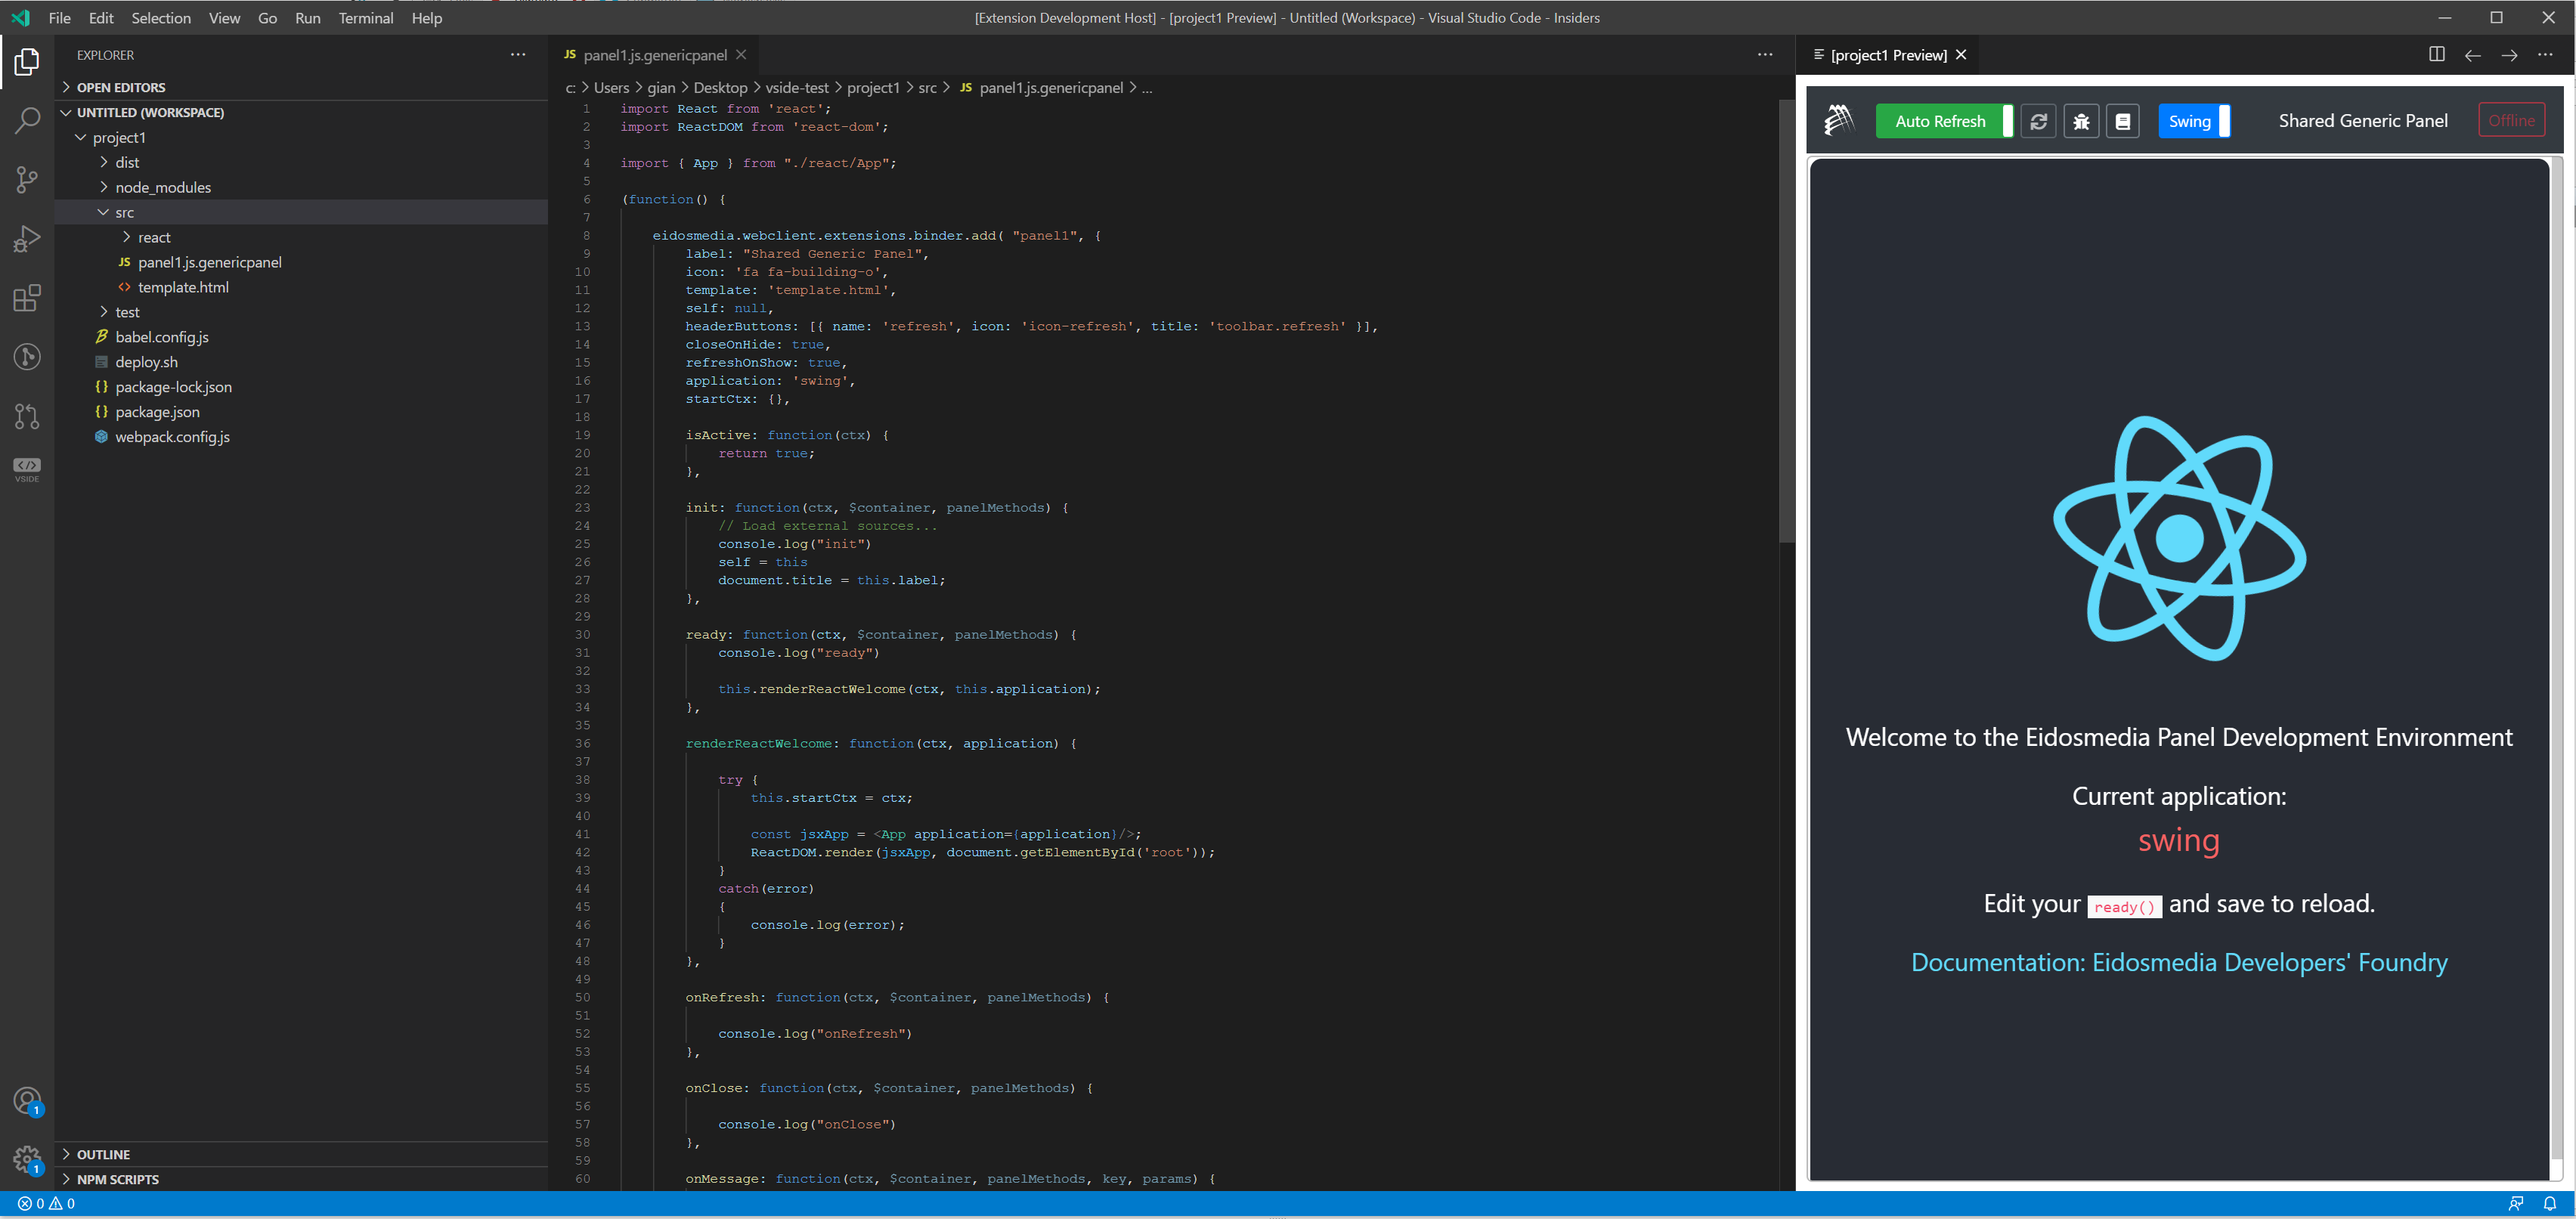
Once finished, the environment is ready and will look similar to the example screenshot below. The numbers on the screenshot will guide you through.
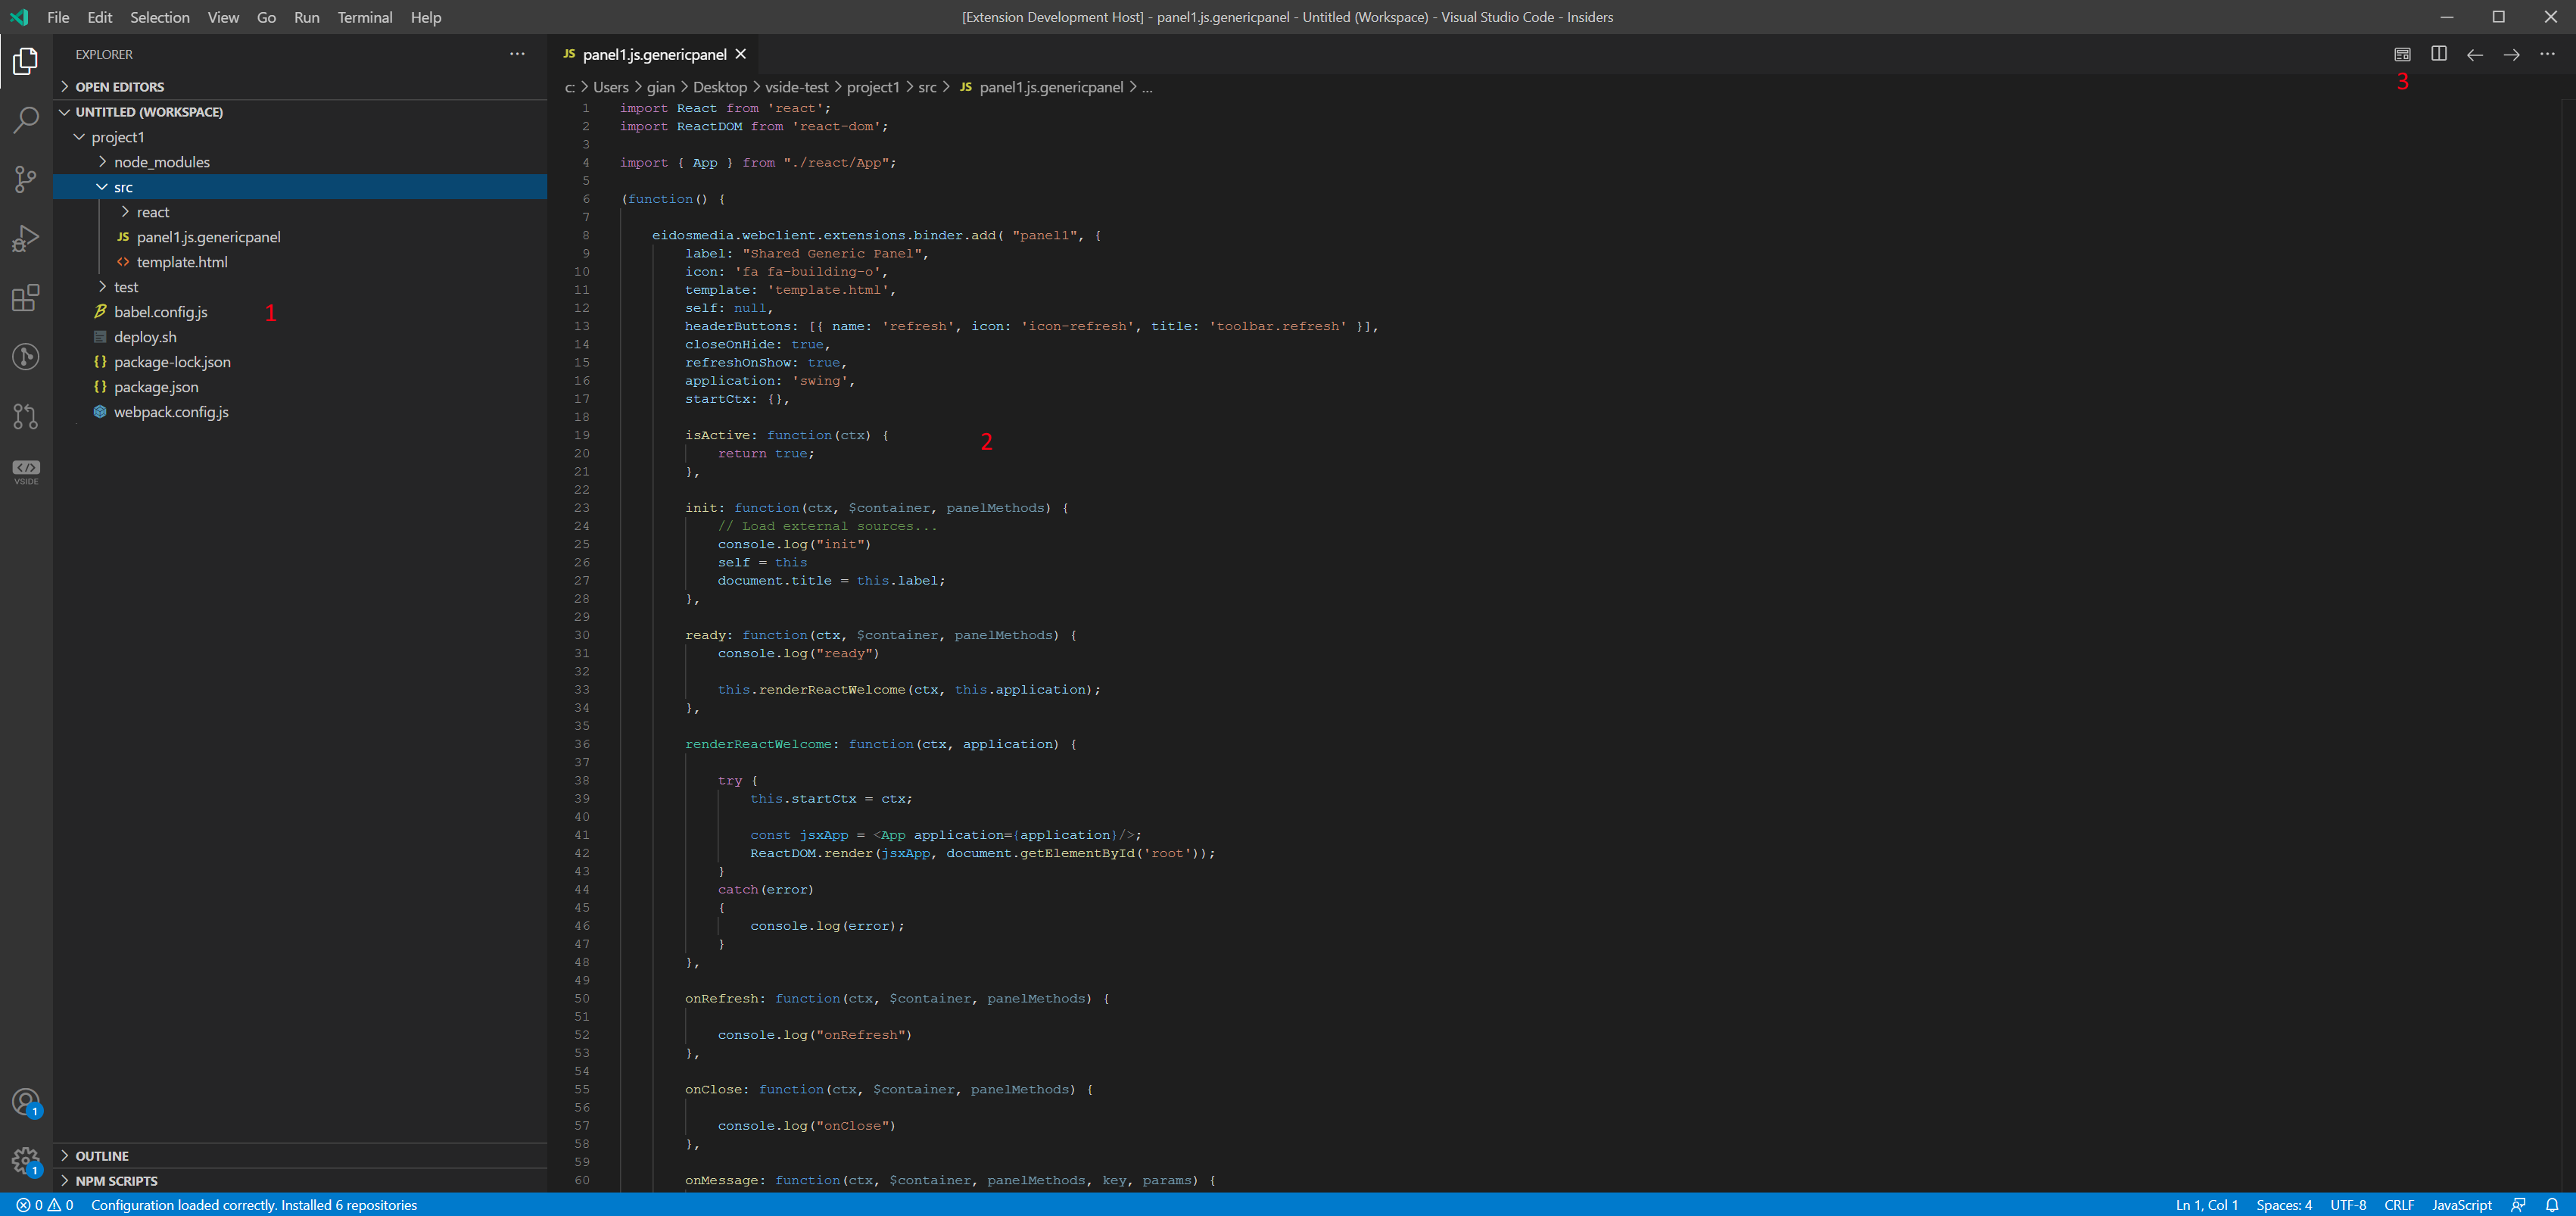
1 - Explorer Area
Here you can see the files created by VSIDE. The JS file related to your panel in this case is named "panel1.js.genericpanel" and the HTML file has been named "template.html".
2 - File structure
The file "panel1.js.genericpanel" contains the interface of the Eidosmedia Shared Framework. You can start implementing the methods of the interface according to the Em Shared Framework documentation (here).
3 - Toolbar
While your are editing the panel source code (*.genericpanel or *.objectpanel) you have the option to display a real time preview of the panel. The project created with the wizard will display a react component.
6.5. The Preview Panel
The preview of the panel you are implementing contains some tools that can improve your productivity while building the extension. The screenshot below shows the preview of a generic panel; the numbers on the screenshot will guide you to use the available tools.
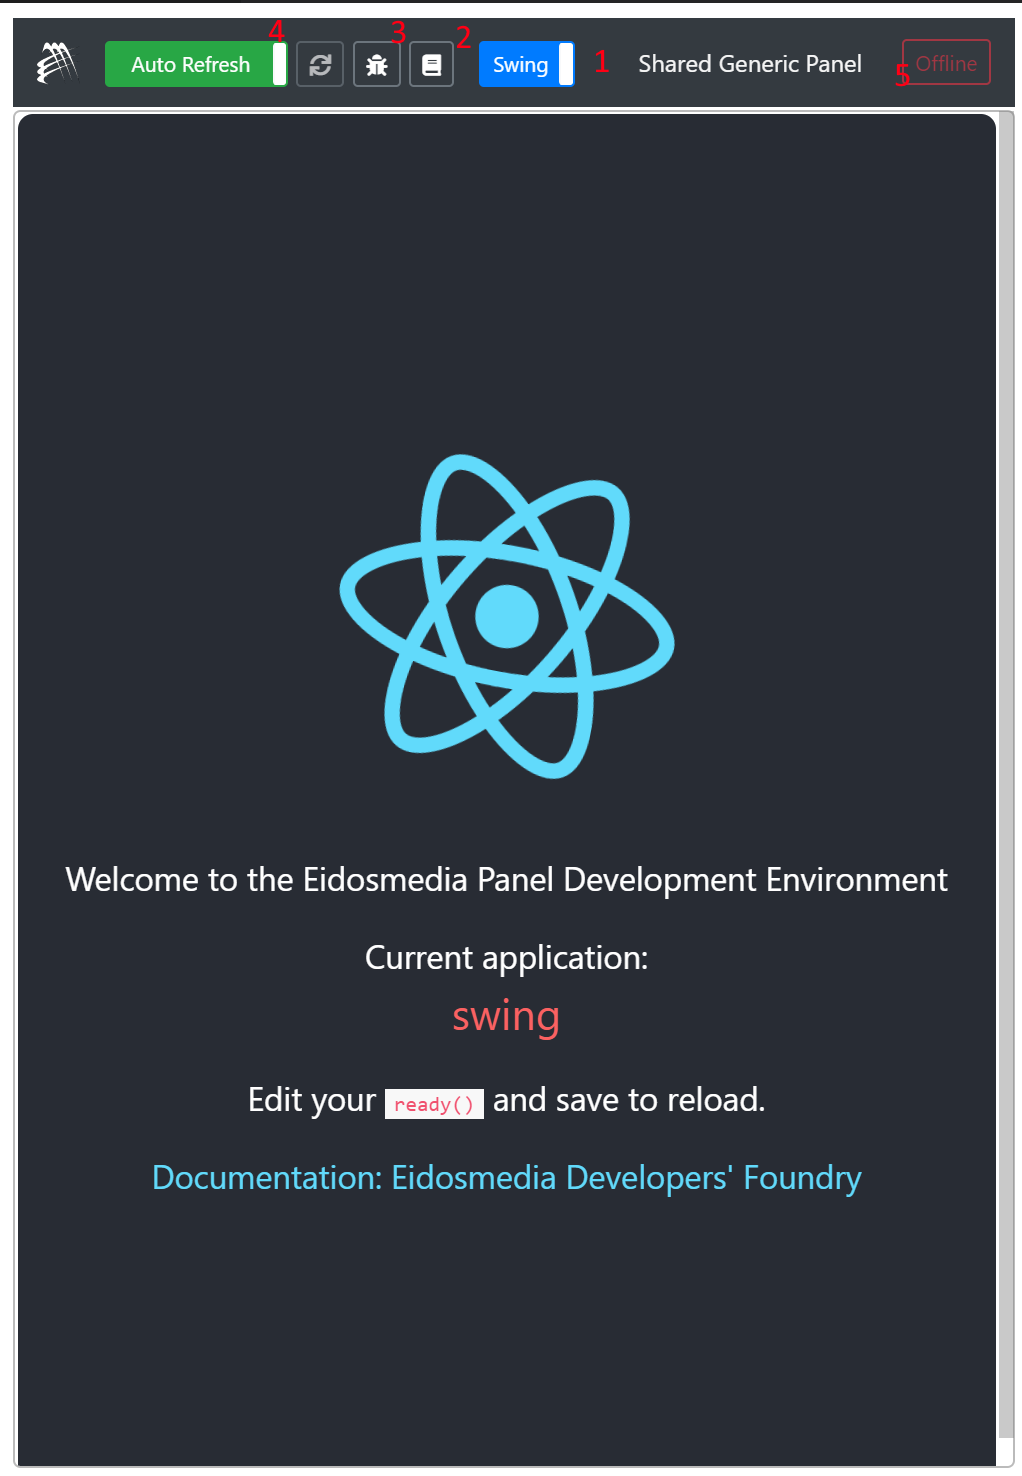
1 - Switch button to choose the UI
By using the Eidosmedia React Component library, the UI/UX will be always aligned with the application where the panel is currently running. During the development phase, you can easily switch between applications (Swing or Prime) by using the switch button shown in the image above. The UI will change according to the currently selected application.
2 - Available documentation
Through this button you access the documentation (namely the Storybook) of the EM React Component where you can find the list of all the available components and a lot of suggestions about the best approach for the UI/UX building.
3 - Debugger
The preview is hosted by a Visual Studio Code web view which is essentially a Chrome panel (sand-boxed). Clicking on this button you access the debugger which allows you to see the console messages and to put some breakpoints to debug your code.
4 - Auto Refresh command
The panel will be automatically updated every time you modify your code. Sometimes (mostly at the beginning of the project) this activity could be time consuming. To overcome this, you can disable the auto-update feature (and manual refresh your panel only when needed) by clicking on this button. To enable it anew, click again on the button.
5 - Offline\Online status
The OFFLINE\ONLINE message tells you if the "panel emulation" is connected with the back-end and has some valid objects to work with.
You can specify the connection\object to be used whie using the panel wizard. You can also specify or change this configuration later through the package.json file.
The package.json is the project file of every nodejs project. VSIDE has a custom section in this file used to configure some project settings including the back-end connection configuration. See the "VSIDE "package.json" Custom Properties" for more details.
6.6. VSIDE "package.json" Custom Properties
In order to create a preview inside Visual Studio Code you need to have some "custom" properties inside the package.json file. These properties are the same that you usually must configure to run the panels in Prime.
Usually these properties are written by the Wizard itself during the panel creation. However, if you want, you can change some of them during the development phase. Find below an example of package.json file and its structure.
package.json file
"emvs": {
    "sharedpanel": {
        "type": "",
        "reactSupport": true|false,
        "swingversion": "4.1.0",
        "repositoryConnectionId": "",
        "objectId": "",
        "objectPath" : "",
        "webServicesBaseRoot": "",
        "extraJs": [],
        "extraCss": [],
        "automaticRefresh": true
    }
}
The parameters present in the package.json file are:
-
type: the type of the shared panel. Its value can be "objectpanel" or "genericpanel".
-
reactSupport: allows you to define whether the React support will be enabled in the panel. Possible values are true (React support enabled) or false.
-
swingversion: the version of the Swing framework.
-
repositoryConnectionId: the id of the repository in the configured in the *.vside configuration file. If the panel works connected with the EOMDB, it will use this connection.
-
objectId: the object Id (in the EDAPI format) used to retrieve the information in case the panel should work with the activeObject.
-
objectPath: the object Path (in the EDAPI format) used to retrieve the information in case the panel should work with the activeObject.
-
webServicesBaseRoot: the Swing app context. It will be saved in the variable: eidosmedia.webclient.app.context.
-
extraJs: extra JS used by the panel project.
-
extraCss: extra CSS used by the panel project.
-
automaticRefresh: lets you decide whether the panel preview must be automatically refreshed when some files in the panel project change. Possible values are: true (automatic refresh is enabled) or false.
7. Import\Export of objects
7.1. Introduction
VSIDE can import\export the database objects to save them into any version control system such as GIT, Subversion etc…
VSIDE does not implement any direct function of versioning with any external program, it only gives you the possibility to "serialize" the object into the file system and viceversa.
7.2. Configuring and using the Import\Export operations
To help the user minimize the UI gestures, the import/export functionality must be configured in the same configuration file used by VISDE to load the repository connection data (the procedure to configure the repositories and the connections is described here).
Below an example of a standard ".vside" file with one repository configured:
{
    "repositories": [
        {
            "label": "Dev - Ps02",
            "id": "ps02",
            "uriMras": "http://qa-test1:8080/restapi/rest",
            "connectionId": "edapiconn1",
            "username": "EidosTest1",
            "password": "password",
            "enable": true
        }
    ]
}
To enable the import/export function, you must add a new "export" property having a list of mappings which map an EomDb Folder and a file system folder, as shown below
{
    "repositories": [
        {
            "label": "Dev - Ps02",
            "id": "ps02",
            "uriMras": "http://qa-test1:8080/restapi/rest",
            "connectionId": "edapiconn1",
            "username": "EidosTest1",
            "password": "password",
            "enable": true,
            "export": [
                {"eomdb": "/Libraries/", "local": "C:/test/export1" },
                {"eomdb": "/Temp/", "local": "C:/test/export2" }
            ]
        }
    ]
}
The export property will map one or more directories of the EOMDB with as many directories on the file system. In the above example the folder "/Libraries/" of the EOMDB will be exported to\ imported from the "export1" folder of the local file system while the folder "/Temp/" of the EOMDB will be exported to\imported from the "export2" folder of the local file system.
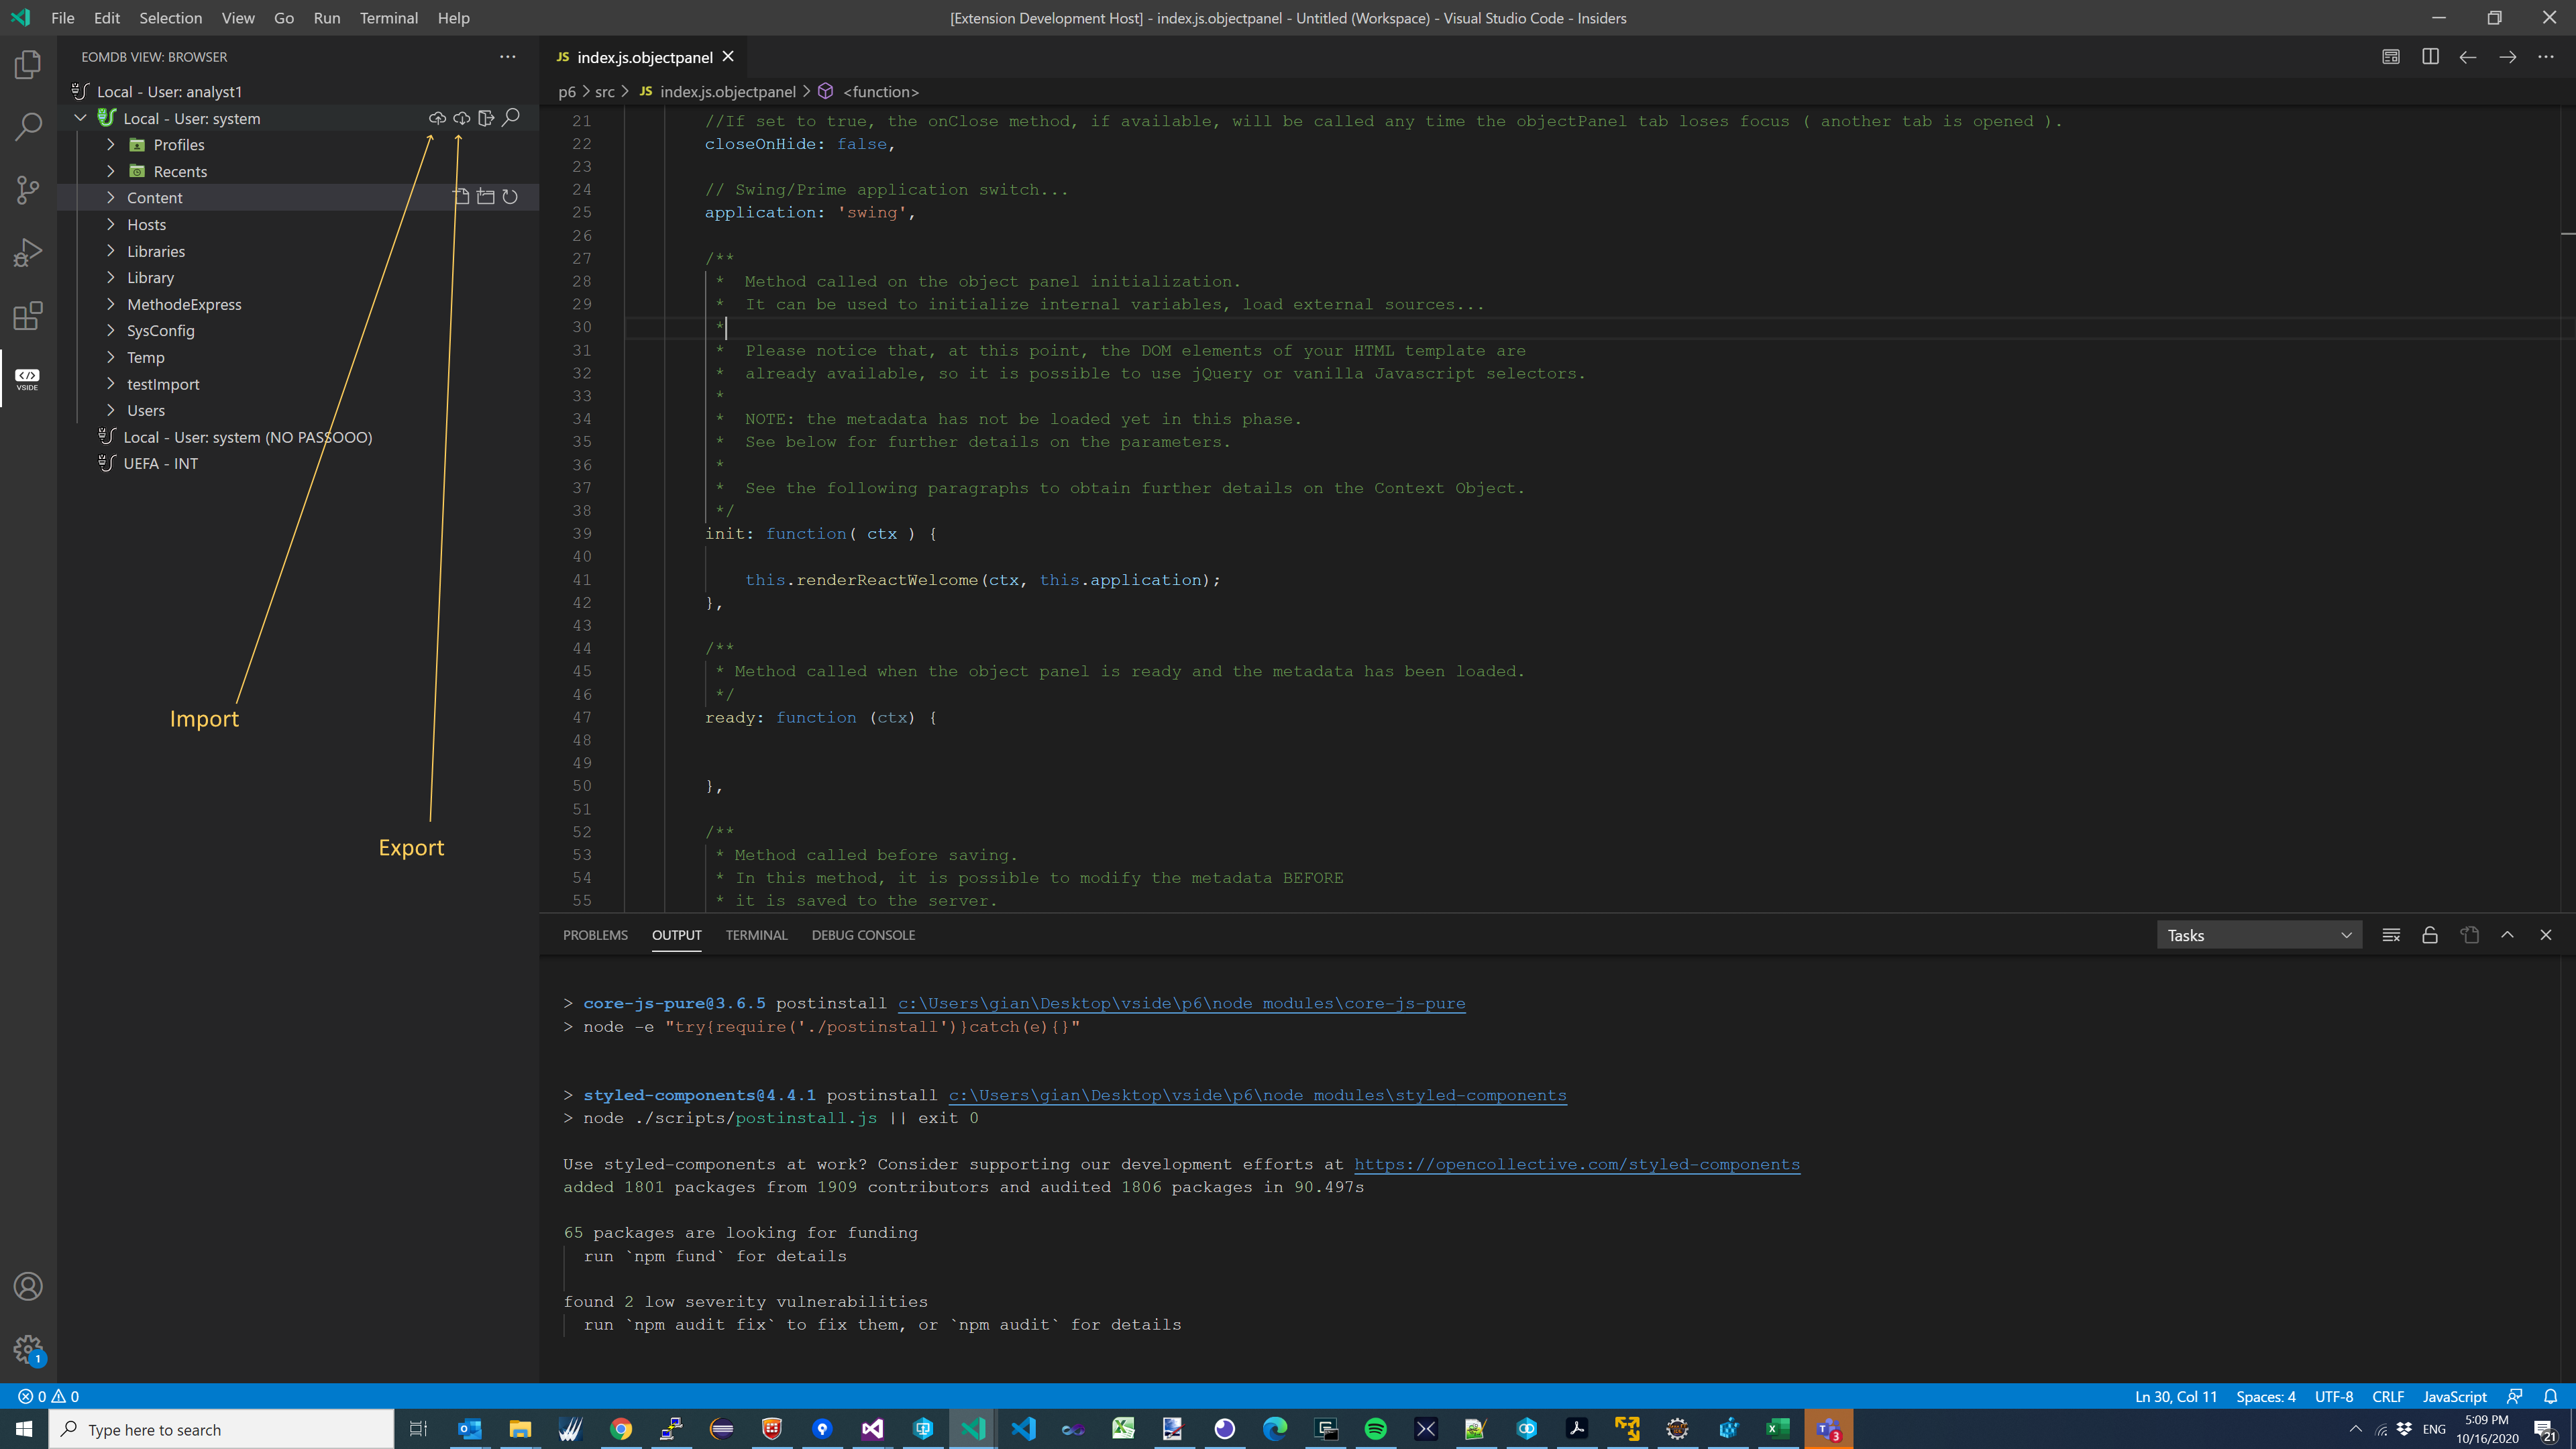
Once the "export" property has been configured, two new buttons will be available inside the VSIDE UI: Import and Export, as you can see in the image below.
By clicking one of the buttons, the related operation will start.
7.3. Import\Export Report
After the execution of an Import or Export action, a report page will be generated and displayed. The report will give you the list of all the files imported or exported with the result of the relevant operation.
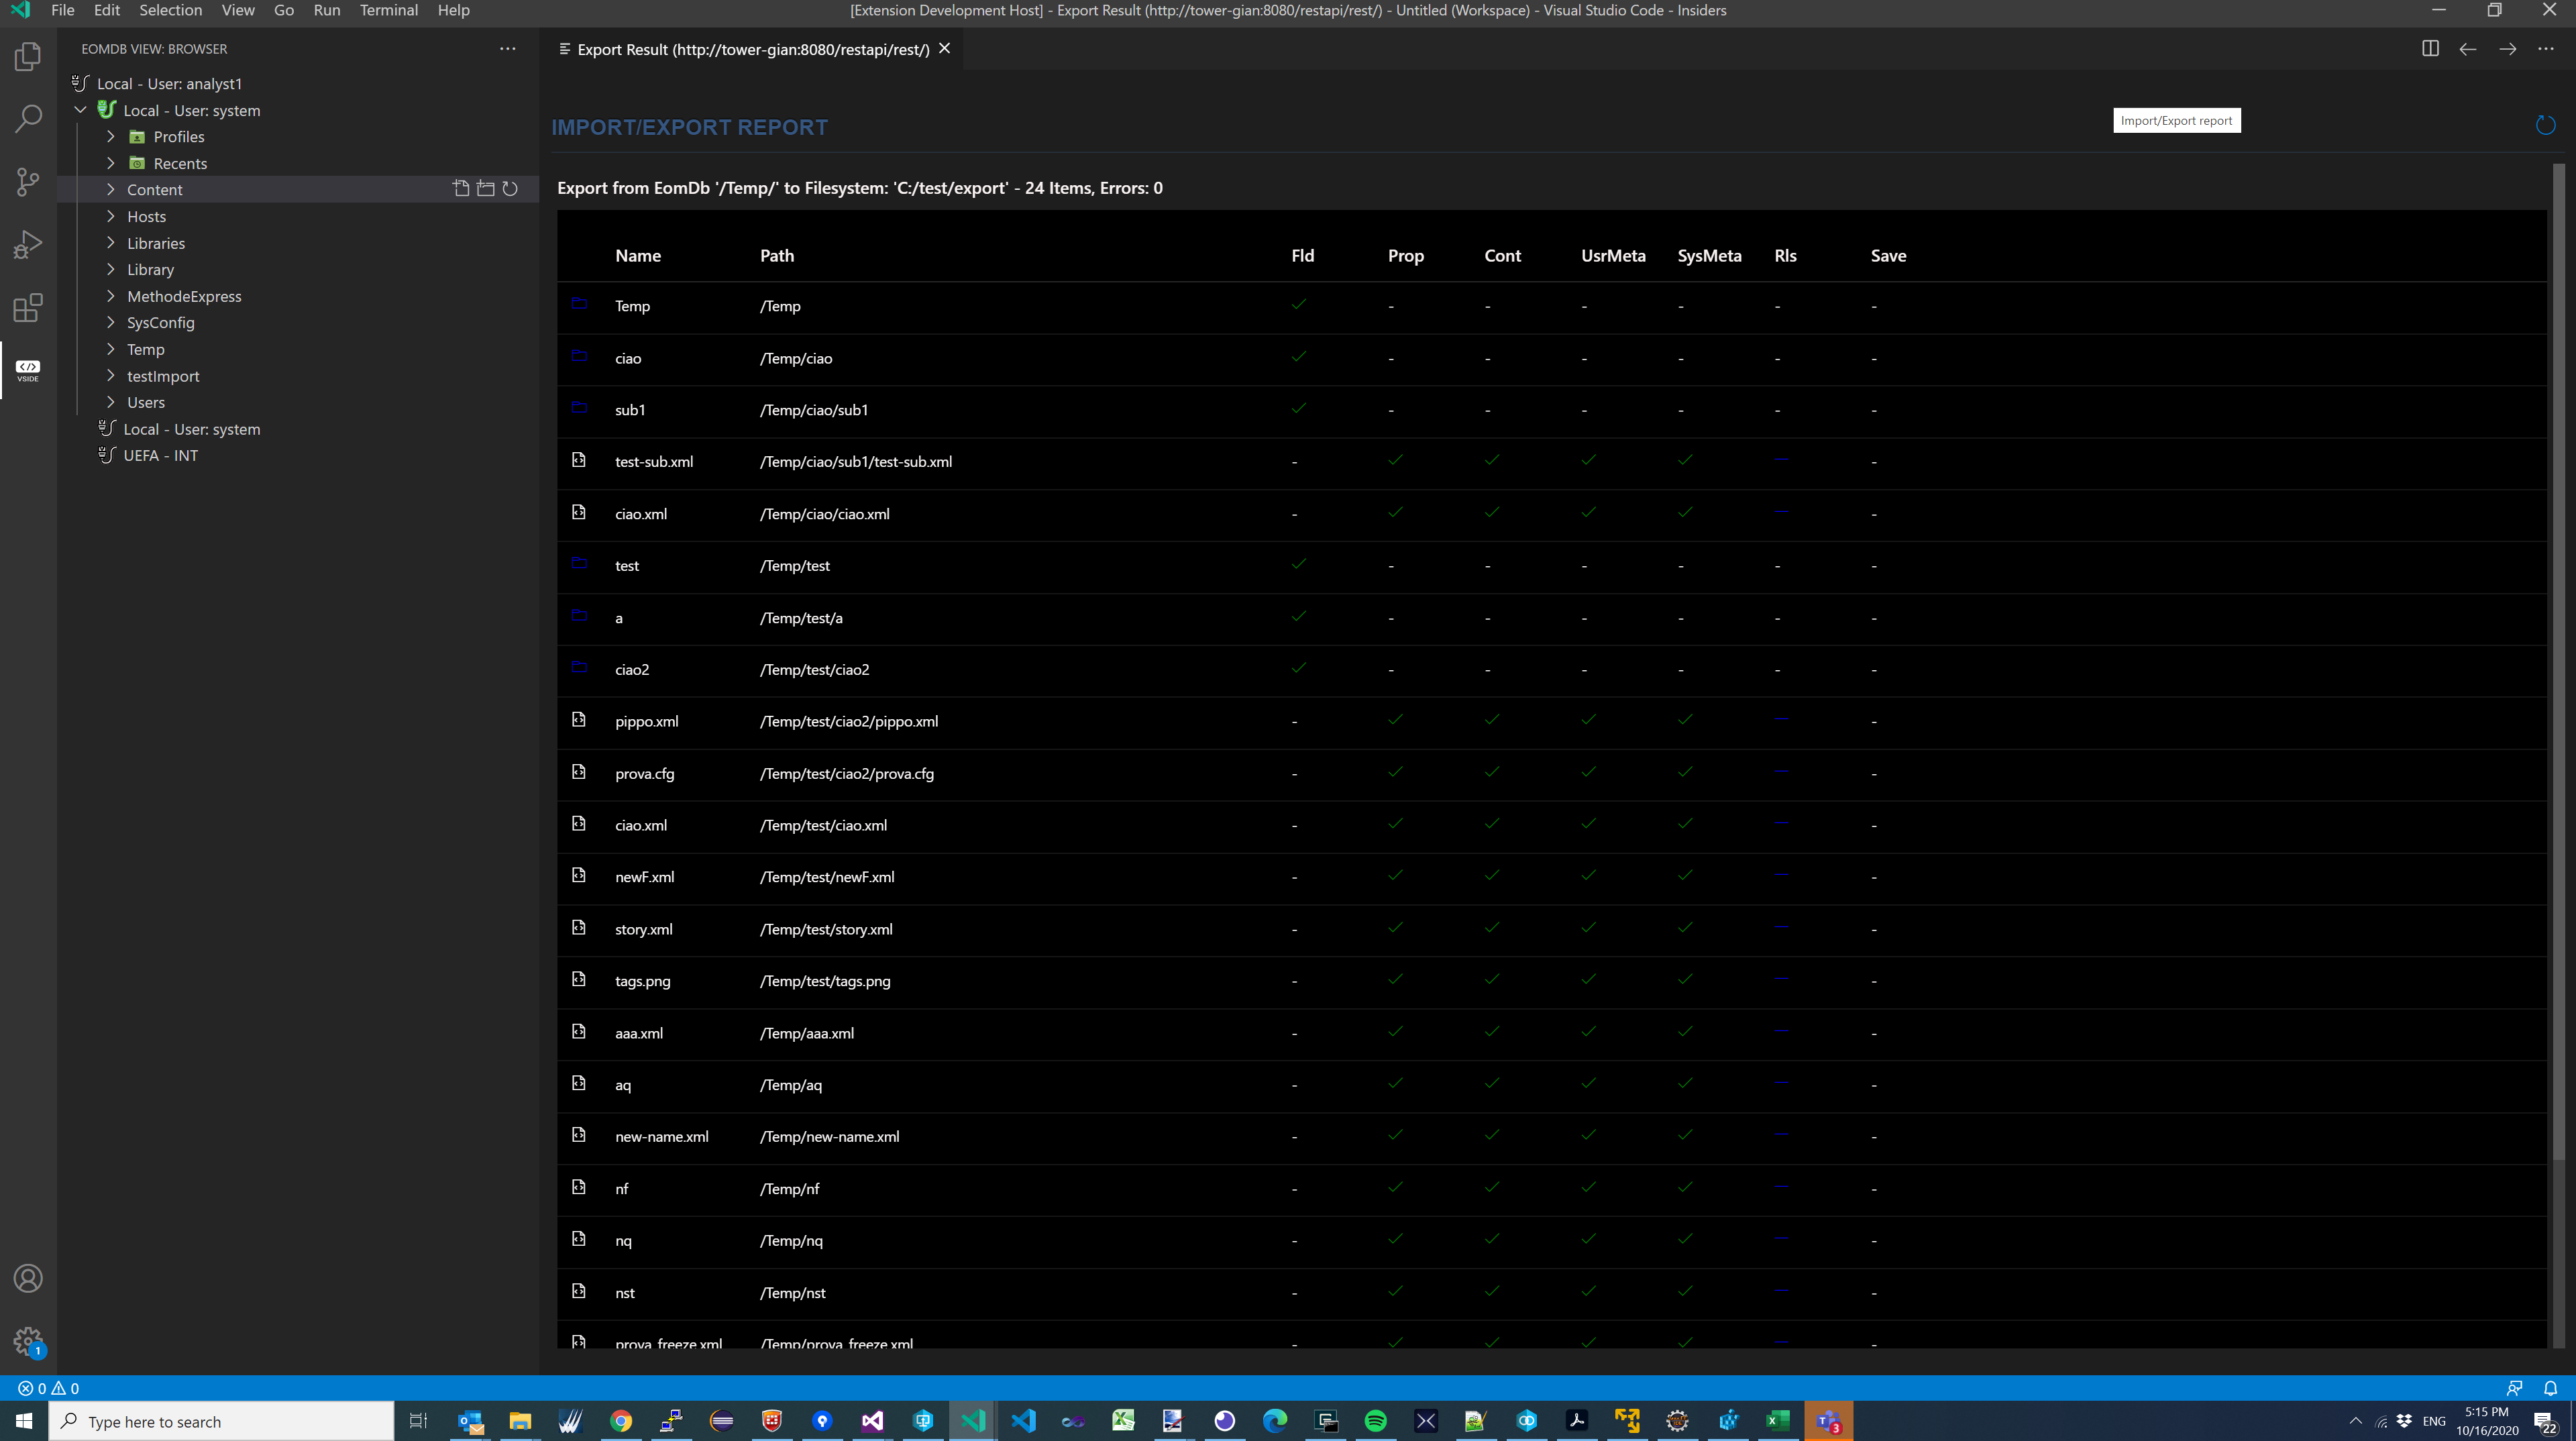
The columns of the report page will report the result of the single parts of the objects. Below the detailed description of each column:
Fld = Folder → In case of Export, it notifies if the folder was correctly created in the FS. In case of Import, the icon notifies if the folder was correctly created.
Prop = Properties → Only after the Export will notify if the file of the properties has been created and written successfully
Cont = Content → Only after an Export, it notifies if the file of the content was successfully created and written
UsrMeta = User Metadata → Only after an Export, it notifies if the file of the user metadata was successfully created and written
SysMeta = System Metadata→ Only after an Export, it notifies if the system metadata file was successfully created and written
Rls = Roles → Only after an Export, it notifies if the roles file has been successfully created and written
Save → Only after an Import, it notifies if the Eomdb correctly saved all the buffer in the EomDb.
7.4. Serialization Format
VSIDE will leverage a specific EDAPI apis to serialize the object. For each object the following files will be created.
| Object Part | File Name | Format |
|---|---|---|
Content |
<objectname> |
binary |
Object Info |
<objectname>.emprops |
JSON |
Roles + Correlation + Link |
<objectname>.emroles |
XML |
System Metadata |
<objectname>.emsysmeta |
XML |
User Metadata |
<objectname>.emusrmeta |
XML |
8. Import\Export console utility: vside-cli
8.1. Introduction
The Import\Export functions described here can also be performed by use of a command line, the "vside-cli", which exposes the import\export functions via the raw console with no need of the Visual Studio Code UI.
8.2. Installation
8.2.1. Prerequisites
"vside-cli" is a command line tool based on the nodejs framework, therefore it will be distributed using the NPM tool. All the Eidosmedia packages are deployed in a private repository: https://artifactory.eidosmedia.sh/.
To download the nodejs packages from this private repository you need to register it on your NPM installation.
To login to the Eidosmedia npm Artifactory repository open a console and type:
npm login --registry=https://artifactory.eidosmedia.sh/artifactory/api/npm/npm-public/ --scope=@eidosmedia
when asked, Username is your Eidosmedia domain username but password is the JFrog Api Key, you can find it on https://artifactory.eidosmedia.sh/ui/admin/artifactory/user_profile
|
Note
|
This command must be executed only once |
8.2.2. vside-cli installation
To install the vside-cli executable in your machine, run this command:
npm install -g @eidosmedia/vside-cli
Your can run this command in any location of your computer. The "-g" option will install the executable "vside-cli" to be used in every folder location.
8.2.3. Usage
To see all the application options, you can run the vside-cli with the help:
vside-cli --help
vside-cli [command]

Commands:
vside-cli import  Import a list of files and folders from the Filesystem to the
                 EOMDB
vside-cli export  Export a list of files and folders from the EOMDB to the
                 Filesystem

Import/Export:
--eomdbPath  EomDb folder path                                        [string]
--fsPath     FS  folder path

EomDb connection:
--edapiUri      Edapi uri
--repositoryId  Repository Id
--username      EOMDB username
--password      EOMDB password

Other Options:
--reportFile    Filepath of the file where will be written the result of the
                import/export
--logVerbosity  Log verbosity
                        [choices: "debug", "info", "error"] [default: "error"]

Options:
--version  Show version number                                       [boolean]
--help     Show help                                                 [boolean]
Each option is well explained.
8.3. Return code
The application will exit with code "0" if everything is fine or "1" in case of error.
8.3.1. Example
The following command will export the /Libraries/ to he file system folder C:/test/export
vside-cli export --eomdbPath=eomdb:///Libraries/ --fsPath=file://C:/test/export --edapiUri=http://demo-express:8080/restapi/rest --repositoryId=Editorial1 --username=system --password=yourpasswordhere
|
Note
|
The first version has the password that must be passed via command line. Before the "final" release it will be removed. |
8.3.2. Import/Export Report
The program can return a detailed report of the status of each file exported or imported. The format of this report is a JSON file so that it can be automatically parsed by any other script.
To enable the report you must use the program parameter "reportFile" with the path and the name where "vside-cli" will have to save the report.
Below an example of the report format.
{
    "title": "Import from Filesystem: 'C:/test/export3' to EomDb '/Libraries/'",
    "items": [
            {
            "object": {
                "id": "33$1.0.4771628",
                "type": "Configuration",
                "pstate": {
                    "uuid": "24aa574c-1216-11eb-b146-9ed6b2c0f790",
                    "suid": "",
                    "loid": "1.0.4771628",
                    "retentionTime": 1147412736,
                    "ucount": 42
                },
                "version": "1.0.4771628-42",
                "name": "Presentation.cfg",
                "description": "",
                "owner": "system",
                "creator": "system",
                "created": 1603117187,
                "lastModifier": "system",
                "modified": 1604332716,
                "locker": "",
                "locked": 1604332716,
                "size": 540,
                "statusInfo": {
                    "name": "",
                    "identifier": ""
                },
                "systemAttributes": null,
                "systemAttributesXml": "",
                "attributes": null,
                "attributesXml": "",
                "usageTicket": {
                    "tl": null
                },
                "usageTicketXml": "<?xml version=\"1.0\" encoding=\"UTF-8\"?><tl/>",
                "virtualAttributes": {
                    "va": {
                        "@xmlns:eom": "http://www.eidosmedia.com/eom",
                        "flags": "0",
                        "POS": null,
                        "vid": "7",
                        "vt": "1604332716",
                        "vm": "system"
                    }
                },
                "virtualAttributesXml": "<?xml version=\"1.0\" encoding=\"UTF-8\"?><va xmlns:eom=\"http://www.eidosmedia.com/eom\"><flags>0</flags><POS/>\r\n<vid>7</vid><vt>1604332716</vt><vm>system</vm></va>",
                "interfaceId": "16",
                "databaseId": "33",
                "path": "/Libraries/TagWizards/Presentation.cfg",
                "lastVersionModificationTime": 1604332716,
                "lastVersionModifier": "system"
            },
            "resultList": [
                {
                    "type": "Properties",
                    "result": {
                        "success": "ok"
                    }
                },
                {
                    "type": "Content",
                    "result": {
                        "success": "ok"
                    }
                },
                {
                    "type": "UserMetadata",
                    "result": {
                        "success": "ok"
                    }
                },
                {
                    "type": "SystemMetadata",
                    "result": {
                        "success": "ok"
                    }
                },
                {
                    "type": "Roles",
                    "result": {
                        "success": "ok"
                    }
                }
            ]
        }
    ]
}
Pay particular attention to the "resultList" property which gives you the result of each operation accomplished to save the buffer indicated by the type.
Changelog
[1.0.21] - 2020-12-15
Added
-
[ide] Minor fix
[1.0.20] - 2020-12-15
Added
-
[general] First Trial Release
[1.0.19] - 2020-12-15
Added
-
[ide] Update the em-components to the 0.0.29
[1.0.18] - 2020-12-15
Added
-
[general] Minor bug fixing
[1.0.17] - 2020-12-14
Added
-
[ide] Added a loading while webpack is running. This is very helpful the first time you compile a new React project
-
[ide] Updated the namespace of the "@eidosmedia/em-components"
-
[general] Added the trial code
[1.0.16] - 2020-12-12
Fixed
-
[general] Fixed a typo in the context menu commands # Added
-
[doc] Finalized the Asciidoc documentation
-
[doc] Added the Changelog and the version inside Asciidoc
[1.0.15] - 2020-12-03
Fixed
-
[ide] Added t5he possibility to exclude the Em Component Library from the panel wizard (in case of problems of access to artifactory) # Added
-
[doc] Add first version of asciidoc documentation (iconmplete) [1.0.14] - 2020-11-17 # Fixed
-
[VSIDE-10] Fixed "export writes user metadata in the system attributes"
[1.0.13] - 2020-11-05
Fixed
-
[ide] Fixed configuration error on import/export which blocked the functionalty
-
[cli] Added bypass for the certificate errors
-
[cli] Added support for the node version >=10.x
-
[ide] Display an error in case of the rest server is unreachable
[1.0.12] - 2020-10-28
Fixed
-
[cli] Added the vside-cli
[1.0.11] - 2020-10-26
Fixed
-
[ide] Fixed bug in the extraJs and extraCss includes.
[1.0.10] - 2020-10-26
Added
-
[ide-object-panel] Added the possibility to configure the "webServicesBaseRoot" used by Swing in the variable: eidosmedia.webclient.app.context. This setting can be configured also from the object panel wizard. (See the https://confluence.eidosmedia.com/display/EN/5.+IDE%3A+Overview)
[1.0.9] - 2020-10-25
Added
-
[import/export] Added the retry queue in case of the "import" fails with a specific code.
-
[import/export] Improved the import/export report. The use can filter the result or hide specific results.
-
[EDAPI] Added a specific VSIDE setting to ignore the SSL certificate errors
[1.0.8] - 2020-10-21
Fixed
-
[import/export] Fixed bug that caused the missing export of the roles.
-
[import/export] Fixed bug that caused the incorrect save of the roles.
[1.0.7] - 2020-10-19
Fixed
-
Minor HTML import/export report improvement.
[1.0.6] - 2020-10-19
Fixed
-
VSIDE-1: Fixed a wrong folder creation bug in the import functionality.
[1.0.5] - 2020-10-18
Fixed
-
VSIDE-3: File lock/unlock inconsistencies when working with multiple files # Minor/Internal
-
Added the locker name and the lock time in the object detailed infomation
[1.0.4] - 2020-10-16
Added
-
The "Object Panel" now support also the React project type
-
The both "Object Panel" and "Generic Panel" now supports the possibility to add the extra Javascript and extra Css to the panel project. See the package.json: You will 2 new properties in the "sharedpanel" object: the "extraJs" and "extraCss". Both properties are array of strings that must contains the javascipt or css url (relative or absolute)
-
First GIT integration preview
[1.0.3] - 2020-10-15
Added
-
Added support for the Query Execution (a "run" symbol will be displayed if the object is a query) # Fixed
-
Fixed the webviews visualization in case of light theme. (the dark theme is still the only supported) # Minor/Internal
-
The applicationId used to login to the EDAPI backend is changed to "VSIDE"
[1.0.2] - 2020-10-05
Added
-
Added a EDAPI version check during the login. It will block the connection if the EDAPI version is not that required by VSIDE # Fixed
-
Renamed the log channels: 'vside-global' for the global channel and the 'vside-edapi-{connection-label}' for the channedl dedicated to the EDAPI call
[1.0.1] - 2020-09-17
Fixed
-
Removed a not ready features
-
Corrected the README.md
[1.0.0] - 2020-09-16
Added
-
First internal release
-
Added the button to execute an action
-
Added a control that verify if there is a new version of VSIDE and it allow also to download it
-
Automatically published on the Eidosmedia Artifactory